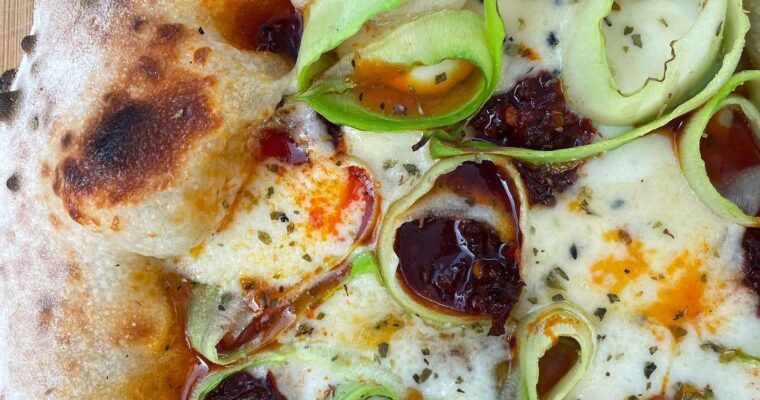
We love a pizza that feels like a warm hug, and this roasted pumpkin, garlic, and walnut combo is just that. It’s creamy, sweet, nutty, and rich with caramelised flavour. We’ve layered roasted garlic and sweet wedges of golden pumpkin over a white base of …
We’re always looking for ways to take simple, classic ingredients and elevate them into something special. This roast garlic marinara pizza is our homage to minimalism done right. Bold in flavour, rustic in feel, and deeply satisfying. This bake starts with a bright and vibrant …
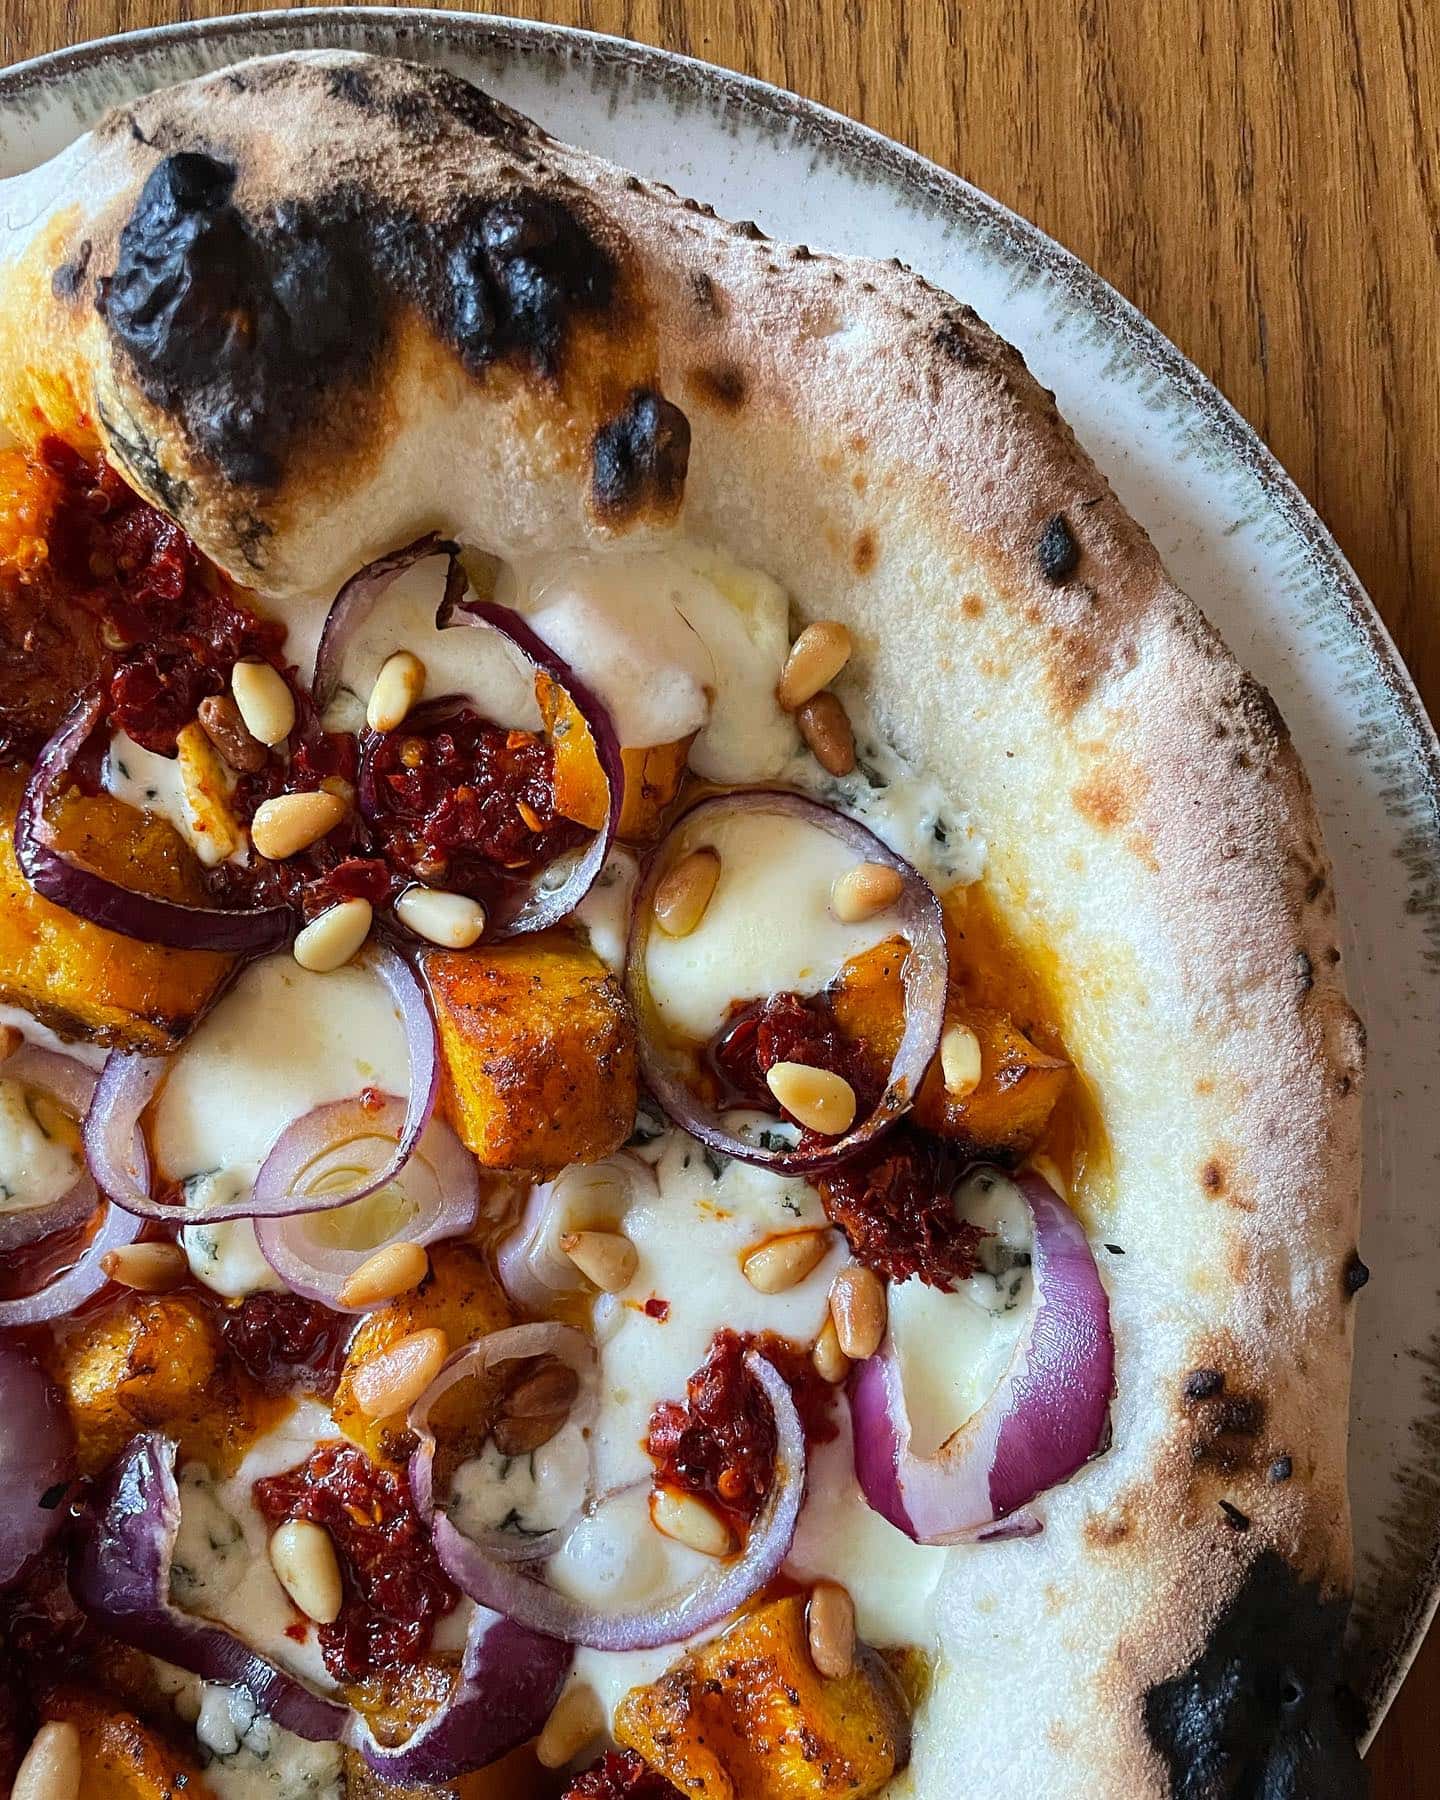
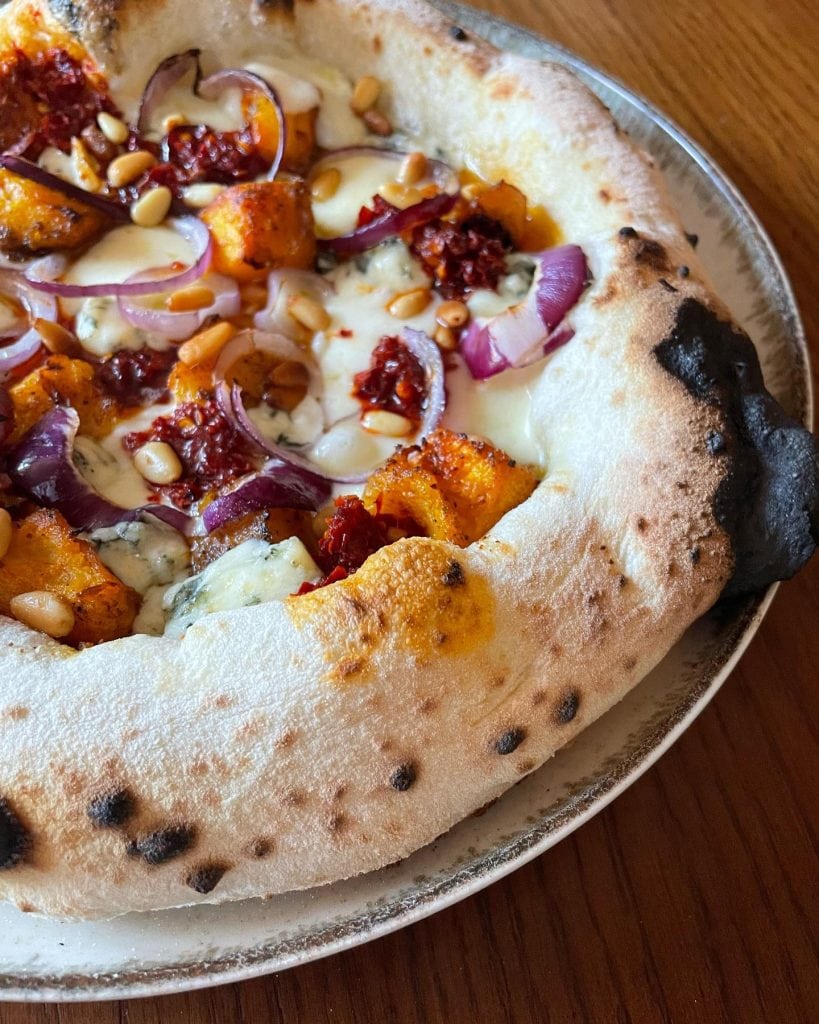
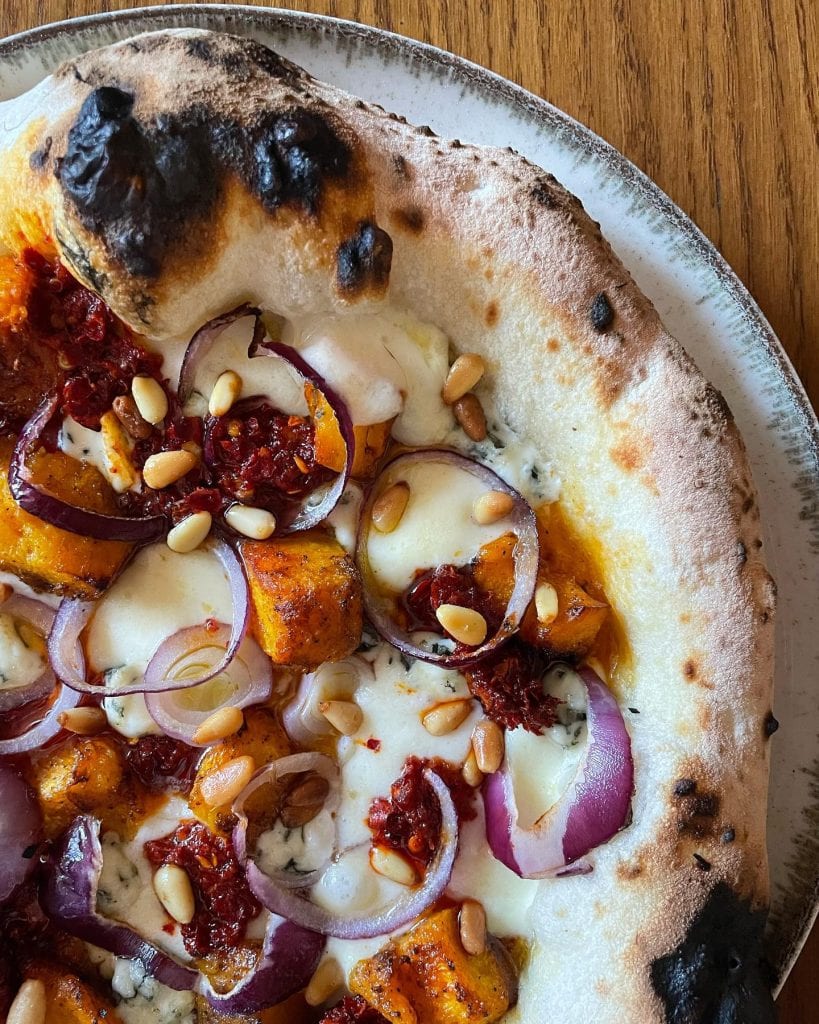
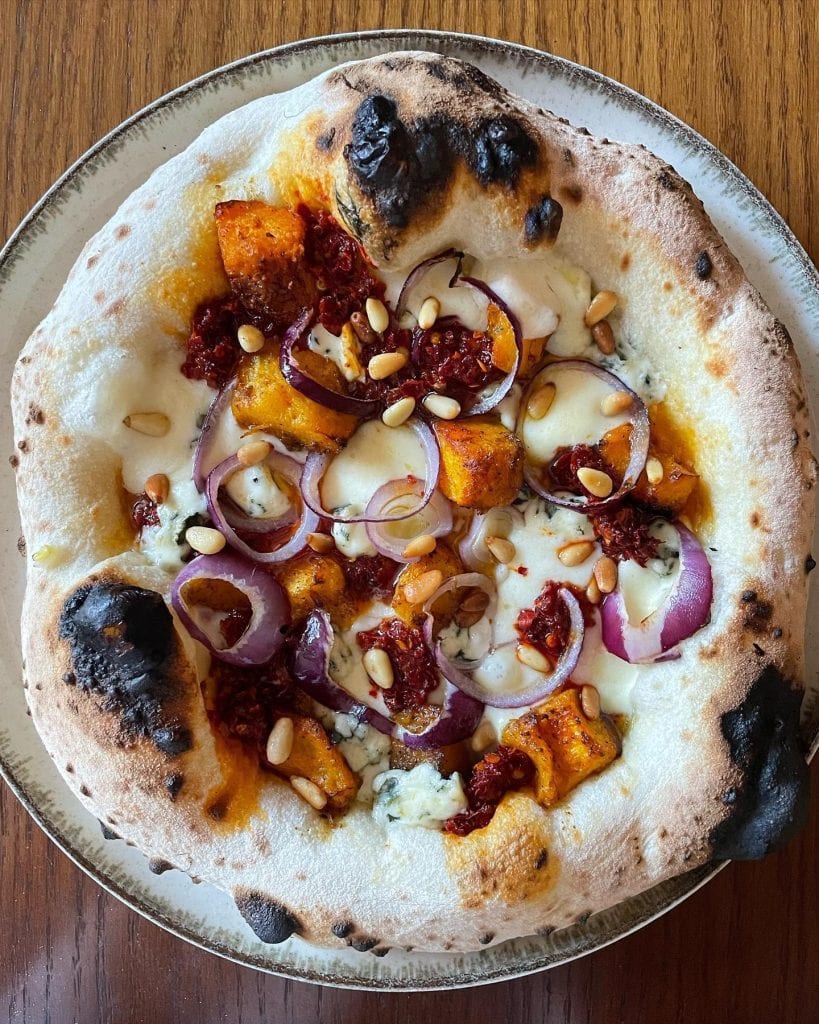
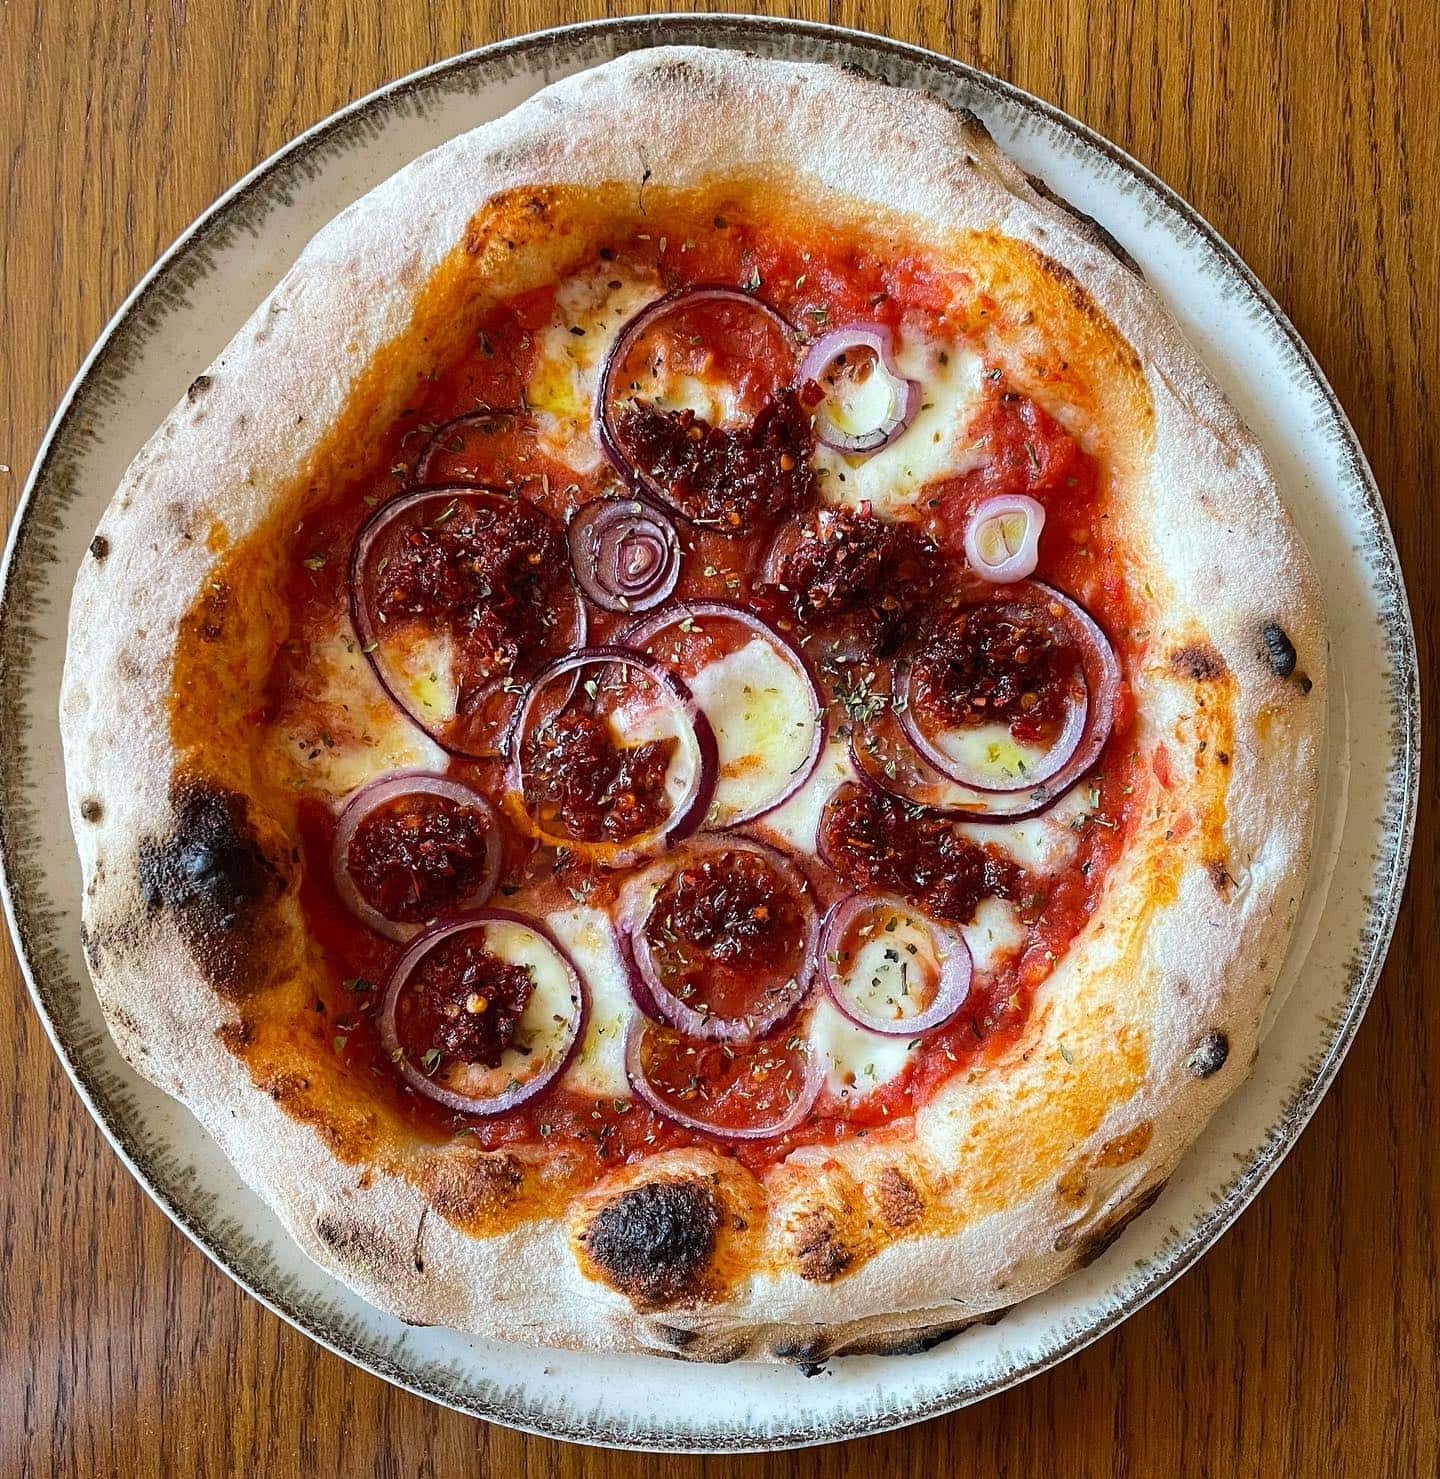
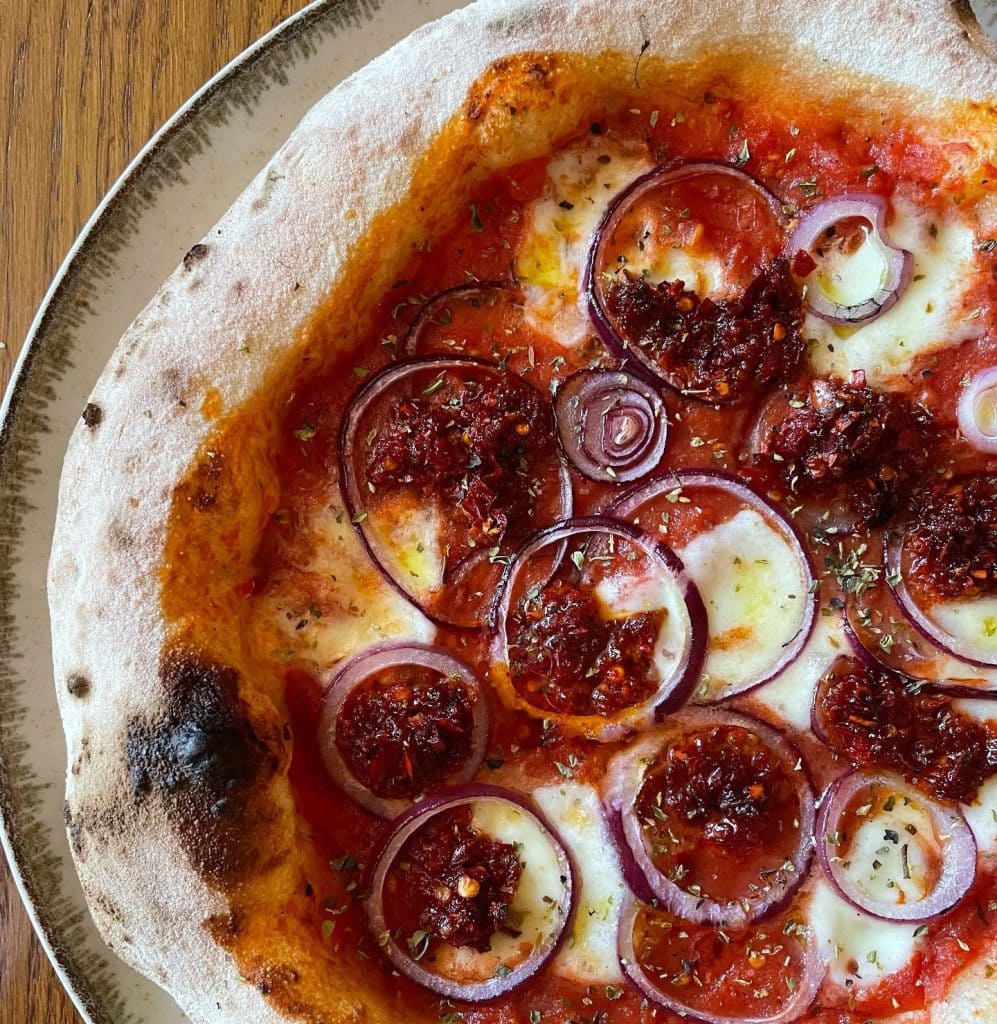
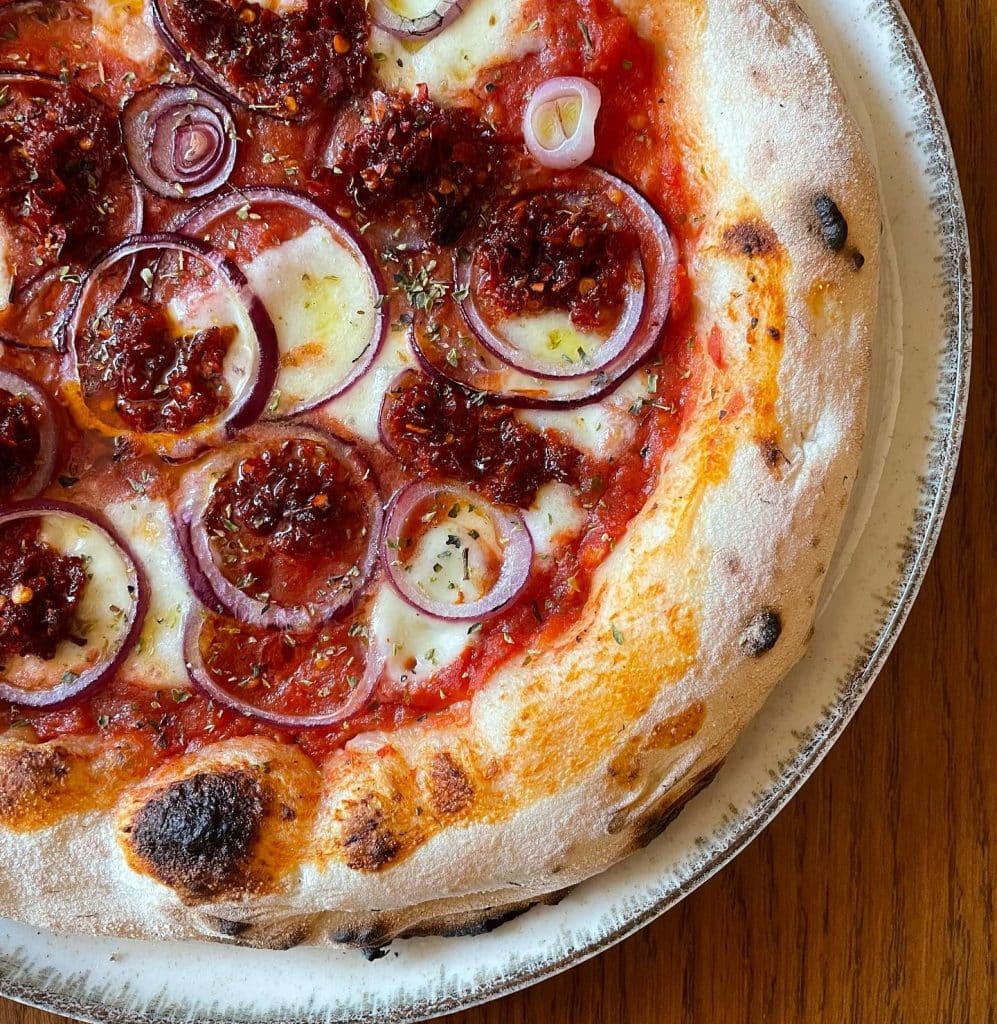
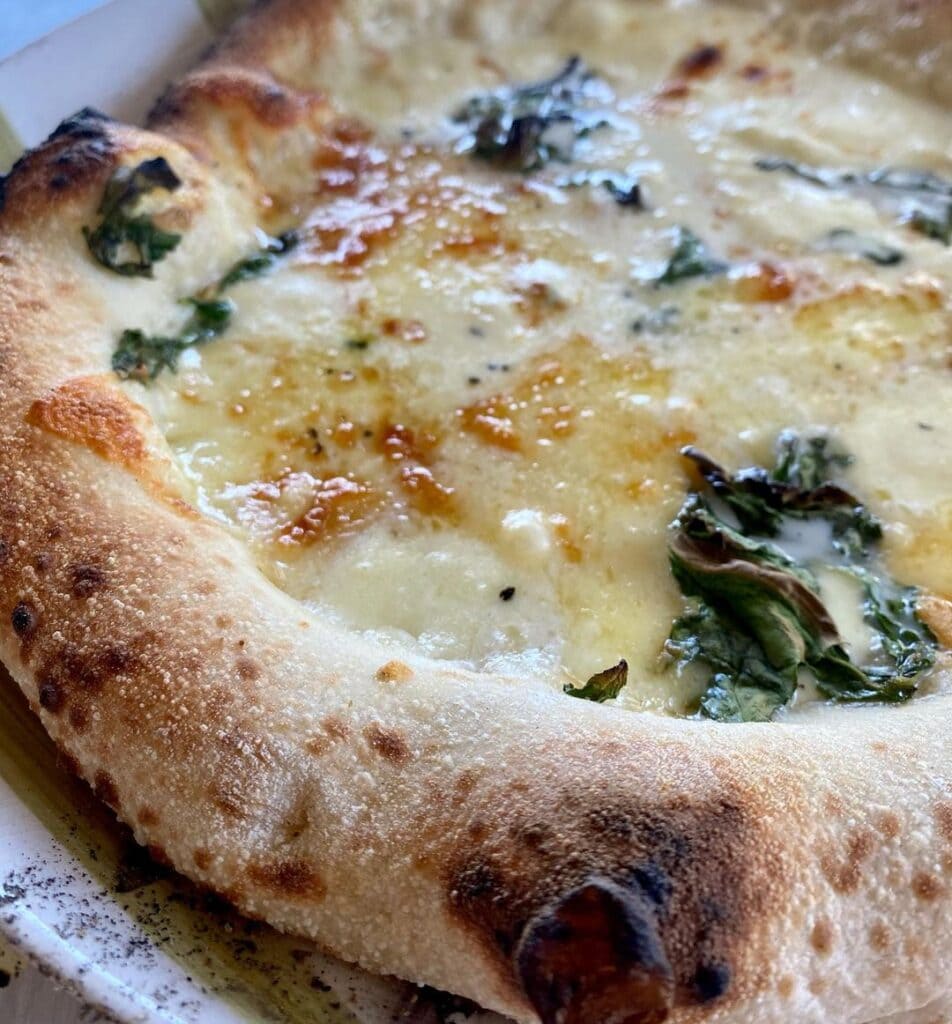
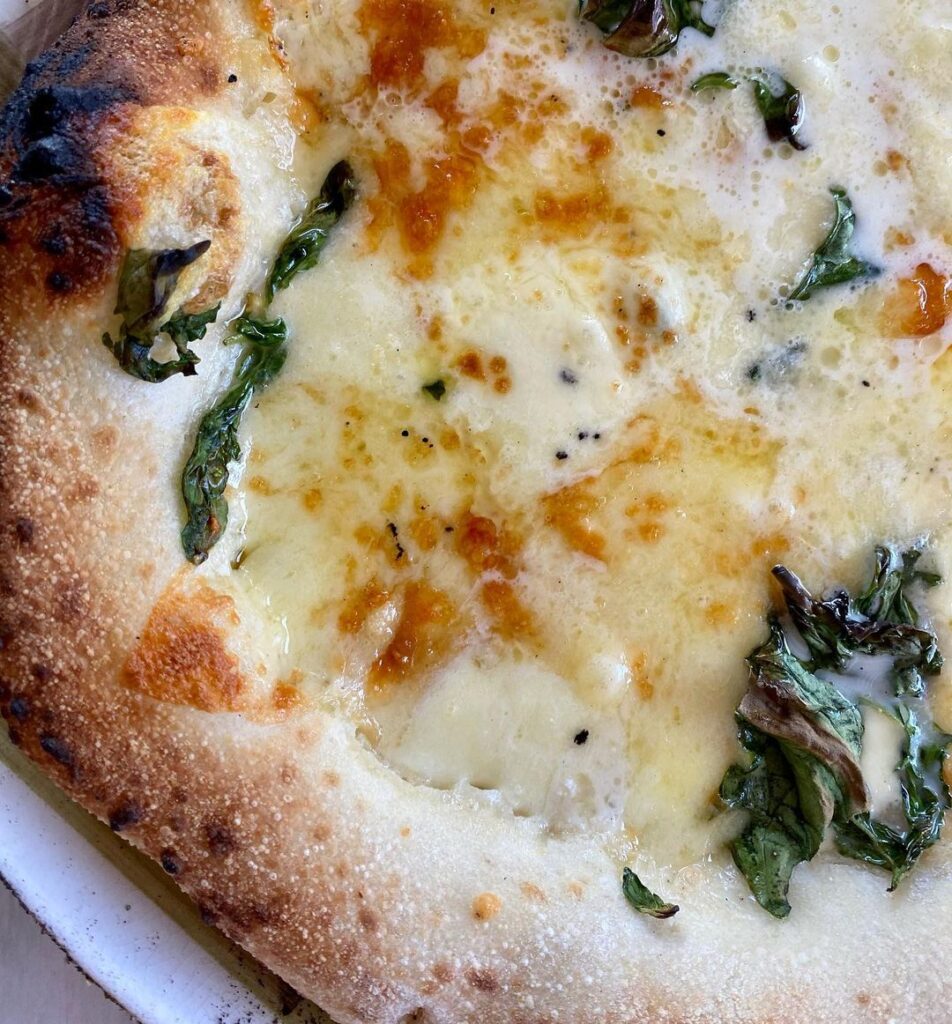
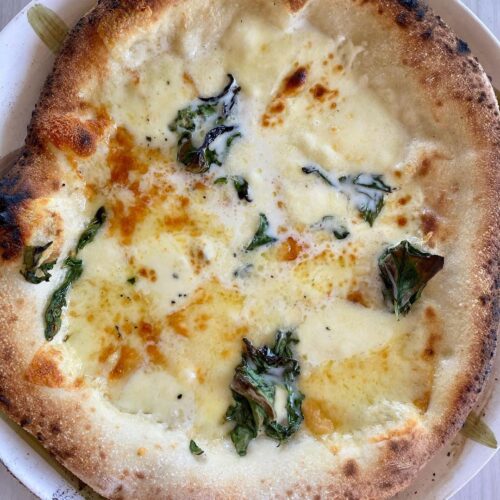
At My Husband Makes Pies, we’re not shy about piling on bold flavours, and this one’s no exception. Today’s loaded pie celebrates savoury richness, sweetness, heat, and crunch, all working in perfect harmony.
We start with roasted pumpkin, which brings a natural sweetness and buttery texture to this pizza’s topping combination. These roasted pumpkin pieces are joined by creamy fresh and low-moisture mozzarella for melt and stretch, and pockets of punchy blue cheese that add sharp, tangy depth, Along with our favourite pizza topping at the moment, ’nduja, the fiery, spreadable Calabrian sausage that melts into the cheese, infusing the pie with a smoky, spicy kick.
Thin slices of red onion brighten things up with a sweet crunch, and roasted pine nuts bring a buttery nuttiness and a lovely bit of textural contrast. A light drizzle of extra virgin olive oil before baking ties everything together and enhances the flavours with a rich finish.
This pizza is a powerhouse—sweet, sharp, spicy, and crunchy, with every bite offering something a little different. A proper celebration of flavour, and one we’ll definitely be making again.
Pumpkin, Blue Cheese, ’Nduja, Red Onion & Pine Nut Pizza
Roasted pumpkin and creamy cheeses create a mellow, comforting base for this bold pie, while blue cheese and ’nduja bring heat and tang. Red onion and roasted pine nuts round things out with crunch and aromatic sweetness. Drizzled with EVOO and baked on our long-fermented dough, this one’s rich, spicy, and deeply satisfying.Follow our step-by-step instructions and you'll be indulging in a slice of this delicious pizza in no time. Bon appétit! And don't forget to check out some of our other pizza recipes for inspiration for your next pie day!
Roast Pumpkin: Preheat your oven to 200°C. Cut the pumpkin into medium-sized cubes. Roast for around 40 minutes, or until golden and tender. Set aside to cool.
Toast Pine Nuts: Add pine nuts to a dry frying pine. Turn the heat to low and stir regularly until the nuts are fragrant and golden brown. Remove pine nuts from the pan and leave to cool.
Prepare Cheeses:Place your fresh mozzarella in a container or bowl with a paper towel at the bottom to allow some of the water to drain. Tear both the fresh mozzarella and low moisture mozzarella cheeses into medium-sized pieces. Tear or cut blue cheese into small cubes. Set all cheeses aside for assembly.
Prepare Red Onion:Finely slice red onion into rings. Set aside for assembly.
Preheat Oven:Outdoor Pizza Oven: If using an outdoor pizza like an Ooni pizza oven, aim for a temperature of 450-500°C at the center of your pizza stone. Use an infrared thermometer to ensure accuracy. It should take around 25-30 minutes to reach temperature.Home Oven: Place pizza steel or stone inside the oven and preheat to the highest temperature for at least 30 minutes.
Prepare Base:On a lightly floured surface, stretch out the dough by hand according to the steps outlined in our dough recipe.Once you're happy with the shape of the base, lightly dust your pizza peel and transfer the dough onto the peel.
Assemble Pizza:Distribute mozzarella cheeses evenly across the dough, ensuring the pieces are around 2 cm in diameter and spaced at least 1.5 cm apart.Add blue cheese cubes, followed by roasted pumpkin pieces. Scatter small amounts of ’nduja across the surface. Top with red onion slices and finish with a drizzle of extra virgin olive oil.
Bake Your Pizza:Outdoor Pizza Oven: Launch the pizza into the oven and bake for 60-90 seconds. Keep an eye on the pie and rotate every 10-15 seconds to ensure even cooking and to prevent burning.Home Oven: Launch pizza onto a pizza steel or stone, the bake time should be around 7-10 minutes.
Serving:Once the pizza is done, remove from the oven and place on a serving board. Finish with a generous sprinkle of roasted pine nuts. Now it's time to enjoy your delicious homemade pizza with pumpkin, blue cheese, ’nduja, red onion & pine nuts.
At My Husband Makes Pies, we’re always on the lookout for ingredients that surprise and delight—especially when they appear unexpectedly. That’s exactly what happened when we stumbled upon a cluster of honey fungus mushrooms growing in the garden on pizza day. Naturally, we couldn’t resist …
At My Husband Makes Pies, we’re always up for a little heat, and this one brings it. Today’s pizza combines spicy kabana bits with homegrown chillies for a bold, smoky kick that lingers in all the right ways. Kabana, a smoked cured sausage popular in …
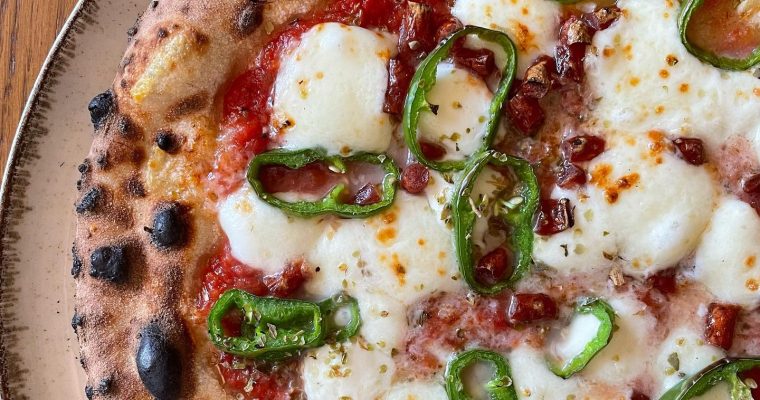
Today, we’re bringing together the spicy intensity of ’nduja with the sweet sharpness of red onion to create a pizza that’s rich, punchy, and full of character.
’Nduja, everyone’s favourite spreadable Calabrian sausage, melts into the pizza as it bakes, releasing its signature spicy, smoky oil and adding depth and richness across every part of the base. Thin slices of red onion bring balance with their natural sweetness and slight crunch, brightening the overall profile and creating an irresistible contrast to the heat of the ’nduja.
A base of Neapolitan-style tomato sauce and fior di latte mozzarella provides the perfect foundation—creamy, stretchy, and just mild enough to let the toppings shine. A light drizzle of extra virgin olive oil (EVOO) before baking adds a touch more depth and complexity, and a finishing sprinkle of dried oregano post-bake ties everything together with visual contrast and warm, aromatic notes.
This pizza was baked in our outdoor pizza oven using a 48-hour cold-fermented dough, resulting in a beautifully developed crust with exceptional flavour and texture.
Red Onion and Nduja Pizza
This pizza brings together the fiery heat of ’nduja and the gentle sweetness of red onion on a base of rich tomato sauce and creamy fior di latte. Finished with EVOO and dried oregano, it’s a bold, flavour-forward experience that’s sure to satisfy anyone craving a pie with a little bit of a kick. Follow our step-by-step instructions and you'll be indulging in a slice of this delicious pizza with red onion and nduja in no time. Bon appétit! And don't forget to check out some of our other pizza recipes for inspiration for your next pie day!
Outdoor Pizza Oven, Pizza Steel, or Stone (if using a home oven)
1 Pizza Peel
1 sauce ladle
1 wooden chopping board or peel for prep and serving
Ingredients
1pizza dough ball
1ladle of pizza sauce
Fresh mozzarella cheese
Red onion
Nduja
Dried oregano
Instructions
Prepare Dough: Follow any of our dough recipes. For this particular bake, we used our cold fermentation dough recipe, opting for a 72 hour fermentation period.You will need to prepare the dough at least 24 hours ahead of time.
Prepare Sauce:We recommend our standard pizza sauce which is versatile, simple to make and is perfect for Neapolitan style pizzas. Spice up this sauce however you like, remember the best part about making pizza is the creative process!
Prepare Cheese:Place your fresh mozzarella in a container or bowl with a paper towel at the bottom to allow some of the water to drain. Set aside for assembly.
Prepare Red Onion:Finely slice red onion into rings. Set aside for assembly.
Preheat Oven:Outdoor Pizza Oven: If using an outdoor pizza like an Ooni pizza oven, aim for a temperature of 450-500°C at the center of your pizza stone. Use an infrared thermometer to ensure accuracy. It should take around 25-30 minutes to reach temperature.Home Oven: Place pizza steel or stone inside the oven and preheat to the highest temperature for at least 30 minutes.
Prepare Base:On a lightly floured surface, stretch out the dough by hand according to the steps outlined in our dough recipe.Once you're happy with the shape of the base, lightly dust your pizza peel and transfer the dough onto the peel.
Assemble Pizza:Assemble the pizza by spreading a ladle of sauce in a circular motion, starting from the center and working outwards. Distribute pieces of mozzarella cheese evenly across the dough, ensuring the pieces are about 2 cm in diameter and at least 1.5 cm apart. Add red onion slices, spacing them evenly across the pizza. Add liberal amounts of Nduja, scattering small pieces across the surface. Finish with a drizzle of extra virgin olive oil.
Bake Your Pizza:Outdoor Pizza Oven: Launch the pizza into the oven and bake for 60-90 seconds. Keep an eye on the pie and rotate every 10-15 seconds to ensure even cooking and to prevent burning.Home Oven: Launch pizza onto a pizza steel or stone, the bake time should be around 7-10 minutes.
Serving:Once the pizza is done, remove from the oven and place on a serving board. Sprinkle with dried oregano. Now it's time to enjoy your delicious homemade pizza with red onion and nduja!
Today, we’re combining the rich, smoky depth of cured kielbasa with the nutty, savoury sharpness of Grana Padano, all on a classic Neapolitan-style tomato sauce base for a pizza that’s both rustic and deeply satisfying. We love how this combination offers a refreshing variation from …
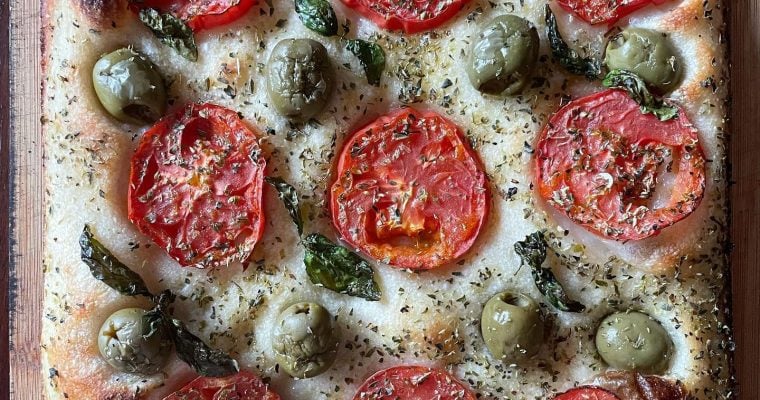
Topped with juicy tomatoes, briny green olives, and a fragrant mix of fresh basil and oregano, this focaccia is a perfect balance of simplicity and bold flavour. A well-fermented 48-hour cold-proofed dough provides the foundation for this focaccia, developing a light, airy interior with a …
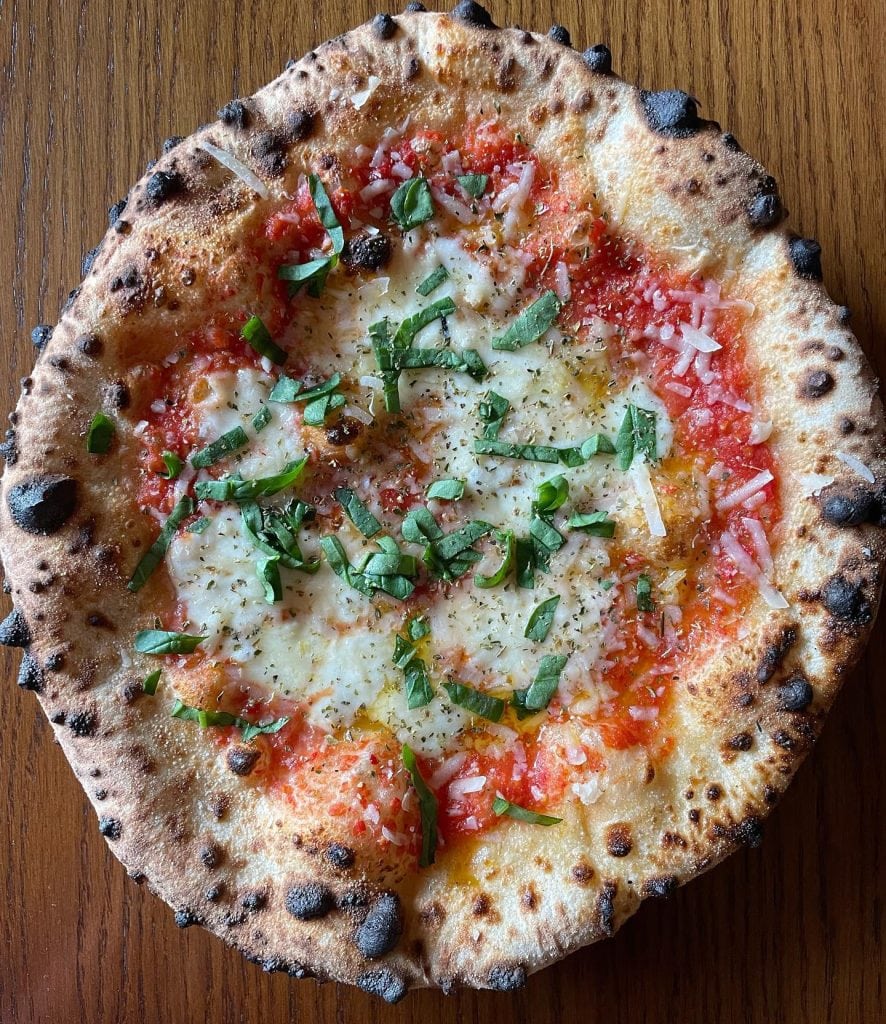
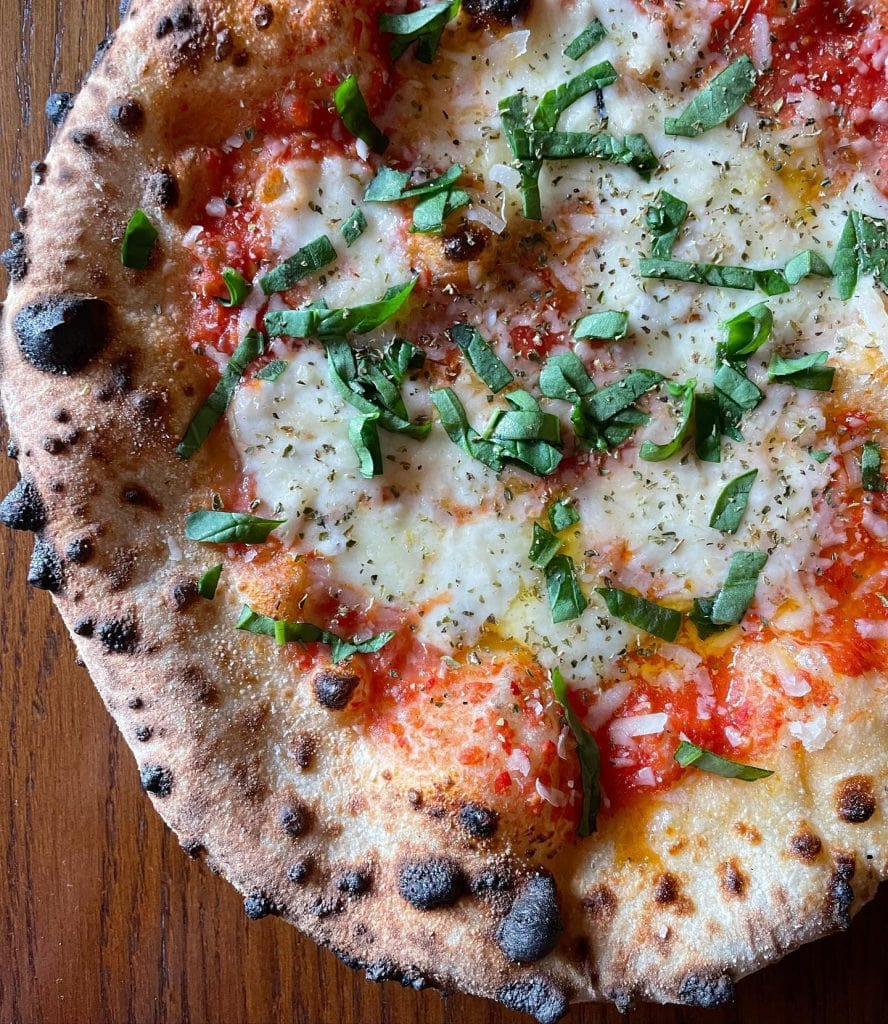
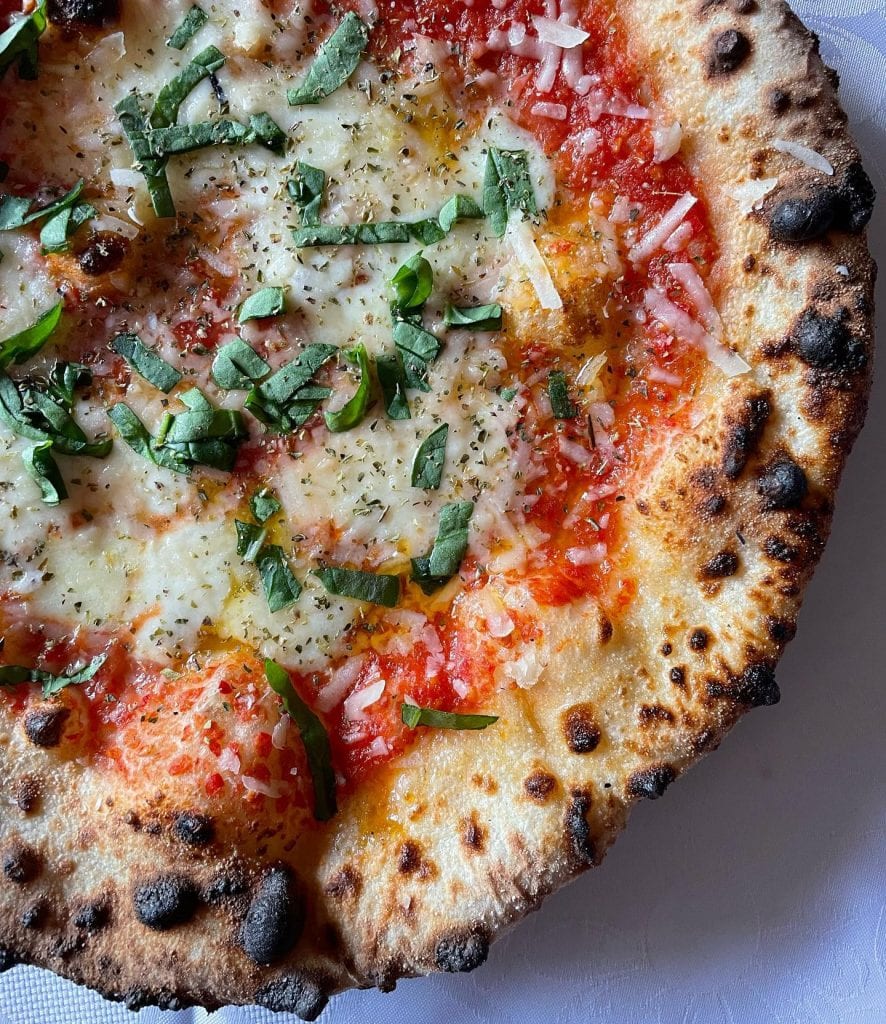
Today, we’re diving into the refined and innovative world of Tokyo-style pizza. This Tokyo style inspired pizza takes a unique approach to dough stretching, shaping, and seasoning, resulting in a crust that stands apart from traditional Neapolitan-style pizzas.
From what we understand, Tokyo style pizza is a refined variation of Neapolitan pizza. This innovative style of pizza was Inspired by legendary pizzaiolo Susumu Kakinuma, of pioneering Tokyo pizzeria, Seirinkan.
From our research and observations, Tokyo-style pizza is distinguished by two key elements: its dough-stretching technique and the salt punch method.
Dough Stretching and Shaping
With traditional Neapolitan pizza, air is pushed outward to create a soft, round, puffy cornicione. From there, the dough is carefully stretched and shaped, taking care not to press out any air from the crust. With Tokyo style pizza (again, these are just our observations), the dough is also pressed from the center outward to form a rim. However, instead of the typical Neapolitan method, the dough is stretched by pinching the edges while rapidly rotating on a floured surface. This creates a jagged, rippled effect with a slightly crispier texture, rather than the smooth, rounded cornicione typical of Neapolitan pizza.
The Salt Punch
The salt punch involves throwing, not just a pinch, but a punch, of salt directly onto the pizza stone before launching the pizza into the oven. This technique seasons the underside of the pizza as it bakes, enhancing the crust with a deeper, more intense, and pronounced flavour.
For this Tokyo style Margherita, we started with a tomato sauce base made from San Marzano tomatoes, layered with fresh mozzarella and a generous sprinkle of Grana Padano for a nutty, savoury boost. A handful of fresh spinach adds a vibrant, earthy contrast, while a drizzle of extra virgin olive oil (EVOO) ties everything together with a smooth, rich finish.
Tokyo Style Margherita with Spinach
This pizza takes the beloved Margherita and refines it with Tokyo-style dough handling and seasoning techniques. The combination of San Marzano tomato sauce, creamy mozzarella, nutty Grana Padano, and fresh spinach results in a beautifully balanced pie with a crisp, yet light crust, and a bold, well-seasoned flavour profile.While this isn’t a strictly traditional Tokyo Margherita, it embraces the essence of the style while incorporating the ingredients we had on hand. We look forward to experimenting further with this exciting approach to pizza-making!To make this Tokyo Style Margherita with Spinach pizza you'll need a few simple ingredients and a little bit of time to prep the dough and toppings. Follow our step-by-step instructions and you'll be indulging in a slice in no time. Bon appétit! And don't forget to check out some of our other pizza recipes for inspiration for your next pizza making day!
Outdoor Pizza Oven, Pizza Steel, or Stone (if using a home oven)
1 Pizza Peel
1 Sauce ladle
1 wooden chopping board or peel for prep and serving
Ingredients
1pizza dough ball
1ladle of pizza sauce
Fresh mozzarella cheese
Grana Padano cheese
Fresh spinach leaves
Extra virgin olive oil
Instructions
Prepare Dough: Follow any of our dough recipes. You will need to prepare the dough at least 24 hours ahead of time.
Prepare Sauce: We recommend our standard pizza sauce which is versatile, simple to make and is perfect for Neapolitan style pizzas. Spice up this sauce however you like, remember the best part about making pizza is the creative process!
Prepare Cheese: Place your fresh mozzarella in a container or bowl with a paper towel at the bottom to absorb excess moisture. Tear fresh mozzarella into medium-sized pieces. Finely grate grana padano. Set aside.
Prepare Spinach: Finely chop a handful of fresh spinach leaves. Set aside.
Preheat Oven:If using an outdoor pizza like an Ooni pizza oven, aim for a temperature of 450-500°C at the center of your pizza stone. Use an infrared thermometer to ensure accuracy. It should take around 25-30 minutes to reach temperature.For a home oven, using a pizza steel or stone, place the stone or steel inside the oven and preheat to the highest temperature for at least 30 minutes.
Prepare Base: On a lightly floured surface, stretch the dough using the Tokyo-style technique (video coming soon). Pinch and rapidly rotate the edges to create an irregular, rippled crust. Once the base is shaped, lightly dust your pizza peel and transfer the dough onto the peel.
Assemble Pizza: Assemble the pizza by spreading a ladle of sauce in a circular motion, starting from the center and working outwards. Add a generous sprinkle of grana padano cheese, distribute pieces of fresh mozzarella evenly across the dough, ensuring the pieces are about 2 cm in diameter and at least 1.5 cm apart. Finish with drizzle of extra virgin olive oil.
Salt Punch Technique: Just before launching the pizza, throw a generous "punch" of salt directly onto the pizza stone or steel. This seasons the underside of the crust as it bakes, enhancing its depth of flavour.
Bake Your Pizza:If you're using an outdoor pizza oven, launch the pizza into the oven and bake for 60-90 seconds. Keep an eye on the pie and rotate every 10-15 seconds to ensure even cooking and to avoid burning.For a home oven with a pizza steel or stone, the bake time should be around 7-10 minutes.
Serving: Once done, remove pizza from the oven and place on a serving board. Sprinkle with chopped spinach, followed by a final drizzle of EVOO. Leave to cool slightly before slicing. Now, it’s time to enjoy your Tokyo Style Inspired Margherita Pizza!
Today’s pizza pairs the delicate sweetness of zucchini with the rich, umami-packed depth of chanterelle mushrooms and the fiery kick of nduja, creating a beautifully balanced and flavourful pie. Chanterelle mushrooms, known for their golden colour and subtly peppery, earthy flavour, bring a meaty texture …
Today, we’re combining creamy stracciatella, crispy pancetta, and a touch of heat from chilli oil for a luxurious and satisfying pizza experience. Pancetta, an Italian cured pork, is known for its rich, salty flavour and delicate fat marbling that crisps beautifully when baked. The pancetta …
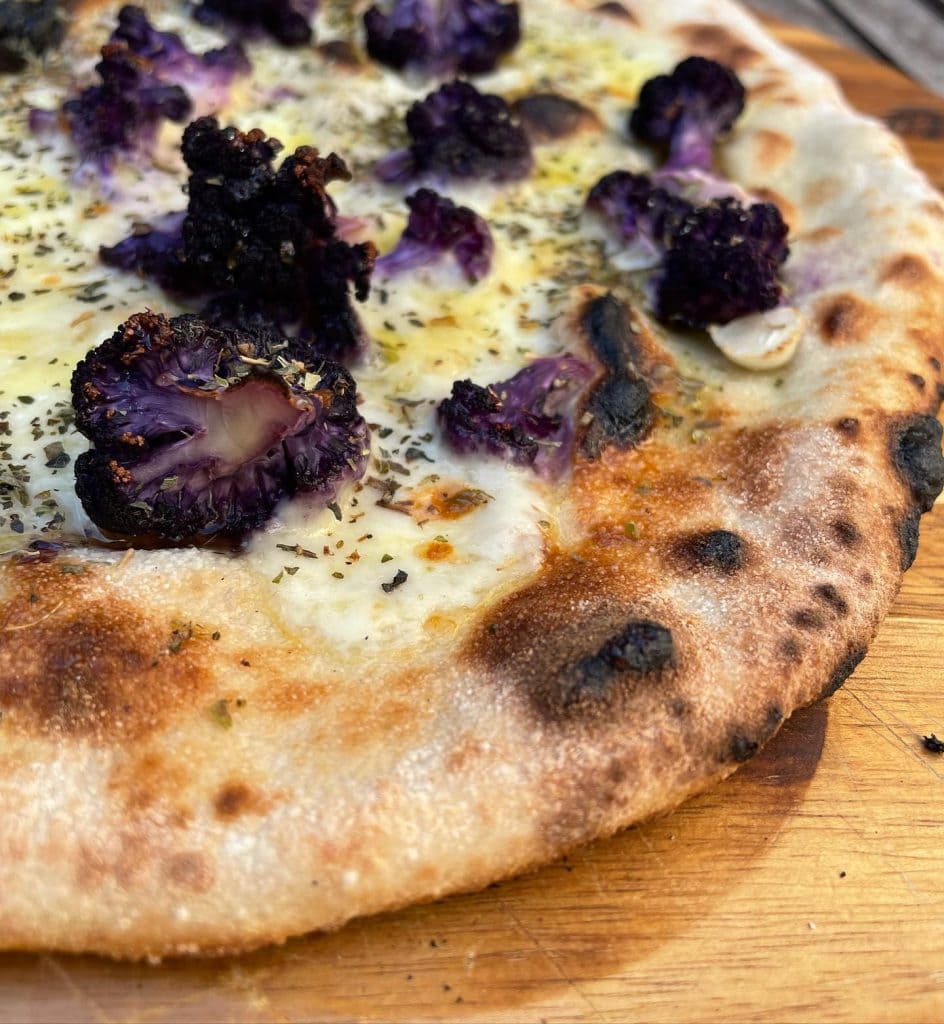
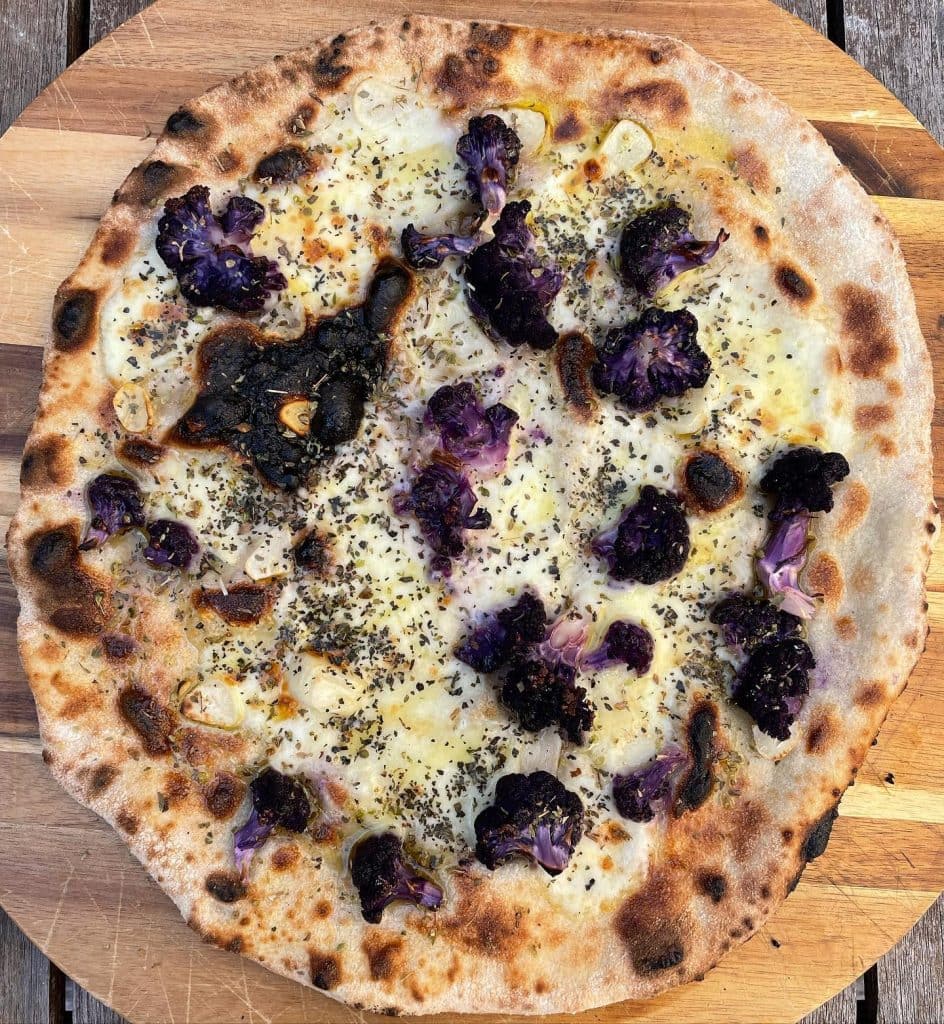
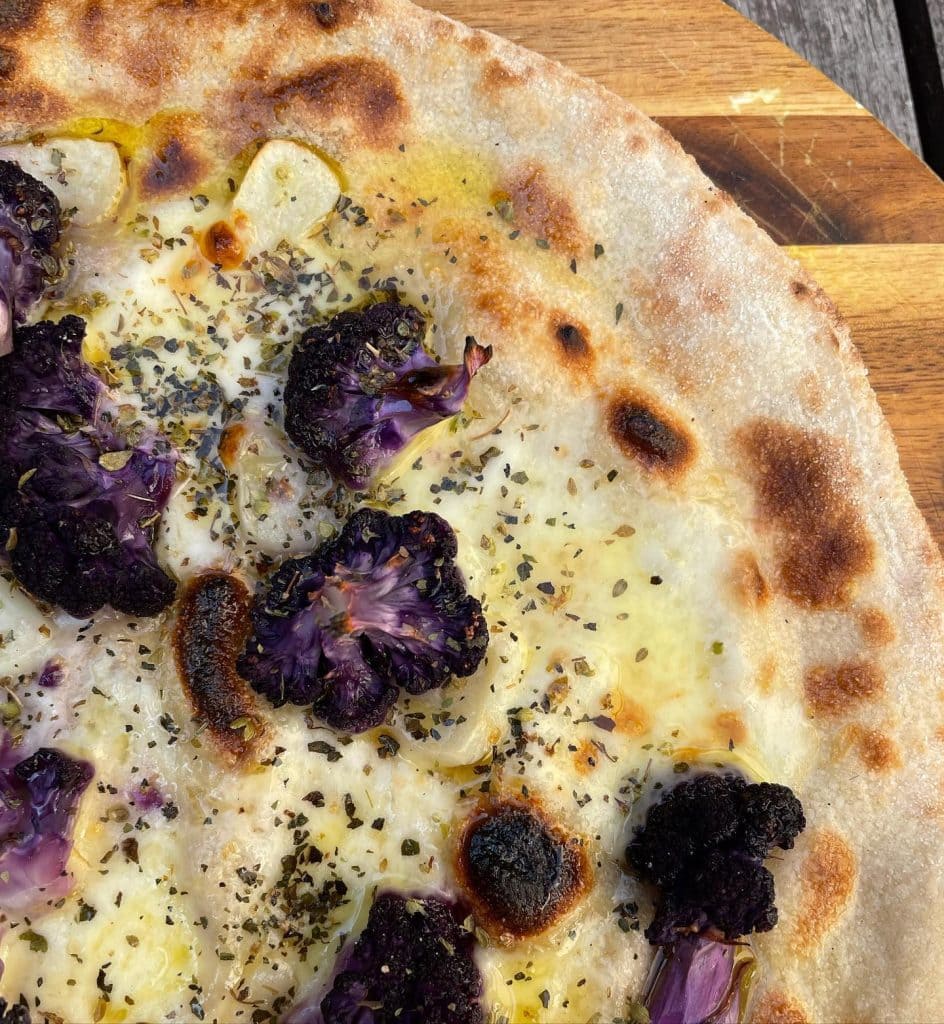
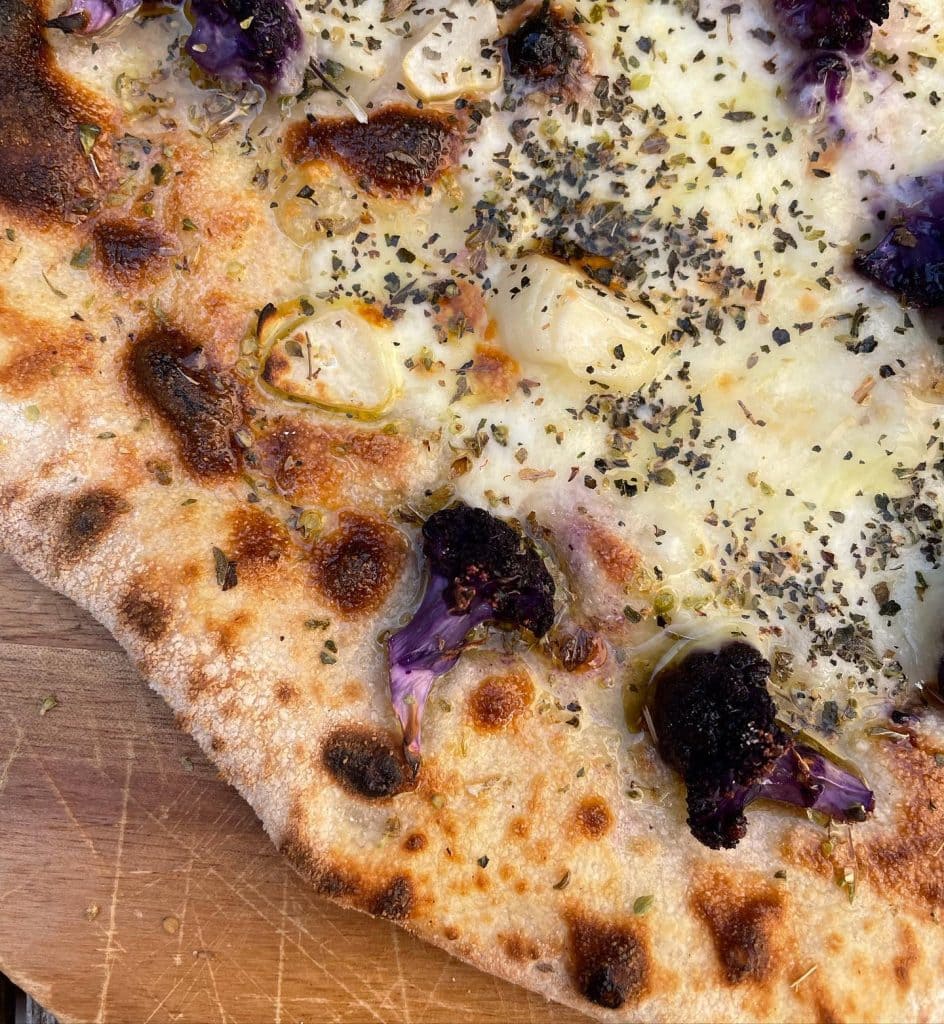
Today’s pizza highlights a unique combination of roasted purple cauliflower, garlic, and a drizzle of honey, creating a dish that’s both vibrant and deeply satisfying.
Purple cauliflower, known for its striking colour, subtle sweetness, and slightly nuttier, milder taste compared to white cauliflower, develops a tender interior with a slightly crispy exterior when roasted in the high heat of the pizza oven. When paired with garlic, it adds a savoury depth that contrasts beautifully with the sweetness of honey.
A mix of fresh and low-moisture mozzarella provides the perfect balance of creaminess, stretch, and structure. Dried oregano and dried basil contribute subtle flavour, colour, and aroma. The final drizzle of honey elevates the entire flavour profile, balancing the roasted and savoury elements with a touch of natural sweetness.
Purple Cauliflower and Garlic Pizza
This pizza combines the nutty sweetness of roasted purple cauliflower with the deep savoury flavour of garlic, brought together with a rich base of fresh and low-moisture mozzarella. Finished with aromatic dried oregano, dried basil, and a drizzle of honey, this pizza offers a unique blend of sweet and savoury notes that make for a satisfying flavour fusion. To make this Purple Cauliflower and Garlic Pizza you'll need a few simple ingredients and a little bit of time to prep the dough and toppings. Follow our step-by-step instructions and you'll be indulging in a slice of this unique and flavourful pizza in no time. Bon appétit! And don't forget to check out some of our other home pizza recipes for inspiration for your next pie day!
Outdoor Pizza Oven, Pizza Steel, or Stone (if using a home oven)
1 Pizza Peel
1 Steamer to prepare purple cauliflower
1 wooden chopping board or peel for prep and serving
Ingredients
1pizza dough ball
Fresh mozzarella cheese
Low moisture mozzarella cheese
1garlic clove
Purple cauliflower
Dried basil
Dried oregano
Extra virgin olive oil
Honey
Instructions
Prepare Dough: Follow any of our dough recipes. You will need to prepare the dough at least 24 hours ahead of time.
Prepare Cheese: Place your fresh mozzarella in a container or bowl with a paper towel at the bottom to allow some of the water to drain. Tear both the fresh mozzarella and low moisture mozzarella cheeses into medium-sized pieces. Set aside.
Prepare Purple Cauliflower: Prepare a steamer by bringing water to a boil. Cut 3 – 4 purple cauliflower florets into halves or quarters, you want them to retain their shape and structure, but avoid making them too chunky, as this could interfere with cooking and eating. Steam until just tender, aroiund 5 – 7 minutes. Remove from the steamer and set aside to cool completely before adding to the pizza, as any residual warmth could cause the dough to stick to the peel.
Prepare Garlic: Thinly slice garlic clove. Set aside.
Preheat Oven:If using an outdoor pizza oven like an Ooni pizza oven, aim for a temperature of 450-500°C at the center of your pizza stone. Use an infrared thermometer to ensure accuracy. It should take around 25-30 minutes to reach temperature.For a home oven, using a pizza steel or stone, place the stone or steel inside the oven and preheat to the highest temperature for at least 30 minutes.
Prepare Base: On a lightly floured surface, stretch out the dough by hand according to the steps outlined in our dough recipe. Once you're happy with the shape of the base, lightly dust your pizza peel and transfer the dough onto the peel.
Assemble Pizza: Distribute mozzarella pieces evenly across the dough, ensuring each piece is around 2 cm in diameter and spaced at least 1.5 cm apart. Add the steamed purple cauliflower, followed by a sprinkle of both dried oregano and basil. Finish with a drizzle of EVOO.
Bake Your Pizza:If you're using an outdoor pizza oven, launch the pizza into the oven and bake for 60-90 seconds. Keep an eye on the pie and rotate every 10-15 seconds to ensure even cooking and to avoid burning.For a home oven with a pizza steel or stone, the bake time should be around 7-10 minutes.
Serving: Once done, remove the pizza from the oven and place it on a serving board. Drizzle with honey for a touch of sweetness. Now it’s time to enjoy your healthy, low-calorie, and delicious Purple Cauliflower and Garlic Pizza!
Today’s variation on the beloved Margherita features hand-crushed cherry tomatoes, adding a fresh, vibrant twist to this timeless favourite. This pizza starts with a base of rich, Neapolitan-style tomato sauce, layered with a combination of fresh mozzarella, low-moisture mozzarella, and Grana Padano for the perfect …
Today’s pizza brings together the rustic heartiness of thinly sliced potatoes with the rich, salty bite of prosciutto, complemented by a medley of cheeses and fragrant herbs. Potatoes on pizza may not be conventional, but when thinly sliced and baked, they develop a soft, creamy …
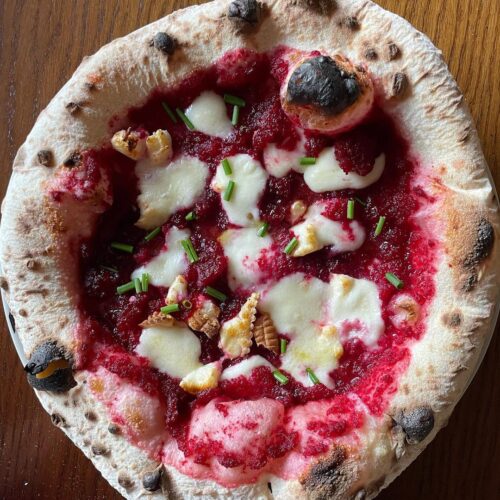
Today’s pizza brings the flavours of Poland to the table by combining smoky Polish kielbasa, tangy sauerkraut, and the sweet heat of beetroot and horseradish relish (ćwikła).
Kielbasa, a traditional Polish smoked sausage, is known for its rich, garlicky flavour and deep, smoky aroma. Sauerkraut, a staple in Eastern European cuisine, adds a tangy tartness that complements the savoury richness of the sausage. Ćwikła, a beetroot and horseradish relish, balances earthy sweetness with sharp heat, cutting through the richness of the cheese and sausage to create a complex, vibrant flavour profile.
A blend of fresh mozzarella and Manchego cheese provides a creamy texture with a slightly nutty, subtly sweet flavour as the base. Dried oregano, chilli flakes, and extra virgin olive oil (EVOO) complete the topping combination before we launch the pizza into the oven. Post-bake, fresh basil and chopped spring onions are added for extra flavour, aroma, and colour. A final drizzle of EVOO ties everything together, adding a smooth, aromatic finish.
Polish Kielbasa and Beetroot Relish Pizza
Polish kielbasa delivers a smoky, garlicky bite, while tangy sauerkraut and the sweet heat of beetroot and horseradish relish (ćwikła) add layers of bold, dynamic flavour. Combined with mozzarella, Manchego, oregano, and a touch of chilli, this pizza is a perfect fusion of savoury, tangy, and mildly spicy elements. To make this Polish Kielbasa and Beetroot Relish Pizza pie, you'll need a few simple ingredients and a bit of time to prepare the dough and toppings. Follow our step-by-step instructions and you'll be delighting in a slice of this delicious pizza in no time. Bon appétit! And remember to explore our other homemade pizza recipes for inspiration for your next pizza adventure!
Outdoor Pizza Oven, Pizza Steel, or Stone (if using a home oven)
1 Pizza Peel
1 wooden chopping board or peel for prep and serving
Ingredients
1pizza dough ball
Fresh mozzarella cheese
Manchego cheese
Low moisture mozzarella cheese
Polish Kielbasa
Beetroot relish
Sauerkraut
Fresh basil leaves
Extra virgin olive oil
Dried oregano
Chilli flakes
Extra virgin olive oil
Instructions
Prepare Dough: Follow any of our dough recipes. You will need to prepare the dough at least 24 hours ahead of time.
Prepare Beetroot Relish: If making your own, this recipe is easy to follow and yielded great results for us.
Prepare Cheese: Place your fresh mozzarella in a container or bowl with a paper towel at the bottom to allow some of the water to drain. Finely grate the manchego cheese. Tear mozzarella into medium-sized pieces. Set aside.
Prepare Polish Kielbasa: Slice Polish kielbasa into thin slices. Set aside.
Prepare Sauerkraut: Pat the sauerkraut dry before assembly to prevent excess moisture and avoid making the pizza soggy.
Prepare Spring Onion: Slice your spring onion, set aside ready for assembly.
Preheat Oven:If using an outdoor pizza like an Ooni pizza oven, aim for a temperature of 450-500°C at the center of your pizza stone. Use an infrared thermometer to ensure accuracy. It should take around 25-30 minutes to reach temperature.For a home oven, using a pizza steel or stone, place the stone or steel inside the oven and preheat to the highest temperature for at least 30 minutes.
Prepare Base: On a lightly floured surface, stretch out the dough by hand according to the steps outlined in our dough recipe. Once you're happy with the shape of the base, lightly dust your pizza peel and transfer the dough onto the peel.
Assemble Pizza: Evenly distribute pieces of fresh mozzarella across the dough, ensuring they are around 2 cm in diameter and at least 1.5 cm apart. Liberally sprinkle grated Manchego cheese over the pizza. Add slices of Polish kielbasa, followed by dollops of beetroot relish and sauerkraut. Finish with an even sprinkle of chilli flakes, dried oregano, and a drizzle of EVOO.
Bake Your Pizza:If you're using an outdoor pizza oven, launch the pizza into the oven and bake for 60-90 seconds. Keep an eye on the pie and rotate every 10-15 seconds to ensure even cooking and to avoid burning.For a home oven with a pizza steel or stone, the bake time should be around 7-10 minutes.
Serving: Once the pizza is ready, carefully remove it from the oven with a pizza peel. Place the pizza on a serving board, add basil leaves and freshly chopped chives. Now, it's time to enjoy your homemade Polish Kielbasa and Beetroot Relish Pizza!
Today’s pizza combines the smoky richness of chorizo, the nutty sharpness of Manchego cheese, and a touch of heat from chilli flakes for a Spanish-inspired pizza topping combination. We absolutely love chorizo, a cured and spiced sausage widely used in Spanish and Latin American cuisine, …
This Shimeji Mushroom and Salami Pizza brings together rich, savoury flavours with a touch of spice and earthy depth. The base starts with a blend of fresh and low-moisture mozzarella, providing the perfect balance of creaminess, sturdiness, and stretch. Thin slices of salami follow, then …
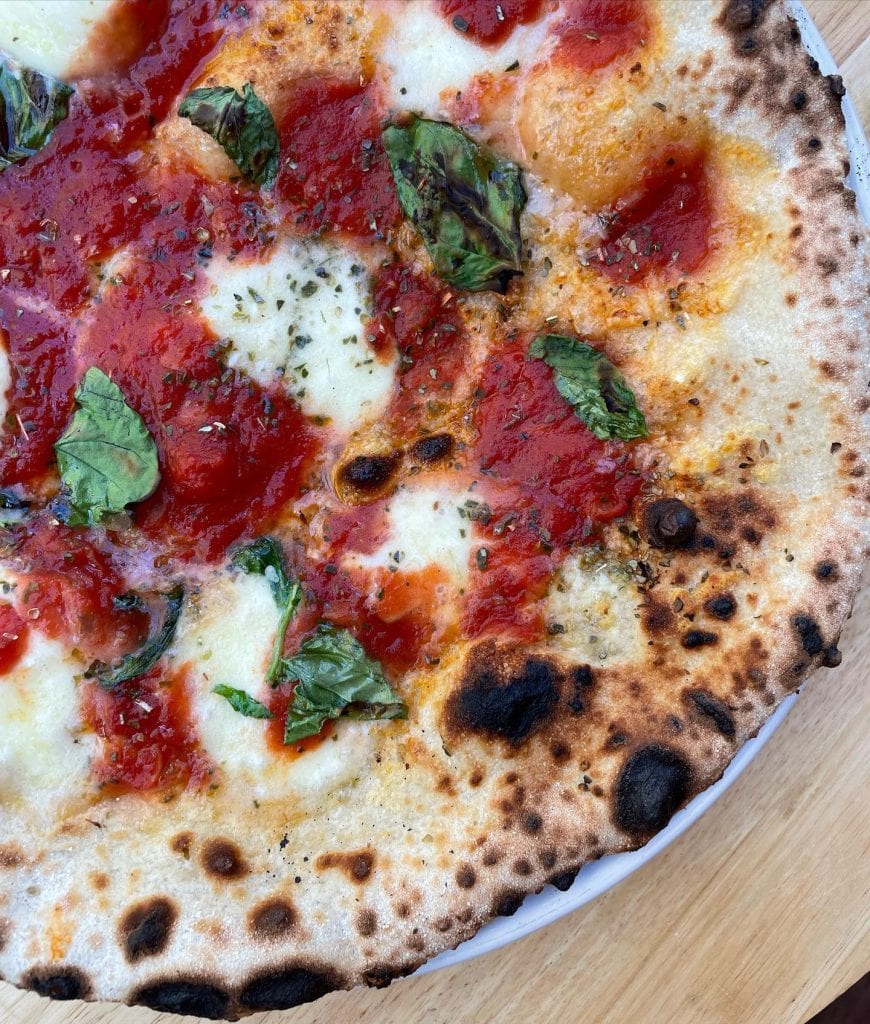
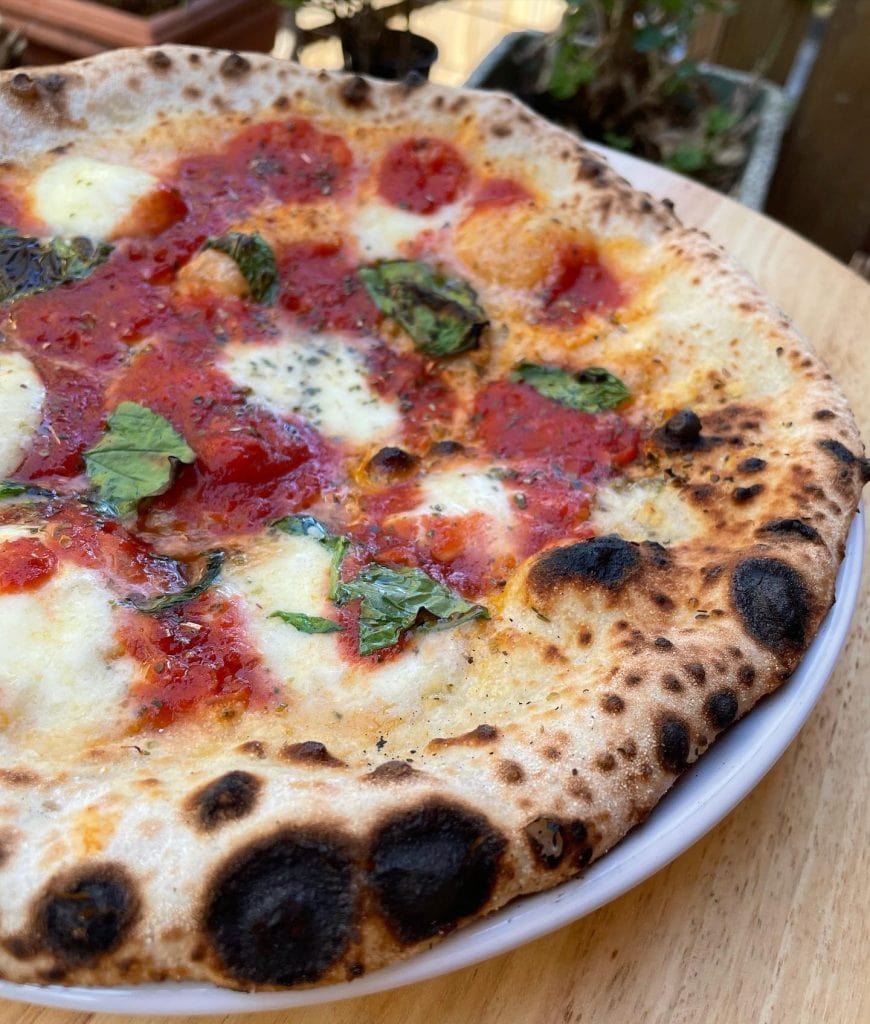
This Margherita Pizza flips the traditional layering method by placing the sauce on top, allowing the flavours of fresh mozzarella and Grana Padano to meld beautifully beneath a rich Neapolitan-style tomato sauce. Baked to perfection in our Ooni Koda 12, it’s a simple yet bold take on a classic favourite.
Inspired by some New York pizzerias where the sauce is layered on top, this method generally creates a firmer base and intensifies the tomato sauce’s flavour. The base starts with a layer of fresh and low-moisture mozzarella, combined with the nutty, subtly salty flavour of Grana Padano, creating a rich and balanced foundation. The Neapolitan-style tomato sauce is then spooned over the cheese, followed by a sprinkle of oregano and a drizzle of extra virgin olive oil.
Once out of the oven, fresh basil leaves are added for a burst of freshness, completing this beautifully balanced take on our favourite style of pizza.
Margherita Pizza – Sauce on Top
This twist on the classic Margherita features a cheese-first approach, with fresh mozzarella and Grana Padano tucked beneath a bold, homemade tomato sauce. Finished with oregano, a drizzle of EVOO, and fresh basil leaves, it’s a beautifully balanced and flavourful take on an all-time favourite.Follow our step-by-step instructions and you'll be indulging in a slice of this delicious Margherita pizza with sauce on top in no time. Bon appétit! And don't forget to check out some of our other pizza recipes for inspiration for your next pie day!
Outdoor Pizza Oven, Pizza Steel, or Stone (if using a home oven)
1 Pizza Peel
1 sauce ladle
1 wooden chopping board or peel for prep and serving
Ingredients
1pizza dough ball
1ladle of pizza sauce
Fresh mozzarella cheese
Low moisture mozzarella cheese
Grana padano cheese
Fresh basil leaves
Dried oregano
Extra virgin olive oil
Instructions
Prepare Dough: Follow any of our dough recipes. You will need to prepare the dough at least 24 hours ahead of time.
Prepare Sauce: We recommend our standard pizza sauce which is versatile, simple to make and is perfect for Neapolitan style pizzas. Spice up this sauce however you like, remember the best part about making pizza is the creative process!
Prepare Cheese: Place your fresh mozzarella in a container or bowl with a paper towel at the bottom to allow some of the water to drain. Finely grate the grana padano, tear both the fresh and low moisture mozzarella into medium-sized pieces. Set aside.
Preheat Oven:If using an outdoor pizza like an Ooni pizza oven, aim for a temperature of 450-500°C at the center of your pizza stone. Use an infrared thermometer to ensure accuracy. It should take around 25-30 minutes to reach temperature.For a home oven, using a pizza steel or stone, place the stone or steel inside the oven and preheat to the highest temperature for at least 30 minutes.
Prepare Base: On a lightly floured surface, stretch out the dough by hand according to the steps outlined in our dough recipe. Once you're happy with the shape of the base, lightly dust your pizza peel and transfer the dough onto the peel.
Assemble Pizza: Start by placing the mozzarella cheeses evenly across the dough, ensuring the pieces are about 2 cm in diameter and at least 1.5 cm apart. Next, sprinkle a generous amount of Grana Padano over the cheese. Spoon a layer of sauce in a circular motion, starting from the center and working outwards, allowing it to settle between the cheese pieces. Finish with a sprinkle of dried oregano and a drizzle of EVOO.
Bake Your Pizza:If you're using an outdoor pizza oven, launch the pizza into the oven and bake for 60-90 seconds. Keep an eye on the pie and rotate every 10-15 seconds to ensure even cooking and to avoid burning.For a home oven with a pizza steel or stone, the bake time should be around 7-10 minutes.
Serving: Once the pizza is done, remove it from the oven and place it on a serving board. Garnish with fresh basil leaves, and enjoy your delicious sauce on top Margherita pizza!
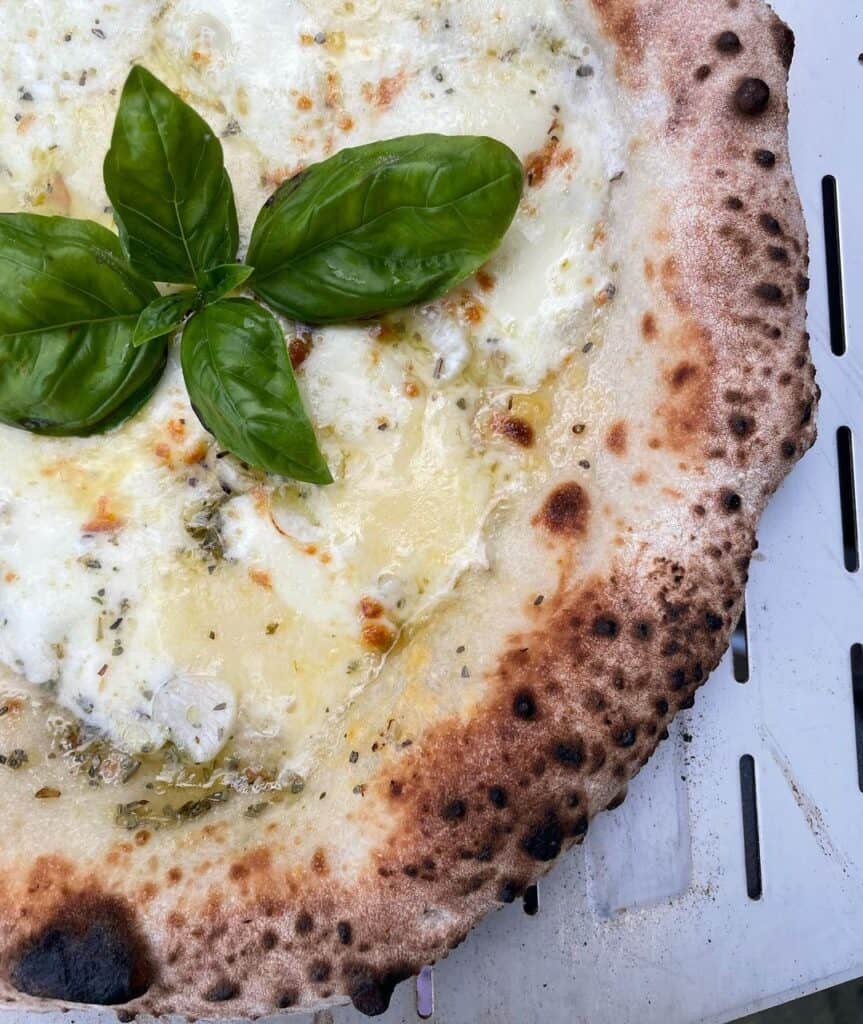
This Pesto and Prosciutto Pizza is a delicious blend of fresh, vibrant flavours and rich, savoury notes, baked to perfection in our Ooni Karu 16. The base features a Neapolitan-style tomato sauce, topped with dollops of fragrant pesto and creamy fresh mozzarella. After baking, thin …
Tonight we’re tweaking the classic Margherita pizza by spicing things up with a drizzle of hot sauce, featuring the mild yet flavourful kick from Bishop’s Chilli. This Margherita starts with a classic Neapolitan-style tomato sauce as its base, topped with a combination of fresh mozzarella …
This Wild Garlic Pesto Margherita Pizza is a bold, aromatic twist on the classic margherita, combining the simplicity of tomato, mozzarella, and oregano with the earthy richness of wild garlic pesto and a drizzle of luxurious truffle oil.
The base features a Neapolitan-style tomato sauce, paired with a blend of fresh mozzarella and low-moisture mozzarella for the perfect balance of creaminess and stretch. Baked to perfection in our Ooni pizza oven, it’s topped with dollops of wild garlic pesto (czosnek niedźwiedzi), adding a burst of intense, garlicky flavour.
A drizzle of truffle oil enhances the rich, savoury profile, while a sprinkle of oregano lends a fragrant, herby finish. This combination of bold and fresh ingredients transforms the classic margherita into a flavour-packed, elevated pizza experience.
Wild Garlic Pesto Margherita Pizza
This pizza combines the timeless simplicity of margherita with the bold, aromatic addition of wild garlic pesto and truffle oil. Try this Wild Garlic Pesto Margherita Pizza for yourself and discover how a few carefully chosen ingredients can elevate a traditional favourite.To make this Wild Garlic Pesto Margherita Pizza pizza, gather your ingredients and follow our easy step-by-step instructions. Bon appétit! And don’t forget to explore our other home pizza recipes for more inspiration.
Outdoor Pizza Oven, Pizza Steel, or Stone (if using a home oven)
1 Pizza Peel
1 sauce ladle
1 wooden chopping board or peel for prep and serving
Food processor
Ingredients
1pizza dough ball
1ladle of pizza sauce
Fresh mozzarella cheese
Low moisture mozzarella cheese
Truffle oil
Dried oregano
Wild Garlic Pesto (If Making Your Own)
150gramswild garlic leaves
50grams parmesan
50grams almonds or pine nuts
Salt to taste
Squeeze of lemon
Instructions
Prepare Dough: Follow any of our dough recipes. You will need to prepare the dough at least 24 hours ahead of time.
Prepare Sauce: We recommend our standard pizza sauce which is versatile, simple to make and is perfect for Neapolitan style pizzas. Spice up this sauce however you like, remember the best part about making pizza is the creative process!
Prepare Cheeses: Place your fresh mozzarella in a container or bowl with a paper towel at the bottom to allow some of the water to drain. Tear both the fresh and low moisture mozzarella into medium-sized pieces. Set aside.
Prepare Wild Garlic Pesto: We made this pizza while in Poland and used a jar of wild garlic pesto purchased in the Bieszczady Mountains. By all means, use store-bought pesto if you can find it. If you'd like to make your own, we’ve done so before by loosely following this recipe: Blitz wild garlic leaves and parmesan until roughly combined, add EVOO, a pinch of salt and a squeeze of lemon. Set aside.
Preheat Oven:If using an outdoor pizza like an Ooni pizza oven, aim for a temperature of 450-500°C at the center of your pizza stone. Use an infrared thermometer to ensure accuracy. It should take around 25-30 minutes to reach temperature.For a home oven, using a pizza steel or stone, place the stone or steel inside the oven and preheat to the highest temperature for at least 30 minutes.
Prepare Base: On a lightly floured surface, stretch out the dough by hand according to the steps outlined in our dough recipe. Once you're happy with the shape of the base, lightly dust your pizza peel and transfer the dough onto the peel.
Assemble Pizza: Assemble the pizza by spreading a ladle of sauce in a circular motion, starting from the center and working outwards. Distribute pieces of mozzarella cheeses evenly across the dough, ensuring the pieces are about 2 cm in diameter and at least 1.5 cm apart. Add small dollops of garlic pesto across the pizza for bursts of flavour.
Bake Your Pizza:If you're using an outdoor pizza oven, launch the pizza into the oven and bake for 60-90 seconds. Keep an eye on the pie and rotate every 10-15 seconds to ensure even cooking and to avoid burning.For a home oven with a pizza steel or stone, the bake time should be around 7-10 minutes.
Serving: Once the pizza is done, remove it from the oven and place it on a serving board. Sprinkle with oregano and finish with a drizzle of truffle oil. Now it's time to enjoy your delicious Wild Garlic Pesto Margherita Pizza!
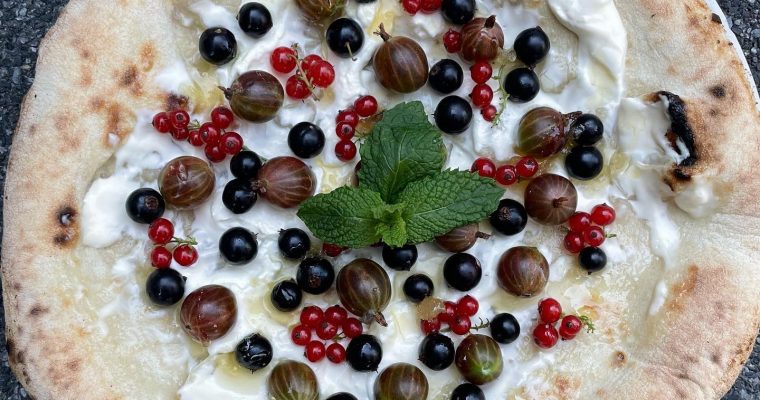
This Mascarpone and Seasonal Fruits Pizza is a lovely twist on traditional toppings, celebrating fresh, seasonal fruits paired with rich, creamy mascarpone. The base begins with a blind bake using sliced apples, which not only infuse the crust with subtle sweetness but also create a …
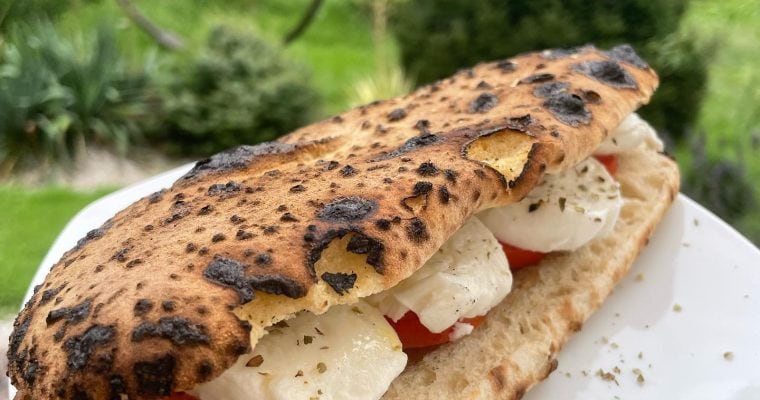
The Panuozzo, a traditional Italian sandwich made with pizza dough, is a beloved street food from the Campania region of Italy. Baked to perfection in our Ooni Karu 12 oven, this Panuozzo boasts a warm, tender, and airy interior with a crispy yet chewy crust. …
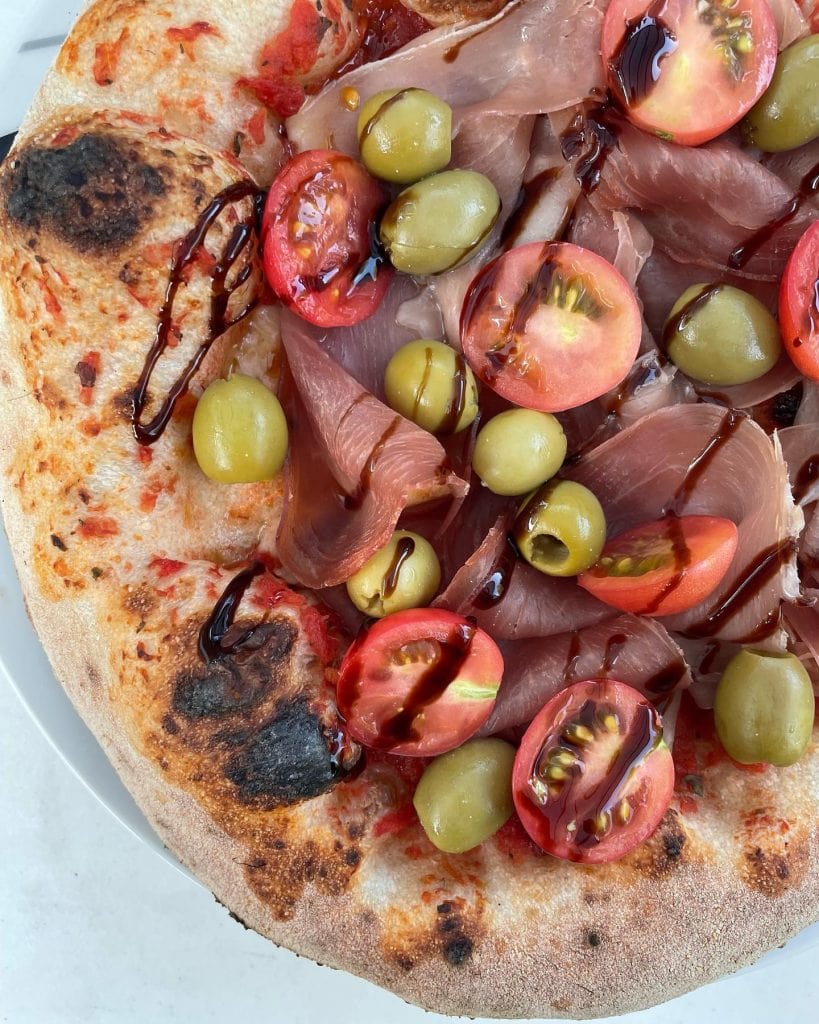
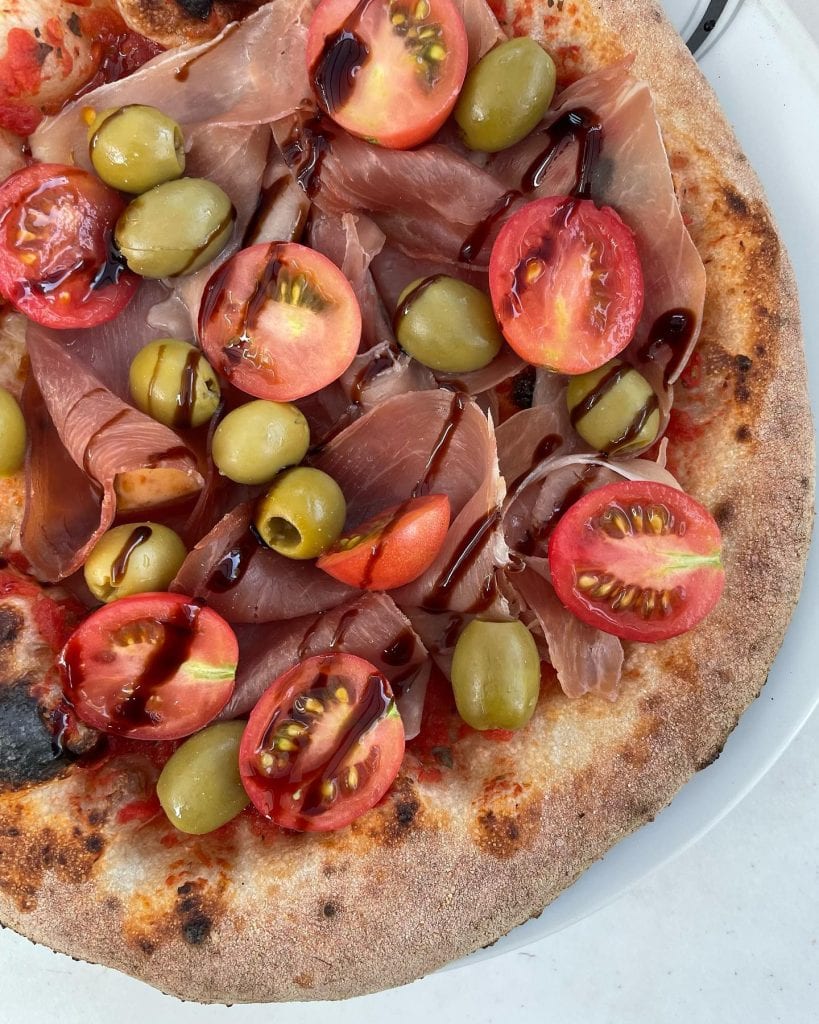
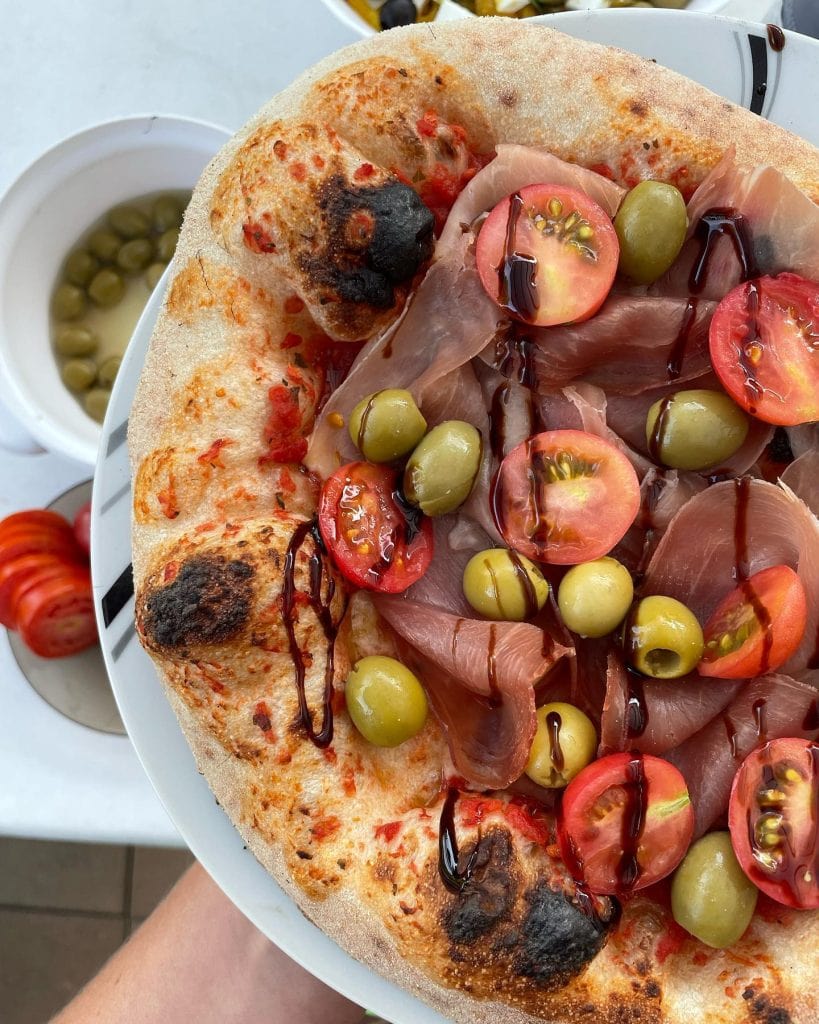
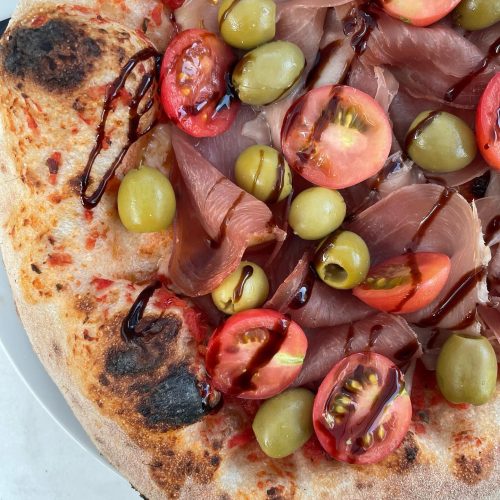
This Prosciutto, Olive, and Cherry Tomato Pizza celebrates simple, fresh flavours that come together beautifully.
The base features a classic Neapolitan-style tomato sauce and fresh mozzarella cheese, baked to perfection. After baking, thin slices of prosciutto, briny green olives, and juicy cherry tomatoes are added. These fresh, vibrant ingredients retain their raw, natural flavours, providing a light and refreshing contrast to the warm, base toppings of tomato sauce and mozzarella.
To enhance the pizza further, a drizzle of sweet, tangy balsamic glaze and a splash of extra virgin olive oil (EVOO) add depth and a velvety finish. The combination of baked and fresh toppings creates a perfectly balanced and delicious flavour profile.
Prosciutto, Olive, and Cherry Tomato Pizza
This pizza combines a classic Neapolitan-style tomato sauce and mozzarella base with fresh post-bake toppings, including salty prosciutto, briny olives, and juicy cherry tomatoes. Finished with a drizzle of balsamic glaze and EVOO, it’s a perfect blend of comfort and vibrant, fresh flavours. To make this Prosciutto, Olive, and Cherry Tomato Pizza you'll need a few simple ingredients and a little bit of time to prep the dough and toppings. Follow our step-by-step instructions and you'll be indulging in a slice in no time. Bon appétit! And don't forget to check out some of our other pizza recipes for inspiration for your next pie day!
Outdoor Pizza Oven, Pizza Steel, or Stone (if using a home oven)
1 Pizza Peel
1 sauce ladle
1 wooden chopping board or peel for prep and serving
Ingredients
1pizza dough ball
1ladle of pizza sauce
Fresh mozzarella cheese
Prosciutto
OlivesWe used green as we prefer the colour for this pizza. However, use whichever type of olive you prefer.
Cherry tomatoes
Balsamic glaze
Extra virgin olive oil
Instructions
Prepare Dough: Follow any of our dough recipes. You will need to prepare the dough at least 24 hours ahead of time.
Prepare Sauce: We recommend our standard pizza sauce which is versatile, simple to make and is perfect for Neapolitan style pizzas. Spice up this sauce however you like, remember the best part about making pizza is the creative process!
Prepare Mozzarella Cheese: Place your fresh mozzarella cheese in a container or bowl with a paper towel at the bottom to allow some of the water to drain. Tear into medium-sized pieces. Set aside.
Prepare Post-Bake Toppings: We used full slices of prosciutto to create a ribbon effect. Ensure the olives are pitted, and slice them if desired. Halve the cherry tomatoes. Set everything aside for post-bake assembly.
Preheat Oven:If using an outdoor pizza like an Ooni pizza oven, aim for a temperature of 450-500°C at the center of your pizza stone. Use an infrared thermometer to ensure accuracy. It should take around 25-30 minutes to reach temperature.For a home oven, using a pizza steel or stone, place the stone or steel inside the oven and preheat to the highest temperature for at least 30 minutes.
Prepare Base: On a lightly floured surface, stretch out the dough by hand according to the steps outlined in our dough recipe. Once you're happy with the shape of the base, lightly dust your pizza peel and transfer the dough onto the peel.
Assemble Pizza: To assemble the pizza, start by spreading a ladle of sauce in a circular motion starting at the center of the dough. Evenly distribute fresh mozzarella cheese over the sauce. Finish with a drizzle of extra virgin olive oil.
Bake Your Pizza:If you're using an outdoor pizza oven, launch the pizza into the oven and bake for 60-90 seconds. Keep an eye on the pie and rotate every 10-15 seconds to ensure even cooking and to avoid burning.For a home oven with a pizza steel or stone, the bake time should be around 7-10 minutes.
Add Post-Bake Toppings: Once the pizza is baked, remove it from the oven and place it on a serving board. Arrange the prosciutto slices over the top, followed by the olives and halved cherry tomatoes. Drizzle with balsamic glaze and touch extra virgin olive oil for a finishing touch.
Serving: Once the pizza is baked, remove from the oven and place on a serving board. Arrange the prosciutto slices over the top, followed by olives and halved cherry tomatoes. Drizzle with balsamic glaze and a touch of extra virgin olive oil for a perfect finishing touch
Today’s creation celebrates the earthy richness of chanterelle mushrooms, paired with fresh herbs and mozzarella for a rustic, yet refined pizza topping combination. Chanterelle mushrooms, prized for their meaty texture and delicate, nutty flavour, are the star of this pizza. These vibrant orange-yellow mushrooms were …
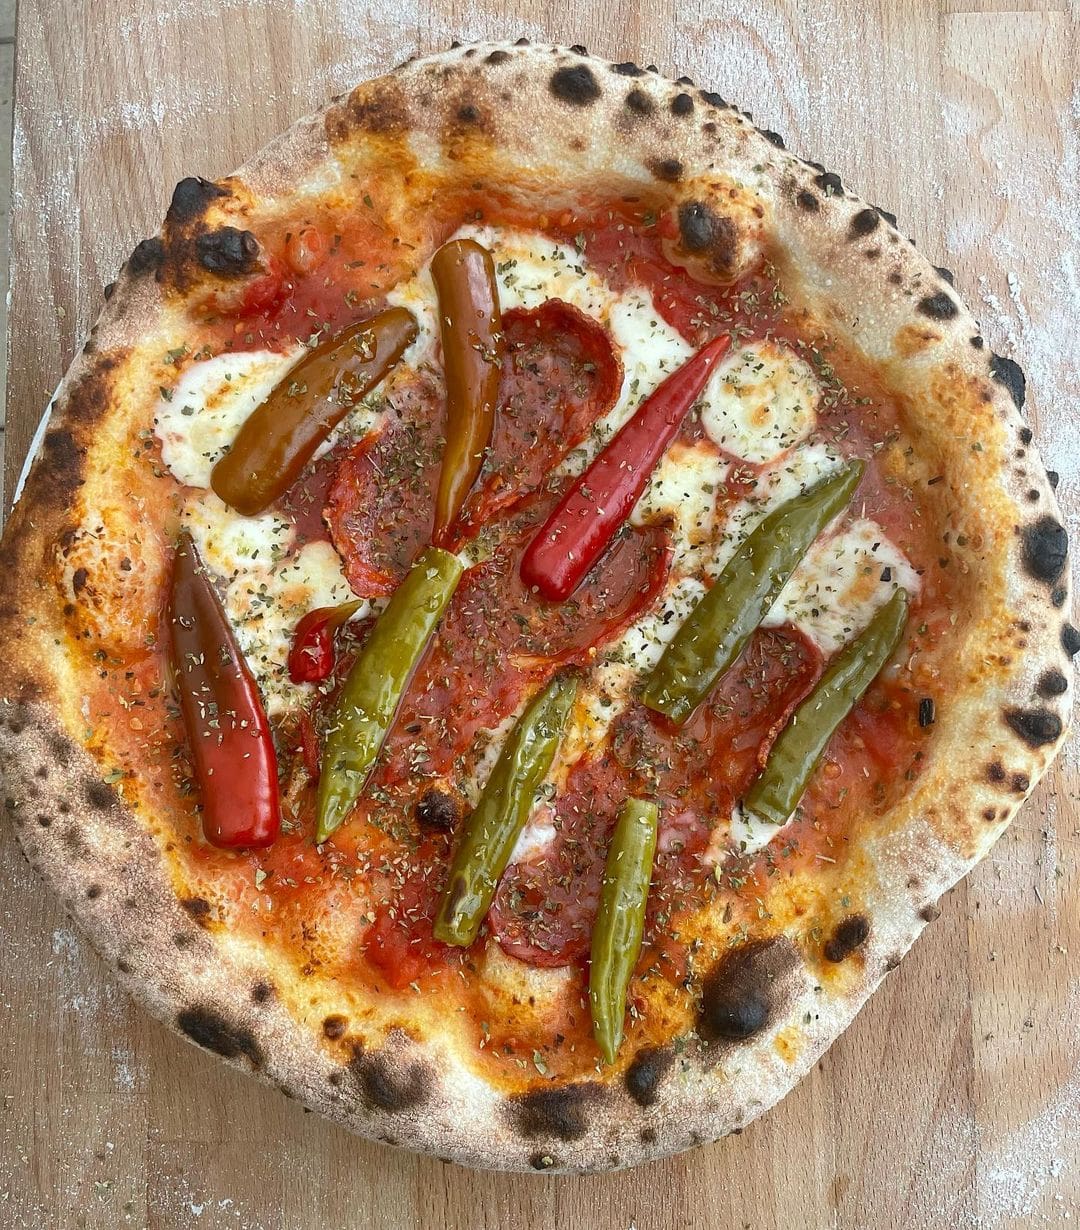
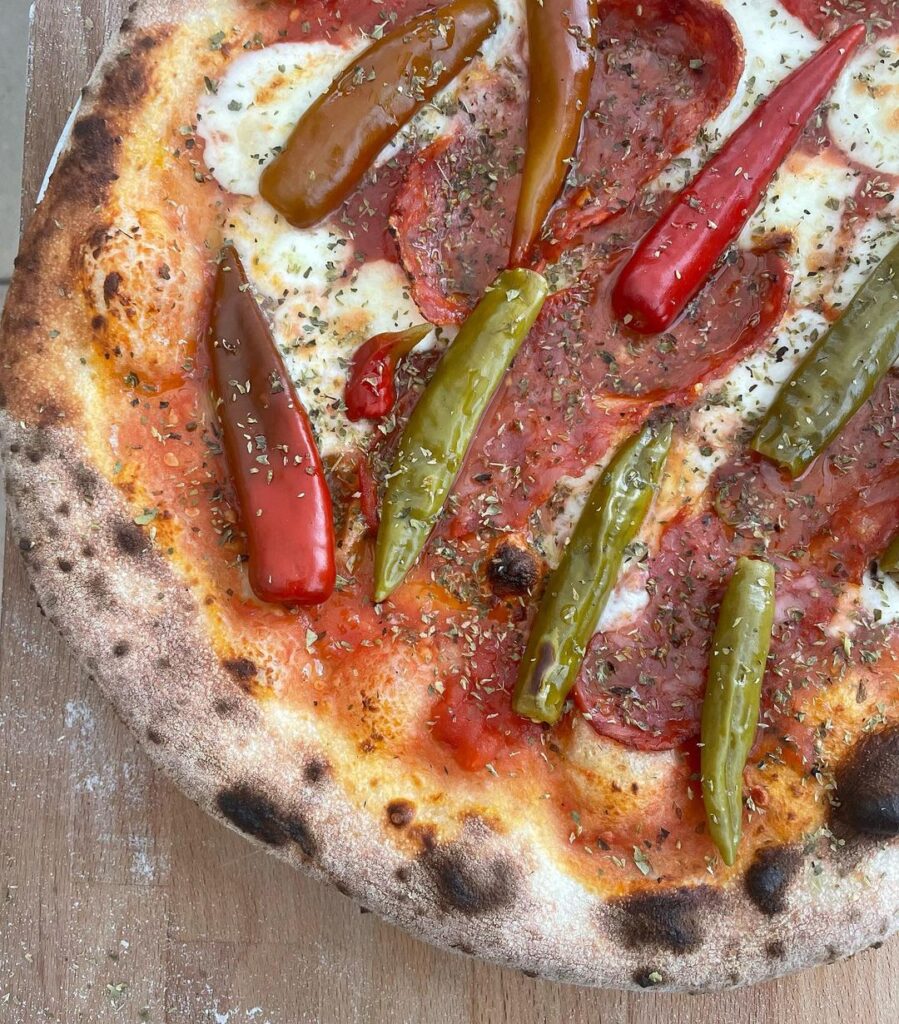
Today, we’re celebrating the vibrant tang of pickled peppers paired with the salty richness of halloumi, brought together on a beautifully crafted pizza. The base starts with a rich tomato sauce made from Mutti tomatoes. Low-moisture mozzarella and creamy bambini bocconcini provide a luscious, gooey …
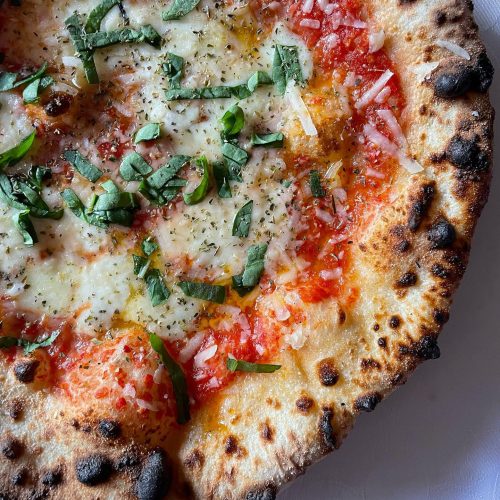
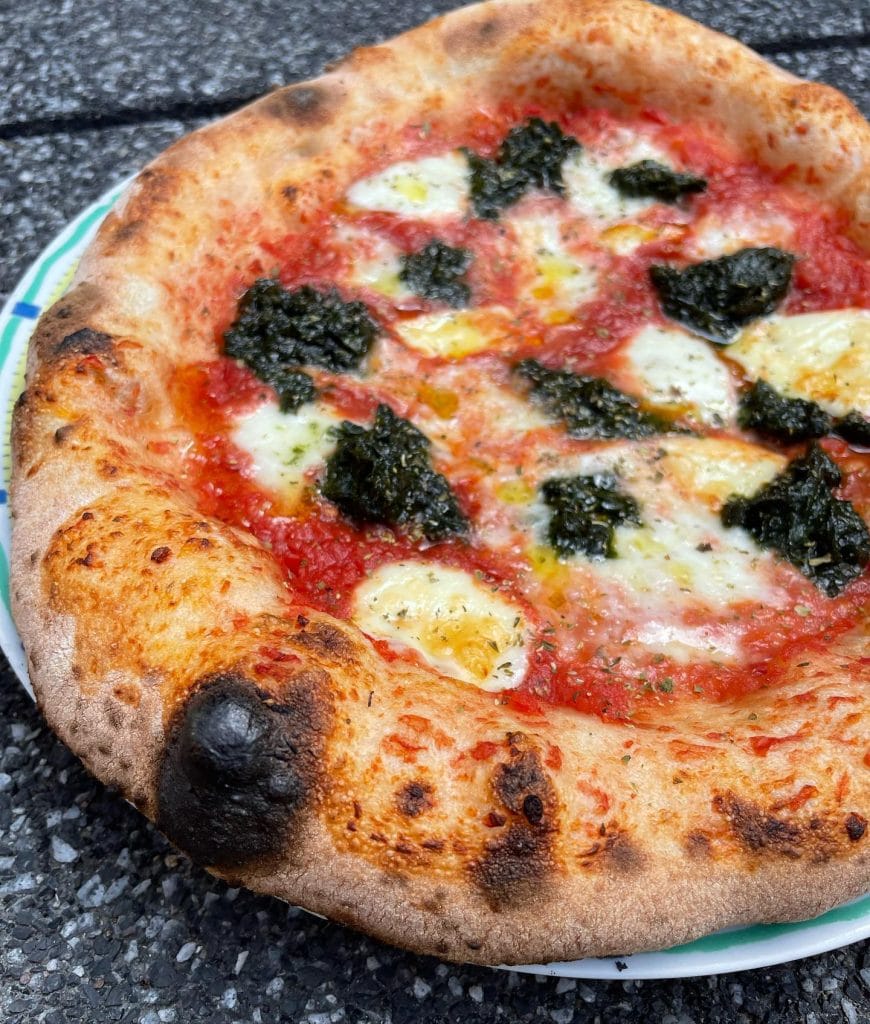
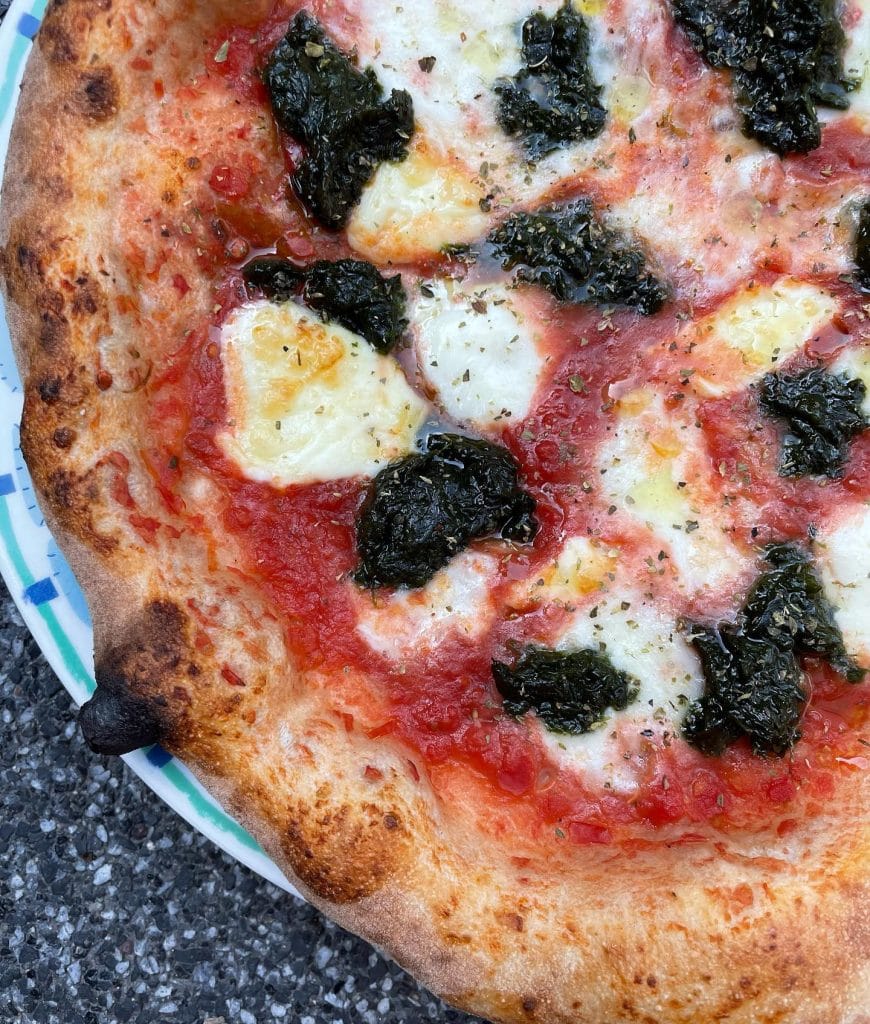
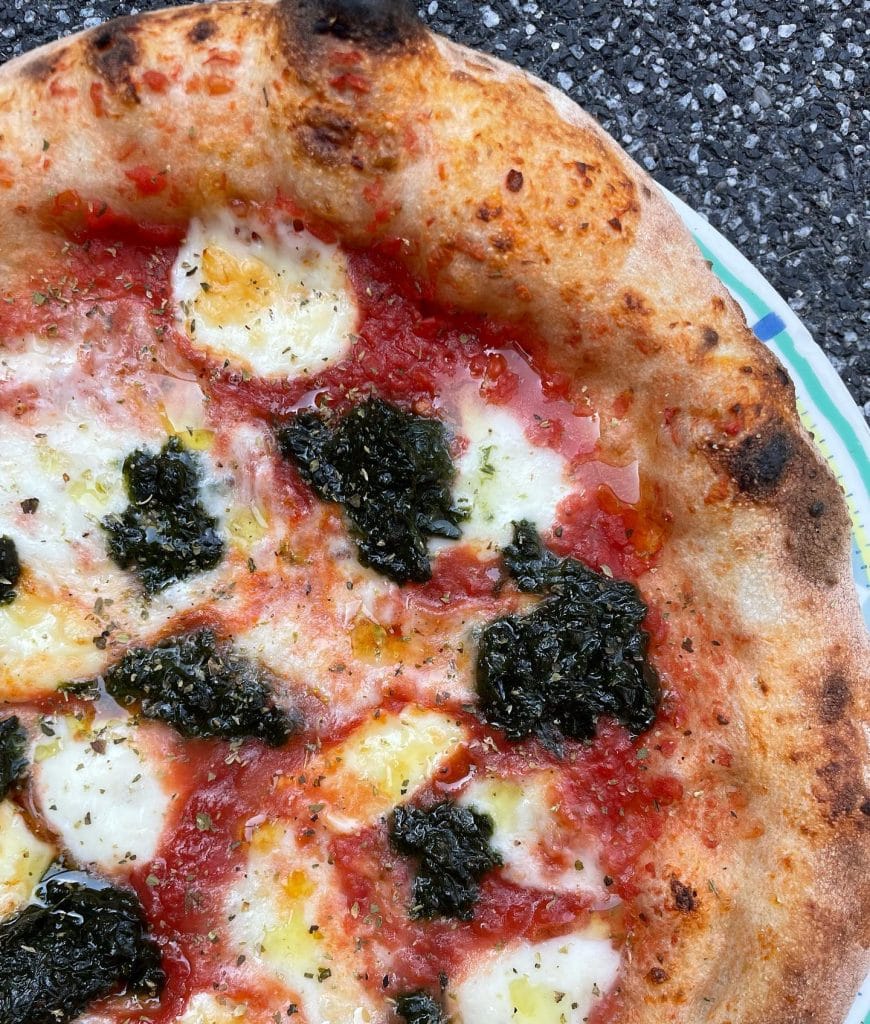
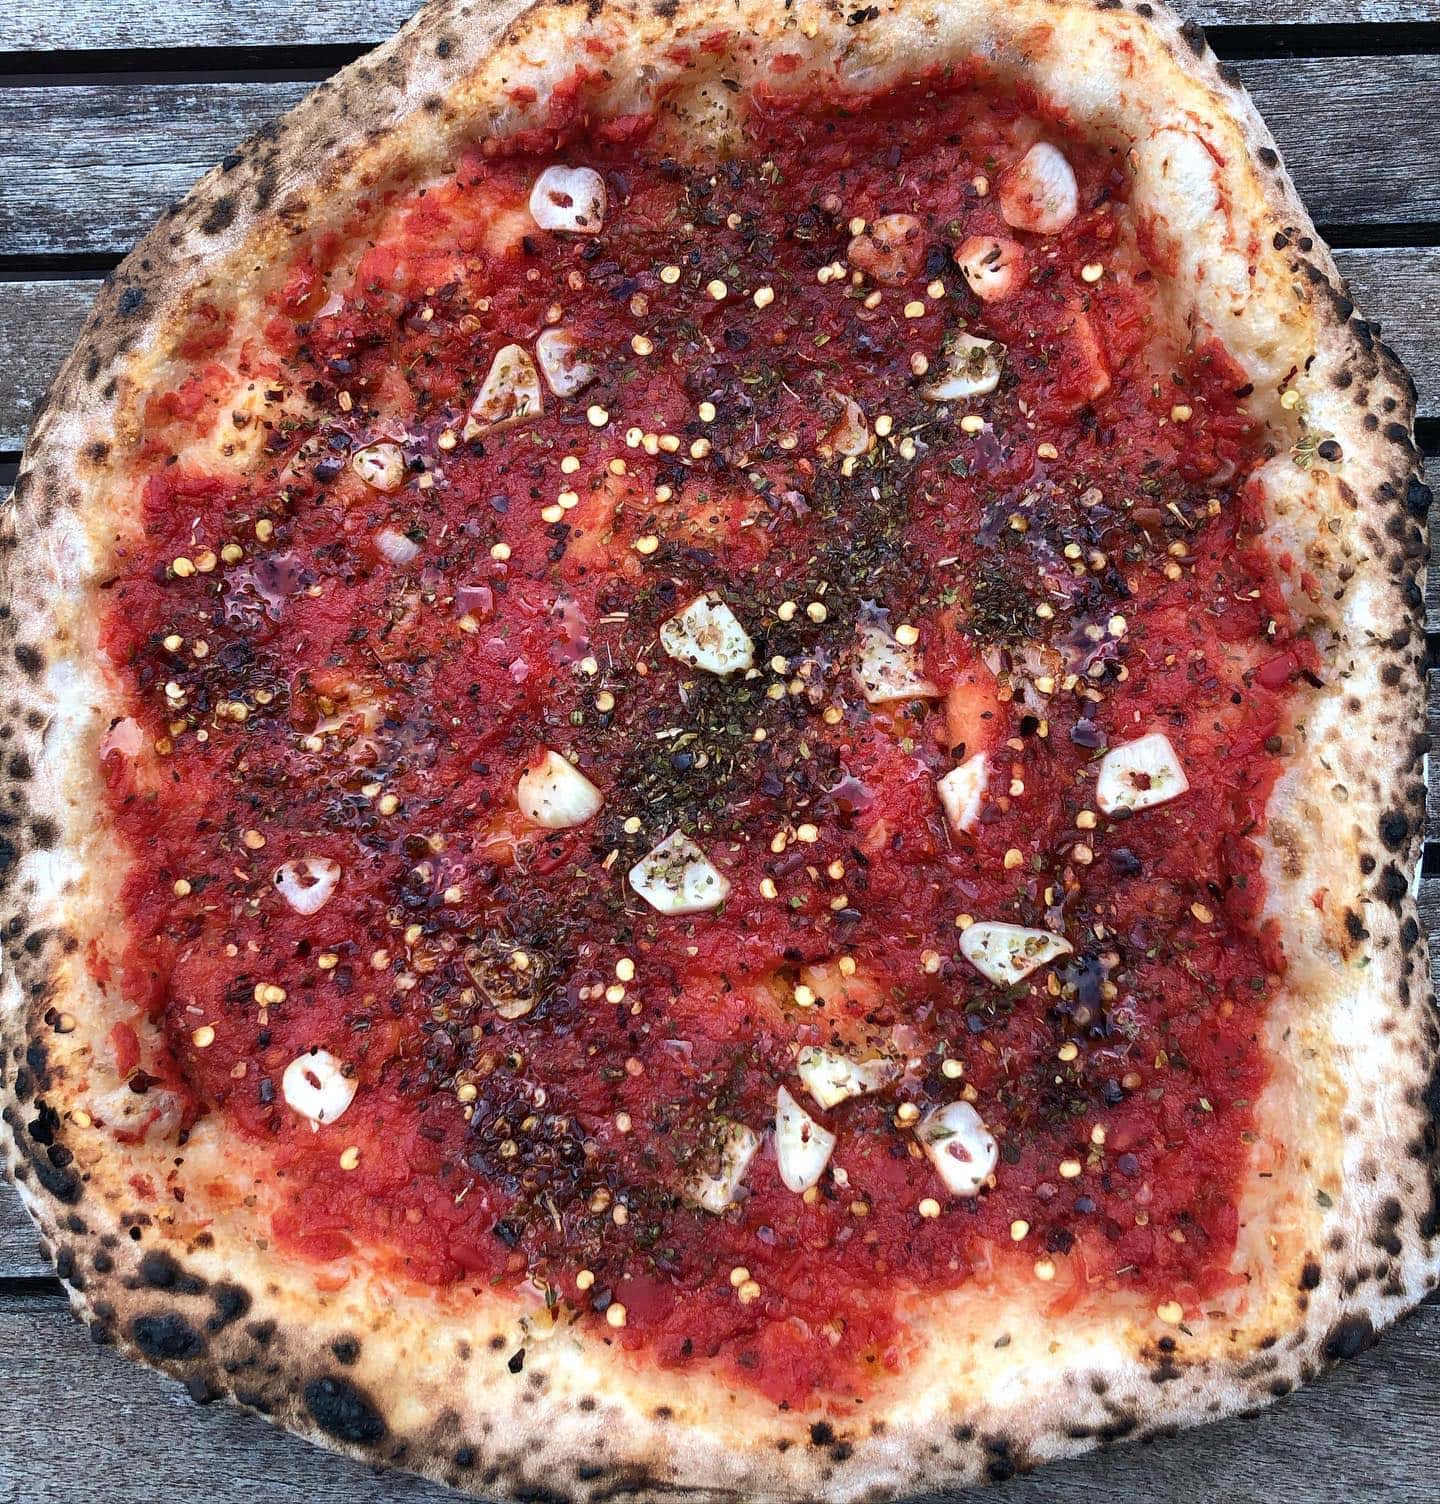
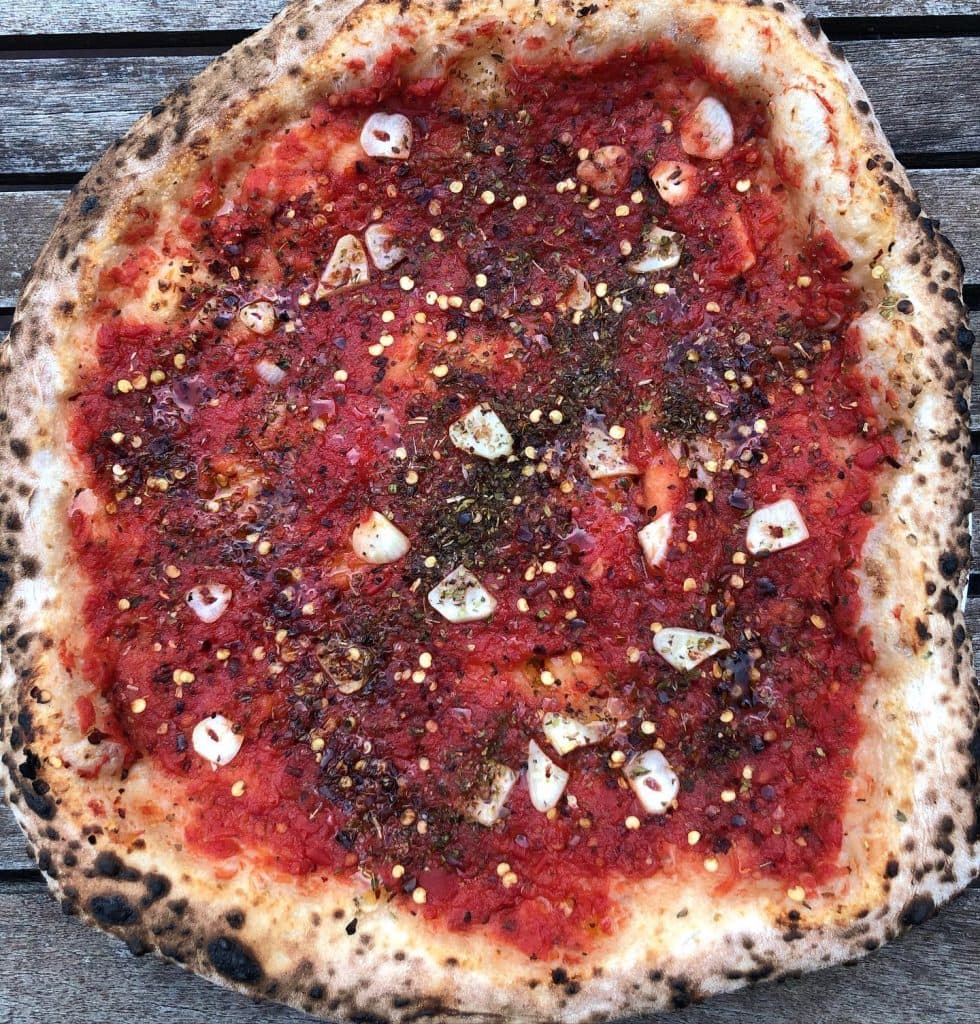
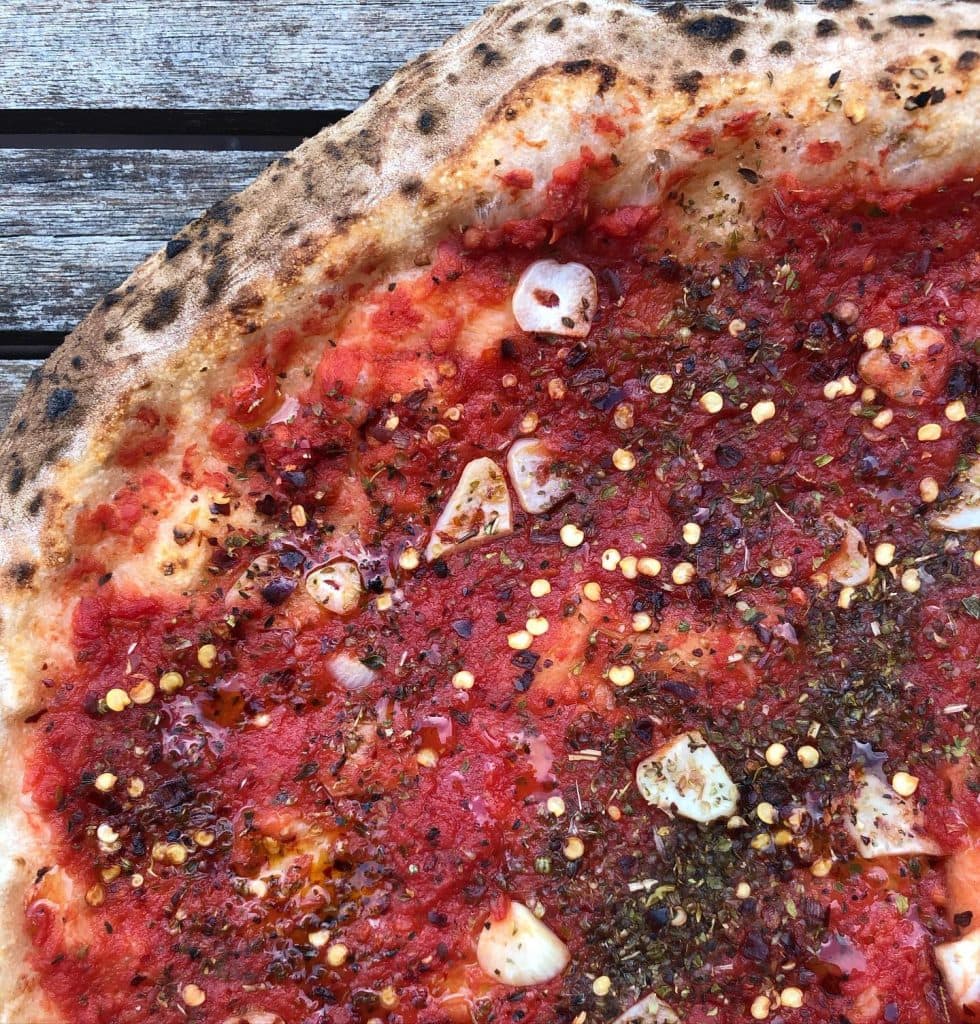
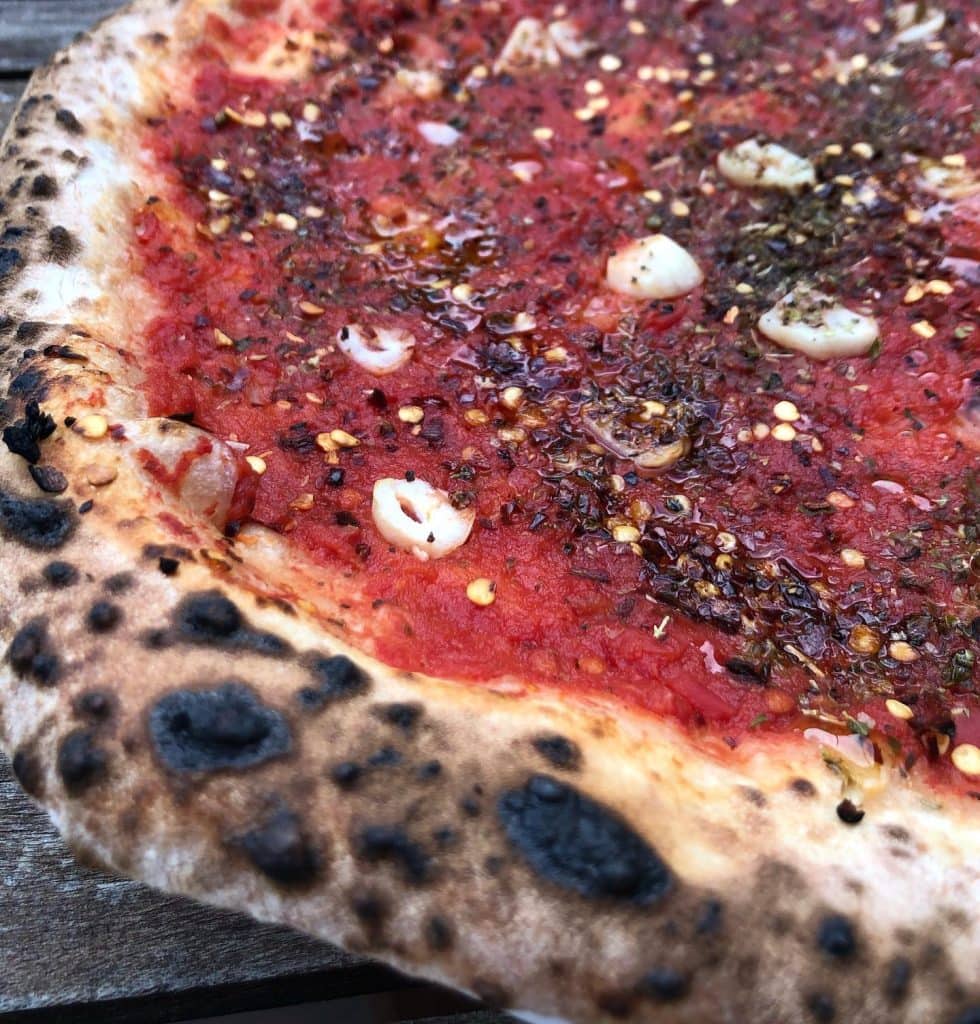
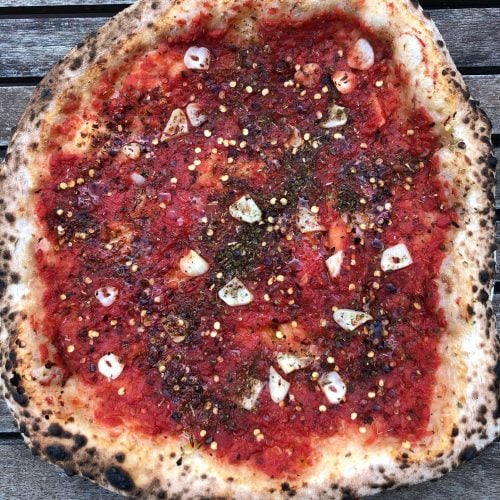
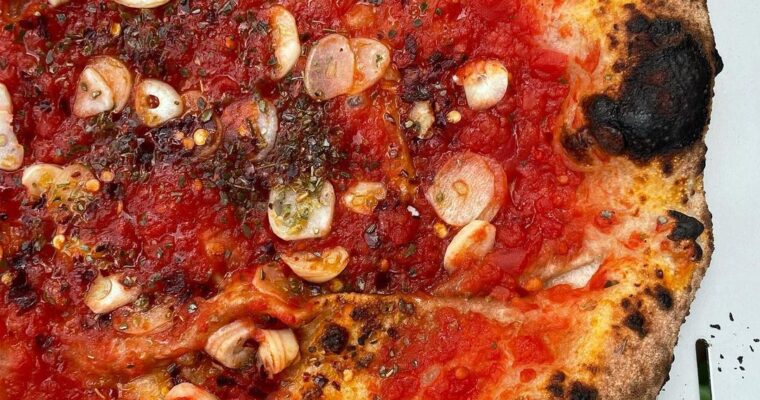
Today, we’re making a marinara pizza, a simple classic featuring garlic, oregano, chili flakes, and extra virgin olive oil.
Fresh garlic brings a bold flavor, dried oregano adds an earthy touch, and chili flakes provide a hint of heat. Extra virgin olive oil enhances everything with its smooth richness.
Combined with a quality tomato sauce, these ingredients create a balanced, flavorful pizza that’s both straightforward and satisfying, a perfect choice for traditional pizza lovers.
Marinara Pizza with Oregano and Chilli Flakes
To create this marinara pizza with oregano and chilli flakes, you'll need just a handful of simple ingredients and a bit of time to prepare the dough and toppings. Follow our step-by-step instructions, and you'll soon be savouring a slice of this delicious pizza. Buon appetito! And don't forget to explore our other home pizza recipes for inspiration on your next pizza-making day!
Outdoor Pizza Oven, Pizza Steel, or Stone (if using a home oven)
1 Pizza Peel
1 sauce ladle
1 wooden chopping board or peel for prep and serving
Ingredients
1pizza dough ball
1 ½ – 2ladle of pizza sauce
2Garlic cloves
Dried oregano
Extra Virgin Olive Oil
Instructions
Prepare Dough: Follow any of our dough recipes. You will need to prepare the dough at least 24 hours ahead of time.
Prepare Sauce: We recommend our standard pizza sauce which is versatile, simple to make and is perfect for Neapolitan style pizzas. Spice up this sauce however you like, remember the best part about making pizza is the creative process!
Prepare Garlic: Thinly slice your garlic cloves, set aside ready for assembly.
Preheat Oven:If using an outdoor pizza like an Ooni pizza oven, aim for a temperature of 450-500°C at the center of your pizza stone. Use an infrared thermometer to ensure accuracy. It should take around 25-30 minutes to reach temperature.For a home oven, using a pizza steel or stone, place the stone or steel inside the oven and preheat to the highest temperature for at least 30 minutes.
Prepare Base: On a lightly floured surface, stretch out the dough by hand according to the steps outlined in our dough recipe. Once you're happy with the shape of the base, lightly dust your pizza peel and transfer the dough onto the peel.
Assemble Pizza: To begin assembling your pizza, start by spreading 1 and a ½ – 2 ladles of sauce (slightly more than a regular pizza with cheese and other toppings) in a circular motion, starting from the center of the dough and working your way outwards. Next, add sliced garlic, generous sprinkle of dried oregano, chilli flakes, drizzle of olive oil.
Bake Your Pizza:If you're using an outdoor pizza oven, launch the pizza into the oven and bake for 60-90 seconds. Keep an eye on the pie and rotate every 10-15 seconds to ensure even cooking and to avoid burning.For a home oven with a pizza steel or stone, the bake time should be around 7-10 minutes.
Serving: Once done, remove the pizza from the oven and place it on a serving board. Now it's time to enjoy your hot and fresh marinara pizza!
Today’s pizza combines pesto, cherry tomatoes, and spinach, finished with a touch of chilli flakes for a gentle kick. Pesto, a rich blend of basil, garlic, pine nuts, and cheese, brings a nutty and herbaceous base to this pizza. It pairs beautifully with the sweetness …
Introducing our Zapiekanka Style Pizza with Kewpie Mayo, a bold and creamy take on a Polish street food classic. We start with a base of classic Neapolitan-style tomato sauce, topped with a blend of fresh and low-moisture mozzarella for the perfect balance of creaminess and …
Today, we delve deep into the heart of Poland with our Zapiekanka Style Pizza, a perfect blend of traditional ingredients and contemporary flair.
Zapiekanka, a popular Polish street food, is typically a half baguette filled with fried mushrooms, cheese, and various toppings, often finished with a generous drizzle of ketchup.
Our adaptation features low-moisture mozzarella, classic Neapolitan tomato sauce, rich kielbasa (Polish sausage), and Polish gherkin (ogórki konserwowe). No Zapiekanka would be complete without ketchup, and our version takes it up a notch with a drizzle of creamy dill sauce, adding a refreshing, herby twist to every bite. Chives and fried shallots round out the dish with bursts of fresh and crispy textures.
Zapiekanka Style Homemade Pizza with Dill Sauce
Experience the essence of Poland with the harmonious blend of fried mushrooms, tomato sauce, smoky kielbasa, and tangy Polish gherkin. Dill sauce introduces a refreshing twist to this zapiekanka style pizza. Dive into this delightful fusion and let your taste buds embark on a journey through the streets of Krakow.Crafting this zapiekanka-inspired pizza requires a curated list of ingredients and a touch of love. Follow our step-by-step guide to recreate this at home. Smacznego! (That's "Bon appétit!" in Polish.) And as always, explore our other pizza recipes to spark your culinary creativity for the next pizza night!
Outdoor Pizza Oven, Pizza Steel, or Stone (if using a home oven)
1 Pizza Peel
1 wooden chopping board or peel for prep and serving
1 frying pan
Ingredients
1pizza dough ball
1ladle of pizza sauce
Low moisture mozzarella cheese
Polish gherkins
1cupMushrooms
Butter
Tomato ketchup
Fresh chives
2tbspMayonnaise
½cupGreek yoghurt
1Clove of garlic
Fresh dill
Lemon
Salt
Pepper
Instructions
Prepare Dough: Follow any of our dough recipes. You will need to prepare the dough at least 24 hours ahead of time.
Prepare Sauce: We recommend our standard pizza sauce which is versatile, simple to make and is perfect for Neapolitan style pizzas. Spice up this sauce however you like, remember the best part about making pizza is the creative process!
Prepare Cheese: Shred low moisture mozzarella cheese. Set aside.
Prepare Mushrooms: Roughly chop mushrooms. Melt a knob of butter in a frying pan over medium heat add the mushrooms. Season with a pinch of salt and pepper and fry for 2-3 minutes until tender and lightly golden. Set aside to cool
Prepare Polish Sausage (Kielbasa): Slice the kielbasa into thin, even pieces for even cooking during baking. Set aside.
Prepare Polish Gherkin (Ogórki Konserwowe): Slice the Polish gherkin into thin rounds. Set aside for topping.
Prepare Dill Sauce: Mix together mayonnaise, sour cream, freshly chopped dill, a squeeze of lemon juice, and a pinch of salt. Stir until well combined. Adjust seasoning to taste and refrigerate until ready to use.
Prepare Chives: Roughly chop the fresh chives. Set aside.
Preheat Oven:If using an outdoor pizza like an Ooni pizza oven, aim for a temperature of 450-500°C at the center of your pizza stone. Use an infrared thermometer to ensure accuracy. It should take around 25-30 minutes to reach temperature.For a home oven, using a pizza steel or stone, place the stone or steel inside the oven and preheat to the highest temperature for at least 30 minutes.
Prepare Base: On a lightly floured surface, use your fingertips to press out the air from the centre, leaving just under an inch of dough around the edge. This will help form a light, airy crust (cornicione). Shape the dough into an elongated oval, similar to a baguette.
Assemble Zapiekanka Style Pizza: Start by spreading a layer of tomato sauce evenly across the base. Next, add low-moisture mozzarella, mushrooms, and kielbasa slices.
Bake Zapiekanka Style Pizza: If you're using an outdoor pizza oven, launch the zapiekanka style pizza into the oven and bake for 60-90 seconds. Rotate every 10-15 seconds to ensure even cooking and to avoid burning.For a home oven with a pizza steel or stone, the bake time should be around 7-10 minutes.
Serving: Once baked, remove the Zapiekanka Style Pizza from the oven and place it on a serving board. Top with sliced gherkin, a drizzle of dill sauce, and fried shallots. Sprinkle with chopped chives and finish with a drizzle of ketchup. Serve immediately and enjoy!
Today’s pizza showcases the versatile jackfruit, paired with a medley of fresh vegetables and spices to create a bold and delicious pizza. Jackfruit, often celebrated for its ability to soak up flavours and mimic a meaty texture, is the star of this recipe. Cooked with …
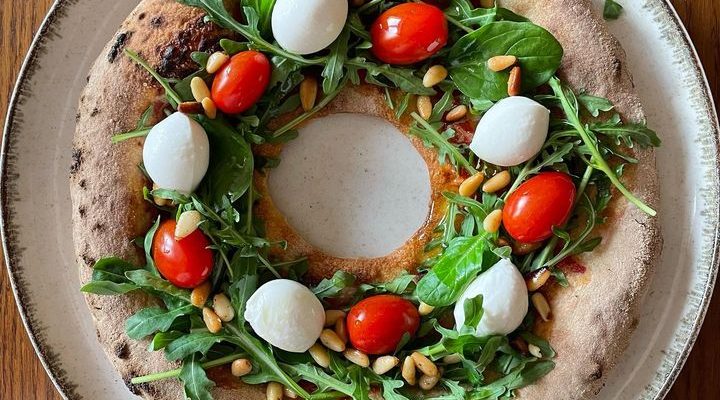
At My Husband Makes Pies, we enjoy crafting pizzas that are visually stunning and bursting with unique flavours. For this festive season, we’re sharing our Christmas Wreath Pizza—a delightful centrepiece for your holiday table. Combining fresh, vibrant ingredients with a creative shape, this pizza embodies …
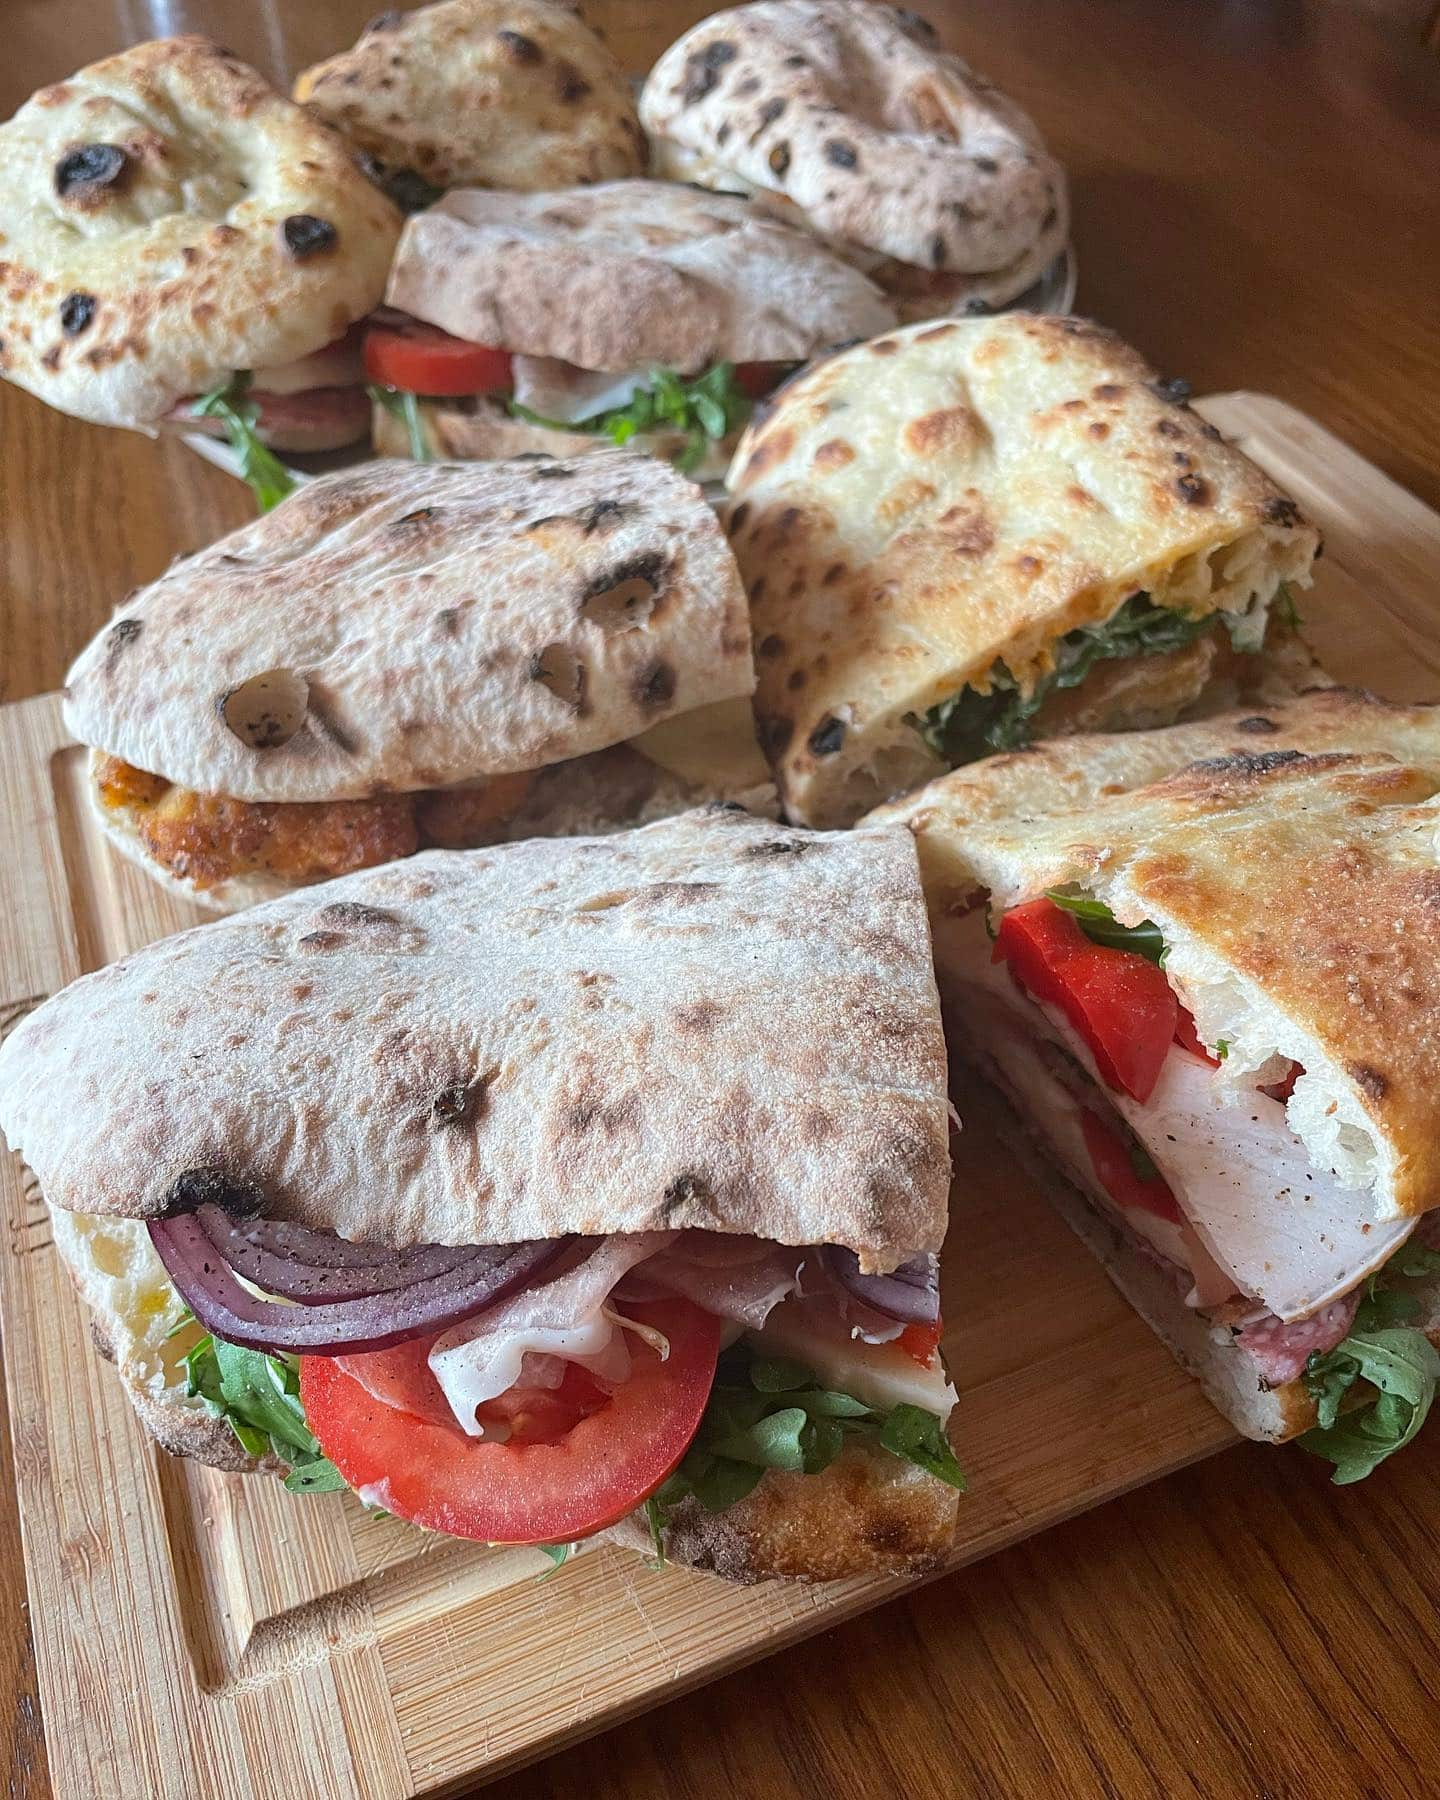
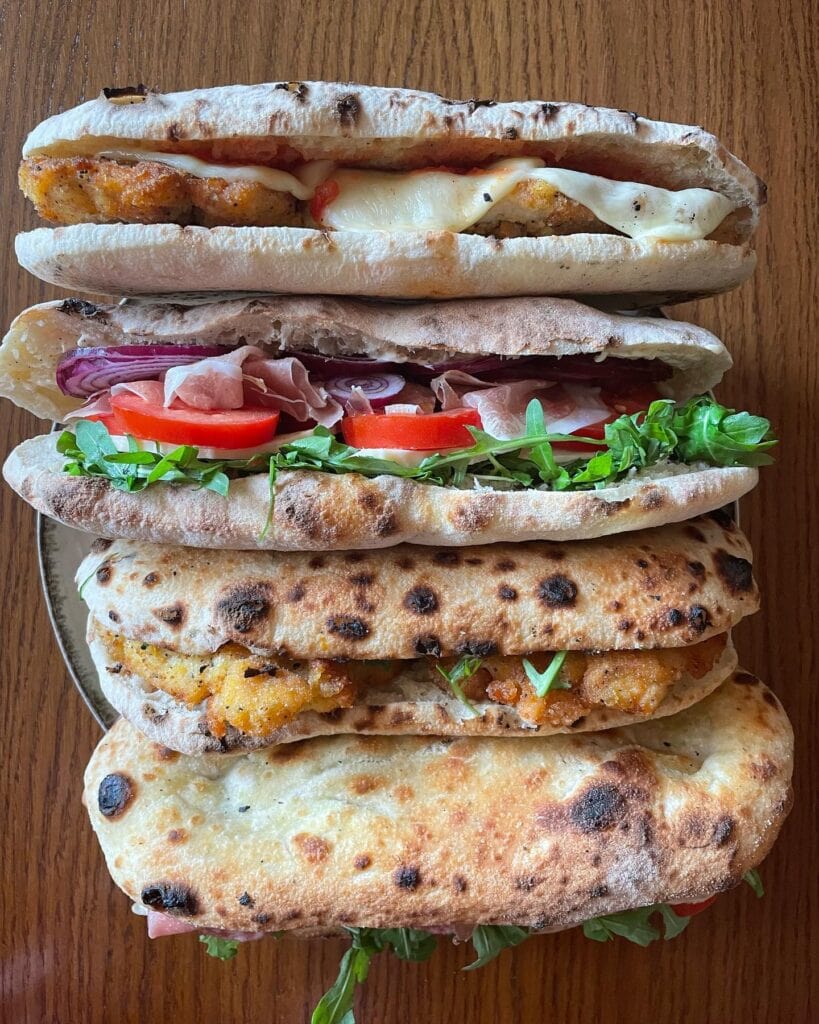
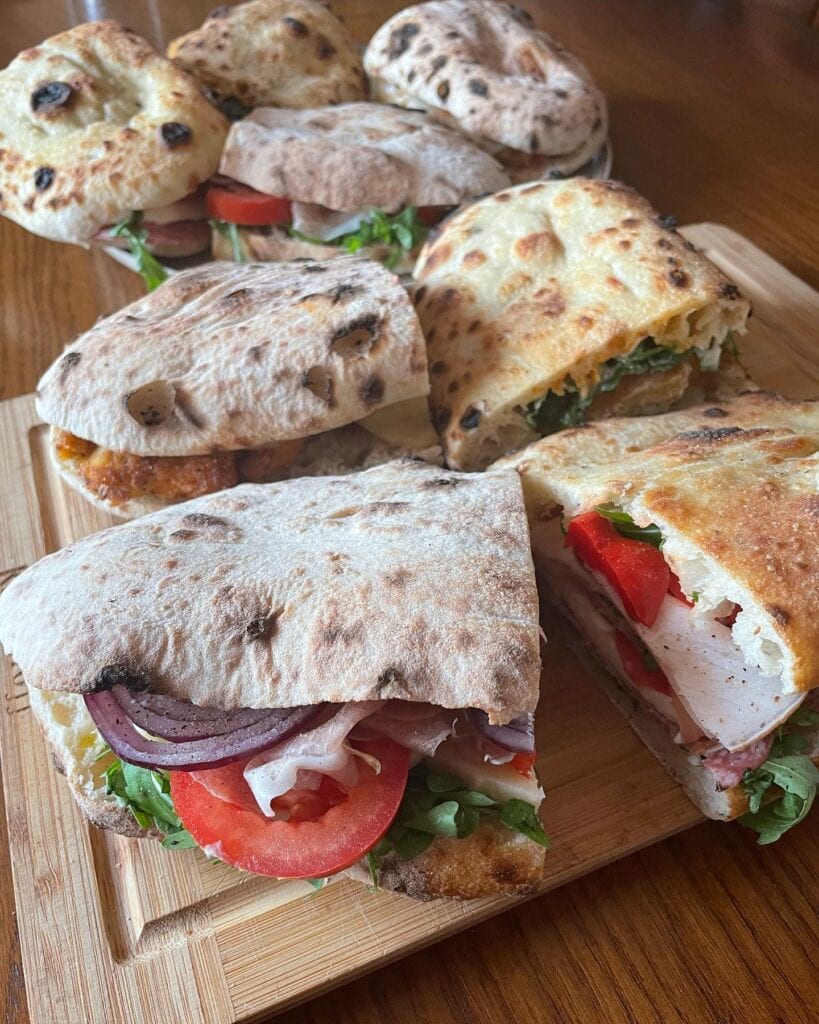
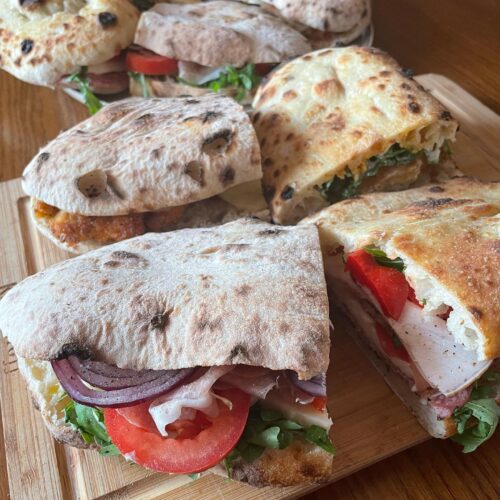
Today, we’re making Panuozzo—a popular Italian street food from Campania. This crunchy yet soft and airy wood-fired bread, with a texture reminiscent of Neapolitan pizza crust, transforms into a gourmet sandwich filled with delicious ingredients, making it the perfect handheld meal.
A Panuozzo sandwich is all about balancing textures and flavours, with a lightly toasted, slightly charred crust that’s soft, chewy, and airy on the inside. Traditionally, it’s filled with a variety of ingredients, from pancetta and mozzarella to crispy chicken schnitzels, melted provolone, fresh rocket, and ripe tomatoes.
Our Panuozzo Pizza Party celebrates classic Italian ingredients and flavours with personalised twists in the fillings. Panuozzo pairs perfectly with savoury fillings and fresh veggies. Whether you’re into classic combos like prosciutto and mozzarella or more adventurous fillings like chicken parmigiana with a touch of spicy rocket, there’s a Panuozzo option for everyone!
Panuozzo Pizza Party – Homemade Panuozzo
Whether you’re a fan of classic combinations like prosciutto and mozzarella or more adventurous pairings like chicken parmigiana with arugula, A panuozzo party has something for everyone. To make panuozzo, gather your ingredients and follow our easy step-by-step instructions. Bon appétit! And don’t forget to explore our other home pizza recipes for more inspiration
Outdoor Pizza Oven, Pizza Steel, or Stone (if using a home oven)
1 Pizza Peel
1 wooden chopping board or peel for prep and serving
Ingredients
Get Creative with Your Panuozzo Fillings! Panuozzo can be filled with a variety of hot and cold ingredients to suit your taste. Choose from options like crispy schnitzels, deli meats, fresh salads, and more. Whether you prefer classic Italian flavours or unique combinations, the possibilities are endless. Customise your Panuozzo with your favourite ingredients to make it truly your own!
Instructions
Prepare Dough: Follow any of our dough recipes. You will need to prepare the dough at least 24 hours ahead of time. Proper fermentation will result in a nice, crisp exterior with an airy, soft interior.
Prepare Ingredients of Choice: Feel free to get creative and choose any ingredients you like for your Panuozzo filling. This could include meats, cheeses, vegetables, or greens—whatever suits your vision of a gourmet sandwich!
Preheat Oven:If using an outdoor pizza like an Ooni pizza oven, aim for a temperature of 400-450°C at the center of your pizza stone. Use an infrared thermometer to ensure accuracy. It should take around 25-30 minutes to reach temperature.For a home oven, using a pizza steel or stone, place the stone or steel inside the oven and preheat to the highest temperature for at least 30 minutes.
Prepare Panuozzo Base: On a lightly floured surface, cut a dough ball in half. Take one half and stretch it by hand, gently pressing and shaping it into an American football shape, perfect for filling later. Avoid using a rolling pin to maintain the dough’s airy texture. Lightly dust a pizza peel and place the shaped dough on it. If desired, brush the dough with extra virgin olive oil for a golden, crispy crust.
Bake Your Panuozzo:Outdoor Pizza Oven: Place the dough into the oven and turn the flame to low. Keep an eye on the Panuozzo, rotating it every 20-30 seconds to ensure even cooking and to avoid burning. The Panuozzo is ready when the top and bottom are crispy with leopard spotting but not overly charred, usually in 2-3 minutes.Home Oven with Pizza Steel or Stone: Bake for 7-10 minutes or until the crust is nicely browned and crispy.
Assemble and Serve: Once baked, remove the Panuozzo from the oven and carefully slice it open to create a pocket, like a sandwich. Add your choice of fillings, close it up, and enjoy your freshly made Panuozzo!
Today, we bring together the simplicity of a classic Margherita with a touch of fresh asparagus for a delicious, seasonal twist. Chopped asparagus adds a fresh, earthy flavour to this pizza, serving as the perfect green element in place of basil. The Mutti tomato sauce …
Combining the best of sweet and savoury flavours, the Prosciutto, Rucola & Caramelised Pineapple Pizza offers a refreshing twist on classic pizza toppings. This unique combination pairs the salty richness of prosciutto with the vibrant freshness of rucola and the sweet, tangy notes of caramelised …
Today we combine the smoky richness of Polish bacon, the sharpness of Oscypek cheese, and the sweet heat of our homemade pineapple sauce for a truly unique pizza experience.
Oscypek, a traditional smoked mountain cheese from Poland, brings a firm texture and a strong, savory flavour that’s perfect for those who enjoy distinctive cheeses. Pairing it with Polish bacon, known as “boczek”, which is thicker and more flavorful than typical bacon, adds a rich, smoky depth. To elevate these rich flavours, we drizzle the pizza with a homemade pineapple sauce made from pineapple, chilli, garlic, vinegar, brown sugar, salt, and lemon. The sweetness of the pineapple, paired with a slight kick from the chilli, creates a beautiful contrast with the salty, smoky toppings.
The combination of these ingredients creates an adventurous flavour profile—sweet, smoky, and slightly spicy—all balanced on a tomato sauce base and topped with a sprinkle of fresh chives for a touch of brightness.
The combination of smoky Polish bacon, sharp Oscypek cheese, and the sweet yet spicy homemade pineapple sauce creates a flavourful pizza that is perfect for those seeking a taste of something different and fun! To make this Polish Bacon, Oscypek Cheese & Homemade Pineapple Sauce Pizzas pizza pie, you'll need a handful of simple ingredients and a little time to prep the dough and toppings. Follow our step-by-step instructions, and soon you'll be savouring a slice of this lovely pizza. Bon appétit! And don't forget to browse through our other home pizza recipes for inspiration for your next pizza-making adventure!
Outdoor Pizza Oven, Pizza Steel, or Stone (if using a home oven)
1 Pizza Peel
1 sauce ladle
Food processor
Ingredients
1pizza dough ball
1ladle of pizza sauce
Fresh mozzarella cheese
Fresh chives
smoked mountain cheese (oscypek)
Polish bacon (boczek)
Pineapple Sauce
1cup of diced pineapple
3cloves of garlic
2tbspwhite vinegar
2tbspbrown sugar
Salt
Lemon
¼ cup of water
Instructions
Prepare Dough: Follow any of our dough recipes. You will need to prepare the dough at least 24 hours ahead of time.
Prepare Tomato Sauce: We recommend our standard pizza sauce which is versatile, simple to make and is perfect for Neapolitan style pizzas. Spice up this sauce however you like, remember the best part about making pizza is the creative process!
Prepare Pineapple Sauce: In a food processor, blend pineapple, garlic, and water until smooth. Pour the mixture into a saucepan and add brown sugar, vinegar, chilli flakes, salt, and a squeeze of lemon. Bring the mixture to a boil, then reduce the heat and simmer until it reaches your desired consistency. Set aside.
Prepare Cheese: Grate the Oscypek cheese finely and tear both fresh and low-moisture mozzarella into medium-sized pieces. Place the fresh mozzarella in a container lined with a paper towel to help absorb excess moisture. Set all cheeses aside.
Prepare Polish Bacon: Slice the Polish bacon into thin, roughly square or rectangular pieces. Set aside.
Prepare Chives: Roughly chop the fresh chives. Set aside.
Preheat Oven:If using an outdoor pizza like an Ooni pizza oven, aim for a temperature of 450-500°C at the center of your pizza stone. Use an infrared thermometer to ensure accuracy. It should take around 25-30 minutes to reach temperature.For a home oven, using a pizza steel or stone, place the stone or steel inside the oven and preheat to the highest temperature for at least 30 minutes.
Prepare Base: On a lightly floured surface, stretch out the dough by hand according to the steps outlined in our dough recipe. Once you're happy with the shape of the base, lightly dust your pizza peel and transfer the dough onto the peel.
Assemble Pizza: Begin by spreading a ladle of tomato sauce evenly across the dough, starting from the center and working outward in a circular motion. Next, sprinkle a generous amount of grated Oscypek cheese over the sauce. Evenly distribute the torn pieces of fresh and low-moisture mozzarella across the base, leaving small gaps between Lay the sliced Polish bacon (boczek) on top of the cheese. Finally, drizzle the homemade pineapple sauce over the pizza.
Bake Your Pizza:If you're using an outdoor pizza oven, launch the pizza into the oven and bake for 60-90 seconds. Keep an eye on the pie and rotate every 10-15 seconds to ensure even cooking and to avoid burning.For a home oven with a pizza steel or stone, the bake time should be around 7-10 minutes.
Serving: Once the pizza is done, remove it from the oven and place it on a serving board. Sprinkle the freshly chopped chives over the top, slice, and enjoy your Polish Bacon, Oscypek Cheese & Homemade Pineapple Sauce Pizza!
Today, we’re excited to bring together the spicy heat of Nduja and the fresh, light touch of zucchini ribbons on a pizza! Nduja, a spicy, spreadable sausage from Calabria, delivers a rich, smoky flavour with just the right amount of kick for those who crave …
Today we’re excited to bring you a fiery yet refined twist with our Nduja & Chives Pizza. Nduja is a spreadable Calabrian pork sausage with a spicy, smoky flavour, perfect for those who enjoy bold and robust tastes. Its heat is beautifully tempered by the …
Today, we’re putting a spin on the traditional Margherita pizza by highlighting chives as a key ingredient.
Chives, known for their mild, onion-like flavour, can transform any dish. Their crisp, aromatic freshness perfectly complements the creamy richness of fresh mozzarella and the classic Margherita base. For this Margherita pizza variation, we’ve chosen chives to add a slight twist, deviating from the traditional basil as the green element.
The combination of good quality tomato sauce, mozzarella, Grana Padano, and chives creates a simple yet refined flavour profile, ideal for those in search of a light and flavourful pizza
Margherita with Chives Pizza
The crisp, aromatic freshness of the fresh chives blends beautifully with the creamy softness of the mozzarella blend, adding a gentle freshness to the pizza. Combined with the salty undertone of Grana Padano and a delicious and well-balanced tomato sauce from high-quality Italian tomatoes, this pizza is a simple yet delicious experience.Follow our step-by-step instructions and you'll be indulging in a slice of this delicious Margherita pizza with chives in no time. Bon appétit! And don't forget to check out some of our other pizza recipes for inspiration for your next pie day!
Outdoor Pizza Oven, Pizza Steel, or Stone (if using a home oven)
1 Pizza Peel
1 sauce ladle
1 wooden chopping board or peel for prep and serving
Ingredients
1pizza dough ball
1ladle of pizza sauce
Fresh mozzarella cheese
Low moisture mozzarella cheese
Grana padano cheese
Fresh chives
Extra virgin olive oil
Instructions
Prepare Dough: Follow any of our dough recipes. You will need to prepare the dough at least 24 hours ahead of time.
Prepare Sauce: We recommend our standard pizza sauce which is versatile, simple to make and is perfect for Neapolitan style pizzas. Spice up this sauce however you like, remember the best part about making pizza is the creative process!
Prepare Cheese: Place your fresh mozzarella in a container or bowl with a paper towel at the bottom to allow some of the water to drain. Finely grate the grana padano, tear both the fresh and low moisture mozzarella into medium-sized pieces. Set aside.
Prepare Chives: Roughly chop the fresh chives. Set aside.
Preheat Oven:If using an outdoor pizza like an Ooni pizza oven, aim for a temperature of 450-500°C at the center of your pizza stone. Use an infrared thermometer to ensure accuracy. It should take around 25-30 minutes to reach temperature.For a home oven, using a pizza steel or stone, place the stone or steel inside the oven and preheat to the highest temperature for at least 30 minutes.
Prepare Base: On a lightly floured surface, stretch out the dough by hand according to the steps outlined in our dough recipe. Once you're happy with the shape of the base, lightly dust your pizza peel and transfer the dough onto the peel.
Assemble Pizza: Assemble the pizza by spreading a ladle of sauce in a circular motion, starting from the center and working outwards. Add a generous sprinkle of grana padano cheese, distribute pieces of mozzarella cheeses evenly across the dough, ensuring the pieces are about 2 cm in diameter and at least 1.5 cm apart. Finish with a drizzle of extra virgin olive oil.
Bake Your Pizza:If you're using an outdoor pizza oven, launch the pizza into the oven and bake for 60-90 seconds. Keep an eye on the pie and rotate every 10-15 seconds to ensure even cooking and to avoid burning.For a home oven with a pizza steel or stone, the bake time should be around 7-10 minutes.
Serving: Once the pizza is done, remove it from the oven and place it on a serving board. Sprinkle chopped chives on top. Now it's time to enjoy your delicious margherita pizza with chives!
Today, once again, we’re utilising a Polish favourite, accompanied by fresh chives from the garden, to create a Polish Smoked Bacon and Chives Pizza. The star of this pizza is the boczek, a type of Polish smoked pork belly that is usually cured and smoked. …
Our culinary adventures and love for travel and exploration lead us to the rich tapestry of flavours from around the globe, and today, we’re diving into the heart of Eastern Europe with our Oscypek Cheese & Kielbasa Pizza. This pizza is a celebration of traditional …
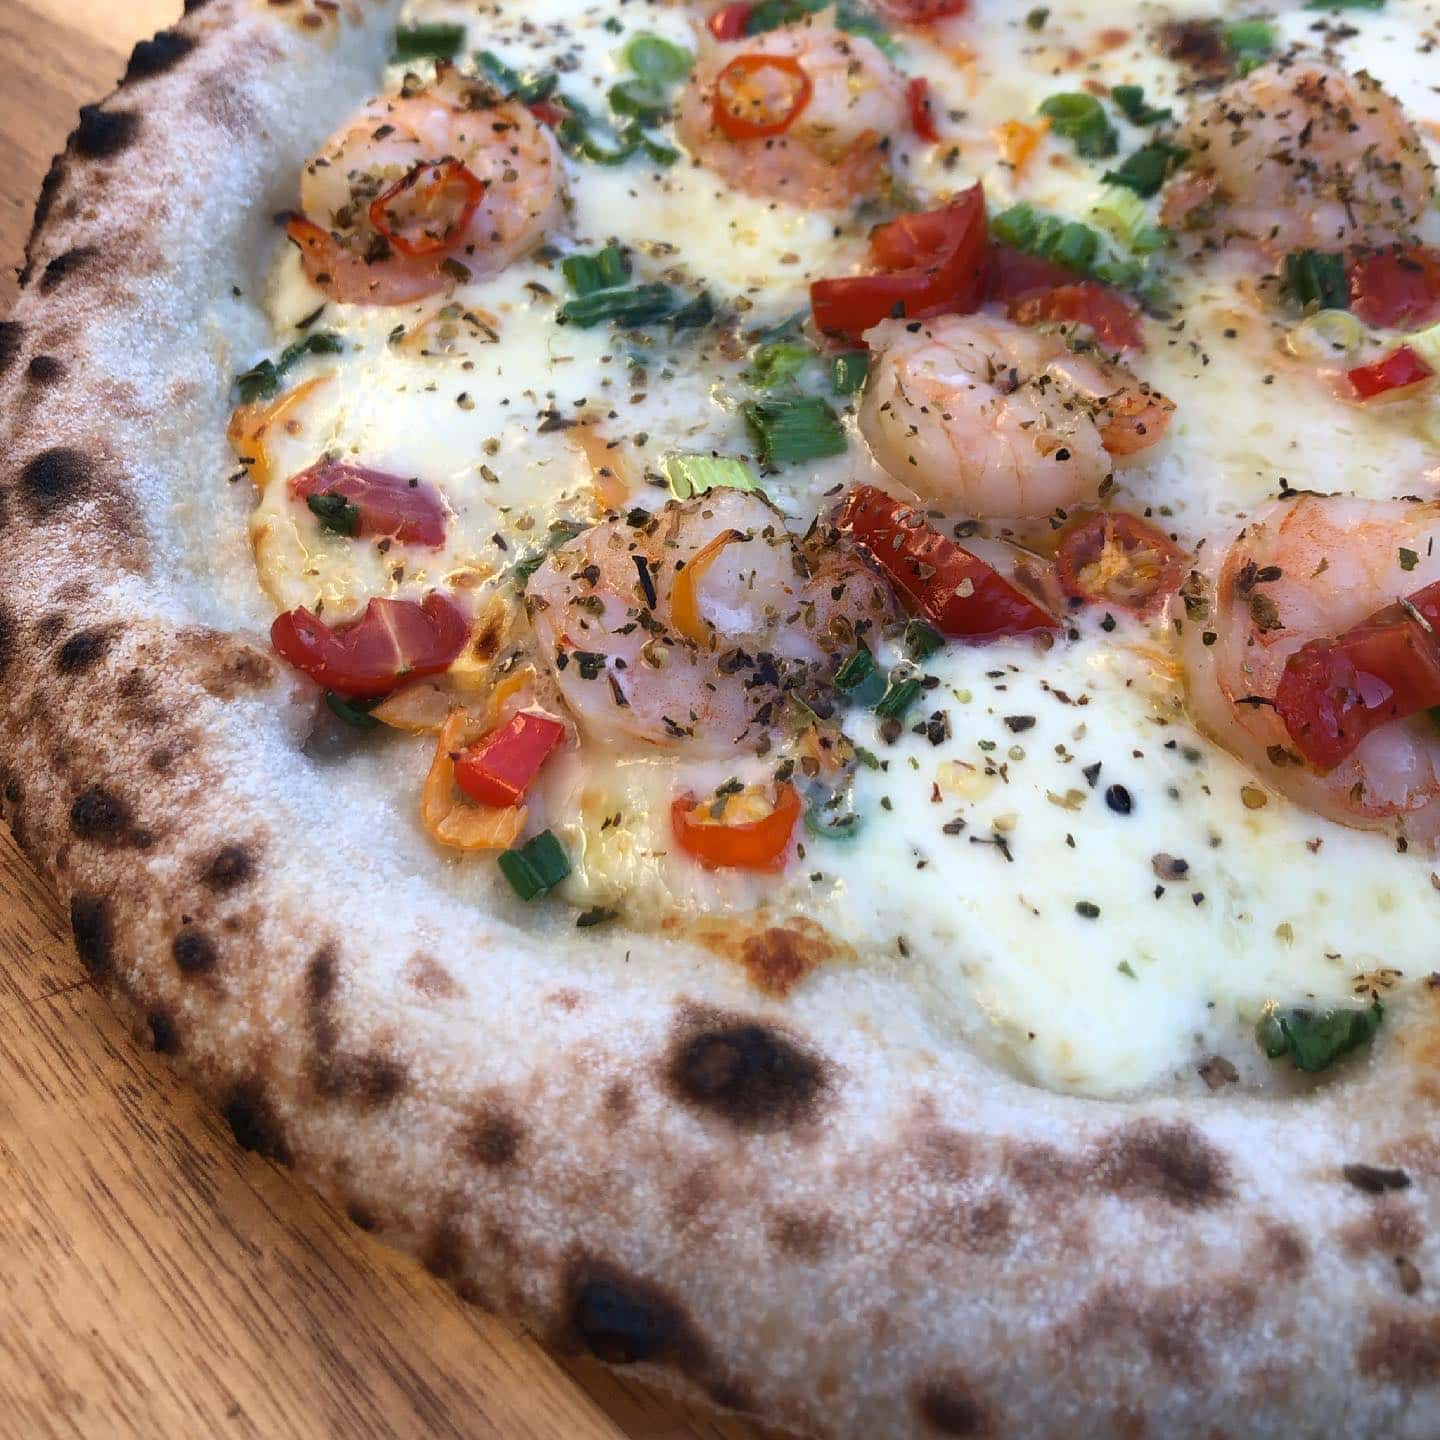
Today, we’re exploring the depths of the ocean and the vibrancy of spice gardens to create an exquisite Chilli Prawn Pizza.
Prawns, known for their juicy and succulent texture, possess a delicate sweetness that pairs beautifully with a variety of aromatic herbs and spices. When cooked in extra virgin olive oil, with a hint of lemon, salt, and pepper, their flavor intensifies, becoming richer and more nuanced. The addition of fresh chillies introduces a fiery dimension, further enhancing the flavour profile of the dish.
The heat from the chillies is beautifully balanced by the creaminess of bocconcini, low moisture mozzarella, and grana padano cheeses. Spring onions add both crunch and freshness, while a sprinkle of oregano brings a hint of Mediterranean warmth. Finished with a drizzle of extra virgin olive oil and a squeeze of lemon, this pizza encapsulates the essence of both sea and garden.
Chilli Prawn Pizza
Juicy prawns and fiery chillies are the heroes of this pie. With the smooth balance of three cheeses and a zest of lemon, the flavour profile is both invigorating and harmonious. For those seeking a spicy and marine twist to their pizza, this is the choice for you.To create this Chilli Prawn Pizza, you'll need a few simple ingredients and a little bit of time to prep the dough and toppings Follow our step-by-step instructions and you'll be indulging in a slice of this exciting and flavourful pizza in no time. Bon appétit! And don't forget to check out some of our other pizza recipes for inspiration for your next pie day!
Outdoor Pizza Oven, Pizza Steel, or Stone (if using a home oven)
1 Pizza Peel
1 frying pan
1 wooden chopping board or peel for prep and serving
Ingredients
1pizza dough ball
Fresh mozzarella cheesefor this pizza we used bocconcini
Low moisture mozzarella cheese
Grana padano cheese
8 – 10 medium size prawns
Fresh chillies
Spring onion
1lemon
Instructions
Prepare Dough: Follow any of our dough recipes. You will need to prepare the dough at least 24 hours ahead of time.
Prepare Cheese: Place your fresh mozzarella in a container or bowl with a paper towel at the bottom to allow some of the water to drain. Tear both the fresh mozzarella and low moisture mozzarella cheeses into medium-sized pieces. Finely grate grana padano. Set aside.
Prepare Prawns: Heat a frying pan over medium heat, add extra virgin olive oil, prawns, season with salt and pepper, and a squeeze of lemon juice. Cook the prawns until they turn pink and opaque. Remove tails and set aside.
Prepare Chillies: Finely slice your fresh chillies. Set aside.
Preheat Oven:If using an outdoor pizza like an Ooni pizza oven, aim for a temperature of 450-500°C at the center of your pizza stone. Use an infrared thermometer to ensure accuracy. It should take around 25-30 minutes to reach temperature.For a home oven, using a pizza steel or stone, place the stone or steel inside the oven and preheat to the highest temperature for at least 30 minutes.
Prepare Base: On a lightly floured surface, stretch out the dough by hand according to the steps outlined in our dough recipe. Once you're happy with the shape of the base, lightly dust your pizza peel and transfer the dough onto the peel.
Assemble Pizza: Distribute fresh and low moisture mozzarella pieces across the base, ensuring they’re evenly spaced. The cheese pieces should be around 2 cm in diameter and at least 1.5 cms apart. Sprinkle grana padano and chilli slices, then evenly distribute the prawns. Sprinkle with oregano. Finish with a drizzle of extra virgin olive oil and a squeeze of lemon.
Bake Your Pizza:If you're using an outdoor pizza oven, launch the pizza into the oven and bake for 60-90 seconds. Keep an eye on the pie and rotate every 10-15 seconds to ensure even cooking and to avoid burning.For a home oven with a pizza steel or stone, the bake time should be around 7-10 minutes.
Serving: Once done, remove the pizza from the oven and place it on a serving board. Now it's time to enjoy your hot, spicy chilli prawn pizza!
Today, we’re excited to present a pizza that combines the spicy kick of hot pepperoni with the fresh taste of spinach. The hot pepperoni is well-balanced with the addition of fresh spinach, adding a touch of colour and a mild, earthy flavor. This complements the …
Today, we’re (loosely) incorporating one of our favourite dishes, Italian carbonara, into our favourite type of cuisine – pizza! We’re crafting a carbonara-inspired pie, and we’re confident it’s going to be fantastic. Carbonara, a signature Roman pasta dish, is revered for its creamy texture and …
At My Husband Makes Pies, we’re constantly on the hunt for fresh and inspiring flavours to enhance our pizza lineup. Today, we’re excited to present a delightful blend of juicy mini meatballs, salami, basil, and the zesty crunch of spring onions.
Our Italian-inspired mini meatballs have a rich and savory flavour, ensuring every bite is a taste sensation. Simmered in our homemade tomato sauce, they add layers of deep, hearty richness. The aroma and taste of fresh basil infuse this dish with peppery undertones. And as a finishing touch, spring onions not only provide a hint of sharpness but also contribute to a vibrant colour contrast, enhancing the pizza’s visual appeal.
The union of mini meatballs, salami, basil, and spring onions creates a multifaceted taste profile – a dance between robustness and freshness. The meatballs and salami are beautifully balanced by the freshness of the tomato sauce and gentle herbal notes from the basil and the slight pungency from the spring onions. For those craving a flavorful and hearty pizza journey.
Mini Meatballs, Salami, Basil & Spring Onion Pizza
Enjoy the rich notes of our homemade mini meatballs, the robustness of salami, the peppery essence of basil, and the crisp zing of spring onions. To make this mini meatball and salami pizza you'll need a few simple ingredients and a little bit of time to prep the dough and toppings. Follow our step-by-step instructions and you'll be indulging in a slice of this exciting and flavourful pizza in no time. Bon appétit! And don't forget to check out some of our other pizza recipes for inspiration for your next pie day!
Outdoor Pizza Oven, Pizza Steel, or Stone (if using a home oven)
1 Pizza Peel
1 sauce ladle
1 wooden chopping board or peel for prep and serving
1 frying pan for the meatballs
Ingredients
For the Homemade Meatballs
500gbeef mince
¼cup finely chopped fresh parsley
1cup dried bread crumbs
½cupparmesan cheese
1egg
Salt and pepper to taste
2cans diced tomatoes
1brown onion
2-3garlic cloves
General Pizza Toppings
1pizza dough ball
1ladle of pizza sauce
Fresh mozzarella cheese
Salami
Fresh basil leaves
Spring onion
Instructions
For the Homemade Meatballs
Begin by finely slicing the garlic cloves and dicing the onion.
In a frying pan, heat oil over medium heat. Once hot, add the garlic and onions. Stir occasionally until the onions turn translucent, which should take about 5 minutes.
Pour the cans of diced tomato into the pan. Bring the mixture to a boil, then let it simmer for 15-20 minutes.
Meanwhile, in a separate bowl, combine the beef mince, chopped parsley, egg, breadcrumbs, salt, and pepper.
Shape the mixture into mini meatballs.
Add these meatballs to the simmering tomato sauce and allow them to cook for an additional 15-20 minutes.
Remove from heat and set aside to cool.
Pizza Toppings and Assembly
Prepare Dough: Follow any of our dough recipes. You will need to prepare the dough at least 24 hours ahead of time.
Prepare Sauce: We recommend our standard pizza sauce which is versatile, simple to make and is perfect for Neapolitan style pizzas. Spice up this sauce however you like, remember the best part about making pizza is the creative process!
Prepare Cheese: Place your fresh mozzarella in a container or bowl with a paper towel at the bottom to allow some of the water to drain. Tear the fresh mozzarella into medium-sized pieces. Set aside.
Prepare Spring Onion: Slice your spring onion, set aside ready for assembly.
Preheat Oven:If using an outdoor pizza like an Ooni pizza oven, aim for a temperature of 450-500°C at the center of your pizza stone. Use an infrared thermometer to ensure accuracy. It should take around 25-30 minutes to reach temperature.For a home oven, using a pizza steel or stone, place the stone or steel inside the oven and preheat to the highest temperature for at least 30 minutes.
Prepare Base: On a lightly floured surface, stretch out the dough by hand according to the steps outlined in our dough recipe. Once you're happy with the shape of the base, lightly dust your pizza peel and transfer the dough onto the peel.
Assemble Pizza: Begin assembling the pizza by spreading a ladle of sauce in a circular motion, starting from the center and moving outwards. Place pieces of mozzarella evenly across the dough. These should be around 2 cm in diameter and spaced approximately 1.5 cms apart. Finally, distribute the salami and mini meatballs evenly.
Bake Your Pizza:If you're using an outdoor pizza oven, launch the pizza into the oven and bake for 60-90 seconds. Keep an eye on the pie and rotate every 10-15 seconds to ensure even cooking and to avoid burning.For a home oven with a pizza steel or stone, the bake time should be around 7-10 minutes.
Serving: Once the pizza is done, remove from the oven and place on a serving board. Garnish with fresh basil leaves and sliced spring onion. Now, it's time to enjoy your Mini Meatballs, Salami, Basil & Spring Onion Pizza homemade pizza!
Today’s pizza is a fusion of spicy hot salami, spinach, and brown onion. Fresh spinach offers a lovely contrast to the spicy, savoury notes of the fiery salami. The brown onion contributes a hint of subtle sweetness and a crisp texture, perfectly balancing the rich …
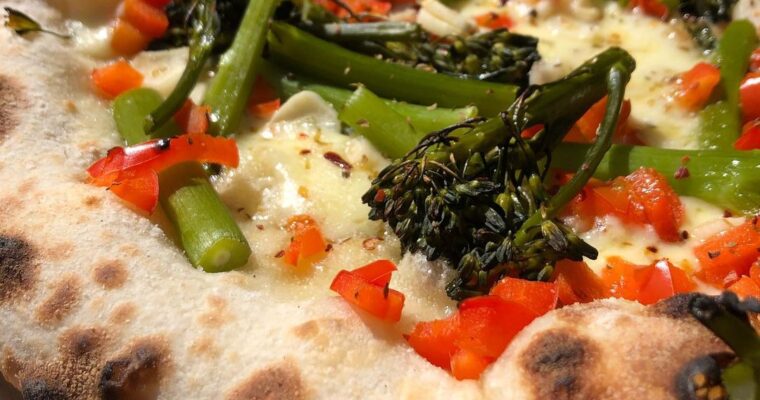
Today’s pie is a delightful fusion of broccolini, red capsicum, and aromatic garlic. Broccolini, often referred to as baby broccoli, has a sweet, earthy flavour with a hint of peppery undertones. Unlike its relative, broccoli, broccolini boasts tender stems that make for a much more …
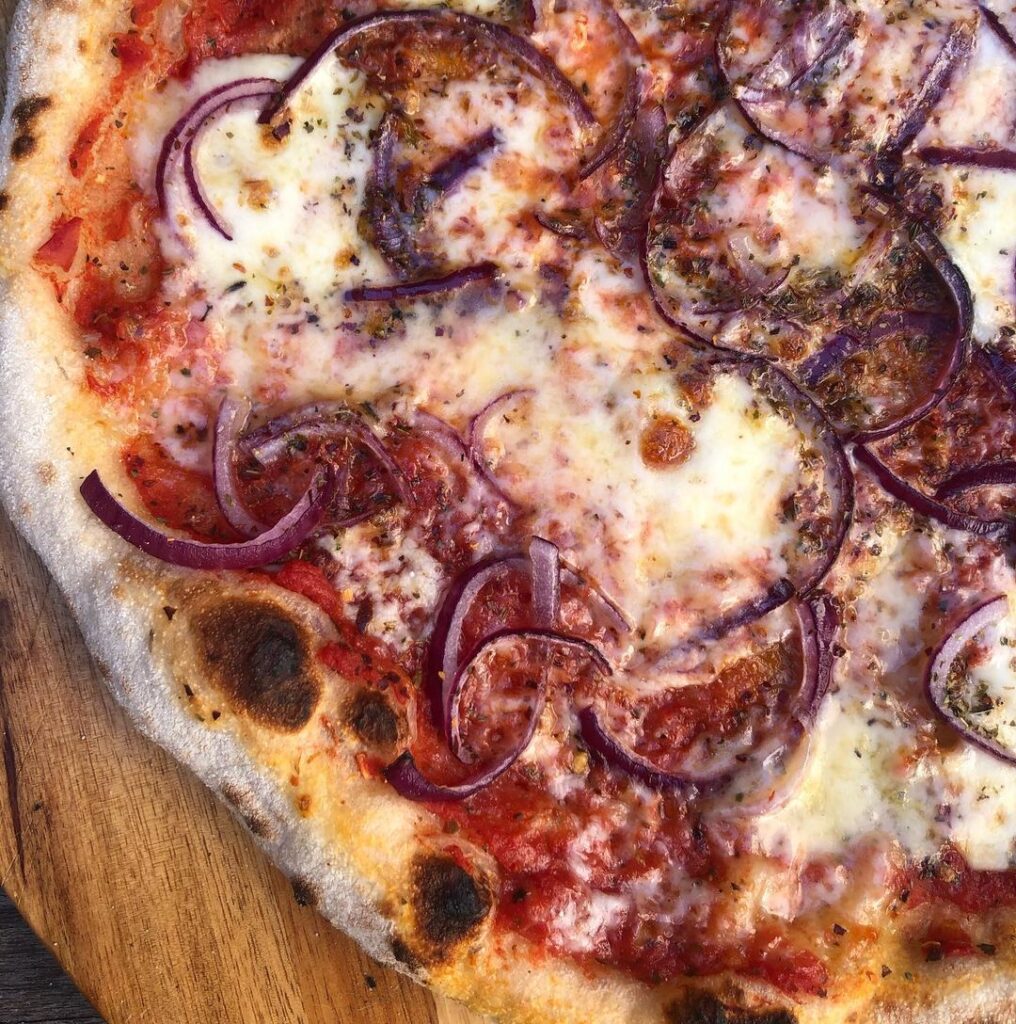
Today, our spotlight is on the aromatic red onion and the subtly sweet, yet rich, Gouda cheese—a simple but delicious combination!
Red onions, recognized for their vibrant hue and slightly sweet flavour, provide a hint of tang and a delightful crunch. Gouda, a renowned Dutch cheese, boasts a creamy, mild taste that’s slightly sweet and nutty. Gouda melts wonderfully, enveloping the other toppings in its rich, velvety goodness.
The mild sweetness of the red onion is perfectly complemented by the creamy richness of Gouda. Oregano and chili flakes introduce a hint of Mediterranean warmth and a touch of heat, enhancing the overall depth of this pizza, making it look and taste fantastic!
Red Onion and Gouda Pizza
The crunch of red onion combined with the creamy melt of Gouda creates a beautifully balanced and delectable flavour palette. With subtle hints of oregano and a kick from the chili flakes, this pizza offers an enchanting taste journey from the first bite to the last. To make this red onion and gouda pizza you'll need a few simple ingredients and a little bit of time to prep the dough and toppings. Follow our step-by-step instructions and you'll be indulging in a slice of this exciting and flavourful pizza in no time. Bon appétit! And don't forget to check out some of our other home pizza recipes for inspiration for your next pie day!
Outdoor Pizza Oven, Pizza Steel, or Stone (if using a home oven)
1 Pizza Peel
1 sauce ladle
1 wooden chopping board or peel for prep and serving
Ingredients
1pizza dough ball
1ladle of pizza sauce
Low moisture mozzarella cheese
Pecorino cheese
Dried oregano
Chilli Flakes
Extra virgin olive oil
Instructions
Prepare Dough: Follow any of our dough recipes. You will need to prepare the dough at least 24 hours ahead of time.
Prepare Sauce: We recommend our standard pizza sauce which is versatile, simple to make and is perfect for Neapolitan style pizzas. Spice up this sauce however you like, remember the best part about making pizza is the creative process!
Prepare Cheese: Tear both the low moisture mozzarella and Gouda into medium-sized pieces. Set aside.
Prepare Red Onion: Slice the red onion into thin to medium slices and set aside.
Preheat Oven:If using an outdoor pizza like an Ooni pizza oven, aim for a temperature of 450-500°C at the center of your pizza stone. Use an infrared thermometer to ensure accuracy. It should take around 25-30 minutes to reach temperature.For a home oven, using a pizza steel or stone, place the stone or steel inside the oven and preheat to the highest temperature for at least 30 minutes.
Prepare Base: On a lightly floured surface, stretch out the dough by hand according to the steps outlined in our dough recipe. Once you're happy with the shape of the base, lightly dust your pizza peel and transfer the dough onto the peel.
Assemble Pizza: Assemble the pizza by spreading a ladle of sauce in a circular motion, starting from the center and working outwards. Add a generous sprinkle of Pecorino cheese, distribute pieces of mozzarella and Gouda evenly across the dough, ensuring the pieces are about 2 cm in diameter and at least 1.5 cm apart. Finally, top with sliced onions, a sprinkle of dried oregano, chili flakes, and a drizzle of extra virgin olive oil.
Bake Your Pizza:If you're using an outdoor pizza oven, launch the pizza into the oven and bake for 60-90 seconds. Keep an eye on the pie and rotate every 10-15 seconds to ensure even cooking and to avoid burning.For a home oven with a pizza steel or stone, the bake time should be around 7-10 minutes.
Serving: Once done, transfer the pizza to a serving board. Now, enjoy your scrumptious homemade red onion and Gouda pizza!
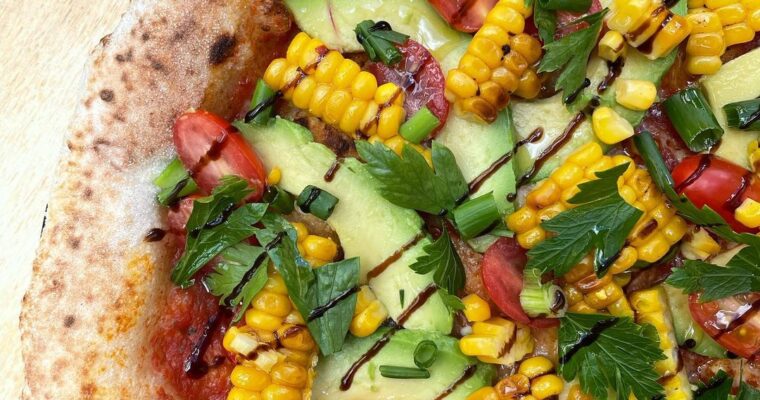
Today we pay tribute to the culinary maestros we admire. This salad pizza beauty was inspired by @lupacotta and was dedicated to all the super talented women in pizza for #womenspizzamonth. Charred corn, with its smoky notes, acts as a bridge between the creaminess of …
Today, our spotlight is on the age-old union of meatballs with aromatic basil leaves. Our Italian-inspired mini meatballs are robust, savory, and hearty. Paired with the gentle aroma of fresh basil, there emerges a harmonious marriage of flavours that tantalises the palate. Basil carries a …
Today, we’ve set our sights on an exciting fusion. We’ve got breakfast and lunch covered with a brunch pizza topped with poached eggs, Polish bacon, and a velvety hollandaise sauce.
Poached eggs, when done right, have a delicate texture and a rich, buttery flavour. The gooey, runny yolk serves as a sauce in its own right. Polish bacon, or “boczek”, adds lovely smoky and savoury elements to this topping combo. Hollandaise sauce, a velvety mix of egg yolk, butter, and lemon, adds richness and tang, complementing the primary toppings. The spring onions, dried oregano and basil, create a fresh, aromatic blend that ties everything together beautifully.
The combination of poached eggs, Polish bacon, and homemade hollandaise, complemented by fresh tomato sauce from Italian tomatoes from Campania, herbs, and mozzarella, results in a pizza that’s both delicious and innovative. It’s an ideal choice for those eager to experience something hearty, fresh, and exciting!
Brunch Pizza with Poached Eggs & Hollandaise Sauce
The buttery poached eggs beautifully complement the smoky boczek and the rich, tangy hollandaise sauce. When paired with the aromatic freshness of spring onions, oregano, and basil, this pizza promises an indulgent and satisfying experience that you can enjoy for bnreakfast, lunch, or dinner.To make this delicious brunch pizza you'll need a few simple ingredients and a little bit of time to prep the dough and toppings. Follow our step-by-step instructions and you'll be indulging in a slice of this exciting and flavourful pizza in no time. Bon appétit! And don't forget to check out some of our other pizza recipes for inspiration for your next pie day!
Outdoor Pizza Oven, Pizza Steel, or Stone (if using a home oven)
1 Pizza Peel
1 sauce ladle
1 wooden chopping board or peel for prep and serving
Ingredients
1pizza dough ball
1ladle of pizza sauce
Low moisture mozzarella cheese
Polish bacon (Boczek)
2poached eggs
Hollandaise sauce
Spring onion
Fresh basil leaves
Dried oregano
Chilli flakes
Instructions
Prepare Dough: Follow any of our dough recipes. You will need to prepare the dough at least 24 hours ahead of time.
Prepare Sauce: We recommend our standard pizza sauce which is versatile, simple to make and is perfect for Neapolitan style pizzas. Spice up this sauce however you like, remember the best part about making pizza is the creative process!
Prepare Cheese: Tear low moisture mozzarella into medium-sized pieces. Set aside
Prepare Spinach & Spring Onion: Finely chop your spring onion and a handful of fresh spinach leaves. Set aside.
Prepare Polish Bacon: Slice the Polish bacon into thin, roughly square or rectangular pieces. Set aside.
Prepare Hollandaise Sauce: We used a variation closely based on this hollandaise sauce recipe.
Preheat Oven:If using an outdoor pizza like an Ooni pizza oven, aim for a temperature of 450-500°C at the center of your pizza stone. Use an infrared thermometer to ensure accuracy. It should take around 25-30 minutes to reach temperature.For a home oven, using a pizza steel or stone, place the stone or steel inside the oven and preheat to the highest temperature for at least 30 minutes.
Poach Eggs: While there are several methods for poaching eggs, the technique shown in this video is both straightforward and easy to follow. Proceed with the steps outlined to poach the eggs. Once done, Set aside.
Prepare Base: On a lightly floured surface, stretch out the dough by hand according to the steps outlined in our dough recipe. Once you're happy with the shape of the base, lightly dust your pizza peel and transfer the dough onto the peel.
Assemble Pizza: To assemble the pizza, start by spreading a ladle of sauce in a circular motion, starting from the center of the dough and working your way outwards. Next, evenly distribute pieces of mozzarella cheese across the dough. The cheese pieces should be around 2 cm in diameter and at least 1.5 cms apart. Finally, top with the Polish bacon slices.
Bake Your Pizza:If you're using an outdoor pizza oven, launch the pizza into the oven and bake for 60-90 seconds. Keep an eye on the pie and rotate every 10-15 seconds to ensure even cooking and to avoid burning.For a home oven with a pizza steel or stone, the bake time should be around 7-10 minutes.
Serving: Once the pizza is done, remove it from the oven and place it on a serving board. Add the poached eggs, followed by a generous drizzle of hollandaise sauce. Scatter some spring onions and chopped basil, then sprinkle with dried oregano and chili flakes. Now, it's time to sit down and enjoy your homemade brunch pizza!
At My Husband Makes Pies, our passion lies in crafting pizzas that surprise and delight. Today’s homemade pizza creation was inspired by the delicious, light, and refreshing caprese salad. The classic Caprese salad, named after the island Capri, is known for its delicate balance of …
At My Husband Makes Pies, we love to experiment with different toppings and flavour combinations. Today’s creation carries a Mediterranean feel, showcasing a fresh and unique fusion of mackerel, tomatoes, and garlic. Mackerel offers a rich flavour that combines salty, slightly sweet, and buttery notes. …
At My Husband Makes Pies, we really enjoy integrating classic toppings with unique flavours. Today, we’re giving a twist to the traditional margherita pizza by featuring blue cheese as the star ingredient.
Blue cheese, renowned for its sharp aroma, can elevate any dish. Its rich and creamy texture fuses beautifully with the smooth creaminess of fresh mozzarella. For this margherita pizza variant, we’ve opted for spinach as the green component, replacing the customary basil. Spinach imparts a subtle, neutral freshness, balancing out the robust flavours of blue cheese. fa
The harmonious blend of blue cheese, mozzarella, and spinach, complemented by the mild saltiness of pecorino and the aroma of oregano, results in a complex yet balanced flavour profile, ideal for those seeking a rich and satisfying meal.
Blue Cheese Margherita Pizza
The bold and distinct flavour of the blue cheese blends beautifully with the creamy softness of the mozzarella, while the spinach adds a gentle freshness to the pizza. Combined with a salty undertone of pecorino and an aromatic touch of oregano, this pizza will take you on a rich and well-rounded flavour journey. Follow our step-by-step instructions and you'll be indulging in a slice of this delicious blue cheese margherita pizza in no time. Bon appétit! And don't forget to check out some of our other pizza recipes for inspiration for your next pie day!
Outdoor Pizza Oven, Pizza Steel, or Stone (if using a home oven)
1 Pizza Peel
1 sauce ladle
1 wooden chopping board or peel for prep and serving
Ingredients
1pizza dough ball
1ladle of pizza sauce
Fresh mozzarella cheese
Blue cheese
Pecorino cheese
Dried oregano
Fresh spinach leaves
Extra virgin olive oil
Instructions
Prepare Dough: Follow any of our dough recipes. You will need to prepare the dough at least 24 hours ahead of time.
Prepare Sauce: We recommend our standard pizza sauce which is versatile, simple to make and is perfect for Neapolitan style pizzas. Spice up this sauce however you like, remember the best part about making pizza is the creative process!
Prepare Cheese: Place your fresh mozzarella in a container or bowl with a paper towel at the bottom to allow some of the water to drain. Tear both the fresh mozzarella and blue cheese into medium-sized pieces. Finely grate the pecorino cheese. Set aside.
Prepare Spinach: Finely chop a handful of fresh spinach leaves and set aside.
Preheat Oven:If using an outdoor pizza like an Ooni pizza oven, aim for a temperature of 450-500°C at the center of your pizza stone. Use an infrared thermometer to ensure accuracy. It should take around 25-30 minutes to reach temperature.For a home oven, using a pizza steel or stone, place the stone or steel inside the oven and preheat to the highest temperature for at least 30 minutes.
Prepare Base: On a lightly floured surface, stretch out the dough by hand according to the steps outlined in our dough recipe. Once you're happy with the shape of the base, lightly dust your pizza peel and transfer the dough onto the peel.
Assemble Pizza: To assemble the pizza, start by spreading a ladle of sauce in a circular motion, starting from the center of the dough and working your way outwards. Next, evenly distribute chunks of mozzarella and blue cheese over the dough, and generously sprinkle a handful or two of pecorino cheese. Follow up with an even distribution of spinach leaves. Finish with a sprinkle of oregano and a drizzle of extra virgin olive oil.
Bake Your Pizza:If you're using an outdoor pizza oven, launch the pizza into the oven and bake for 60-90 seconds. Keep an eye on the pie and rotate every 10-15 seconds to ensure even cooking and to avoid burning.For a home oven with a pizza steel or stone, the bake time should be around 7-10 minutes.
Serving: Once the pizza is ready, take your blue cheese margherita pizza out of the oven and transfer it to a serving board and enjoy!
At My Husband Makes Pies, sometimes we appreciate the beauty in simplicity. Today, we’re showcasing the natural harmony of cherry tomatoes, aromatic basil, with a subtle peppery kick of watercress. Cherry tomatoes, full of sweet and tangy flavour, blend well with the fresh taste of …
At My Husband Makes Pies, we’re constantly pushing the boundaries of traditional pizza toppings. Today, we’re venturing into a unique blend: spiced kohlrabi, fresh mozzarella, and a touch of balsamic glaze Kohlrabi, also known as the German turnip or turnip cabbage, is a crisp and …
At My Husband Makes Pies, we constantly strive to play with unconventional toppings for our pizza creations. This week, it’s all about the fusion of spicy pickled peppers, salami, and our classic duo of fresh and low-moisture mozzarella.
Pickled peppers, especially jalapeños, have been a staple in many pantries and cuisines around the world. They bring a tangy heat, which is further intensified when paired with the saltiness of salami. Our choice of pickled jalapeños is homemade, though store-bought varieties are absolutely perfect too. This combination elevates the tomato base with its vibrant acidity, while oregano adds that touch of herbaceous freshness. The drizzle of extra virgin olive oil (EVOO) gives this pizza a smooth finish, rounding off the flavours.
Together, the spicy pickled peppers, salami, and double mozzarella create a robust and enticing flavour profile. This pickled pepper pizza is perfect for those who love a bit of spice, and while it stays mostly traditional, it offers a unique kick.
Pickled Pepper Homemade Pizza
The pickled peppers bring a tangy spiciness, beautifully complementing sweet and savoury flavours of the salami. Combined with the melty goodness of dual mozzarellas, this pizza bursts with an exciting mix of flavours and textures. To create this pickled pepper and salami pizza, all you need are a handful of ingredients and a bit of time to prep the base and toppings. Dive into our easy-to-follow guide, and you'll be savoring a slice of this spicy and tangy delicacy in no time. Bon appétit! And as always, browse through our collection of homemade pizza recipes for more innovative pie ideas!
Outdoor Pizza Oven, Pizza Steel, or Stone (if using a home oven)
1 Pizza Peel
1 sauce ladel
1 wooden chopping board or peel for prep and serving
Ingredients
1pizza dough ball
1ladle of pizza sauce
Fresh mozzarella cheese
Low moisture mozzarella cheese
Salami (hot if you're after a really fiery slice)
Pickled jalapenos
Dried oregano
Extra virgin olive oil
Instructions
Prepare Dough: Follow any of our dough recipes. You will need to prepare the dough at least 24 hours ahead of time.
Prepare Sauce: We recommend our standard pizza sauce which is versatile, simple to make and is perfect for Neapolitan style pizzas. Spice up this sauce however you like, remember the best part about making pizza is the creative process!
Prepare Cheese: Place your fresh mozzarella in a container or bowl with a paper towel at the bottom to allow some of the water to drain. Tear both the fresh mozzarella and low moisture mozzarella into medium-sized pieces. Set aside.
Prepare Pickled Peppers: Now, onto the pickled peppers! We used homemade ones, but store-bought peppers work just as well. Remove them from the jar, simply cut off the tops (we prefer the look of whole peppers), and set them aside to drain on a paper towel.
Prepare Base: On a lightly floured surface, stretch out the dough by hand according to the steps outlined in our dough recipe. Once you're happy with the shape of the base, lightly dust your pizza peel and transfer the dough onto the peel.
Assemble Pizza: To assemble the pizza, start by spreading a ladle of sauce in a circular motion, starting from the center of the dough and working your way outwards. Next, evenly distribute pieces of mozzarella cheeses across the dough. Layer on the salami slices, followed by the pickled jalapenos. Finish with a sprinkle of oregano and a drizzle of EVOO.
Bake Your Pizza:If you're using an outdoor pizza oven, launch the pizza into the oven and bake for 60-90 seconds. Keep an eye on the pie and rotate every 10-15 seconds to ensure even cooking and to avoid burning.For a home oven with a pizza steel or stone, the bake time should be around 7-10 minutes.
Serving: Once the pizza is ready, take it out of the oven and transfer it to a serving board. Give it a light sprinkle of oregano, and it's ready to enjoy!
At My Husband Makes Pies, we relish in challenging traditional pizza toppings and combinations. Today, we venture into a unique blend of toppings with pomegranate and goat’s cheese as the stars of the dish. Pomegranates, an ancient fruit treasured in many cultures, provide a burst …
At My Husband Makes Pies, we’re passionate about breaking the boundaries of traditional pizza toppings. Today, we’re thrilled to introduce the beautiful combination of burrata cheese, zucchini flowers, and sliced garlic. Zucchini flowers, often overlooked, have a subtle and slightly sweet flavour. They offer a …
The Polish Beetroot Relish on this pie, a classic Polish condiment known as buraczki or cwikła (usually incorporates horseradish), brings a distinctive sweet and tangy flavour to our pizza, acting as a lovely contrast to the other components. Its natural earthiness and acidity makes it a truly interesting pizza topping that dances on the palate.
We also have Oscypek, a smoked cheese from the Polish mountains which we absolutely adore. With its robust flavour and firm texture, Oscypek incorporates hearty, savory, and smokey elements that beautifully complement the sweetness and acidity of the beetroot relish. Oscypek cheese, with its country charm, infuses each slice with a unique, smokey depth of flavour.
We’ve incorporated low-moisture mozzarella cheese, which lends a smooth and creamy texture to the pizza, along with a garnish of fresh chives. The chives introduce a subtle hint of onion and garlic flavour, while adding a pop of vibrant color. Together, these ingredients create a pizza that is different and deliciously satisfying, perfect for those who crave something new and exciting!
Beetroot Relish & Oscypek Pizza
The sweet and tangy Beetroot Relish combined with the robustly flavoured Oscypek creates a daringly different and deliciously satisfying flavour profile that is perfect for those looking for a unique pizza experience. To make this Beetroot Relish and Oscypek pizza pie you'll need a few simple ingredients and a bit of time to prepare the dough and toppings. Follow our step-by-step instructions and you'll be delighting in a slice of this innovative pizza in no time. Bon appétit! And remember to explore our other homemade pizza recipes for inspiration for your next pizza adventure!
Outdoor Pizza Oven, Pizza Steel, or Stone (if using a home oven)
1 Pizza Peel
1 wooden chopping board or peel for prep and serving
Ingredients
1pizza dough ball
low-moisture mozzarella cheese
Beetroot relish – we prefer homemade, but of course, use a storebought version if you prefer. Just make sure its not too chunky and is easy to spread over the base
Oscypek (Polish smoked cheese)
Fresh chives
Instructions
Prepare Dough: Follow any of our dough recipes. You will need to prepare the dough at least 24 hours ahead of time.
Prepare Beetroot Relish: If making your own, this recipe is easy to follow and yielded great results for us.
Prepare Cheese: Tear the low moisture mozzarella into medium-sized pieces. Cut the oscypek into similar-sized pieces. Set aside for assembly.
Prepare Chives: Roughly chop the fresh chives. Set aside.
Preheat Oven:If using an outdoor pizza like an Ooni pizza oven, aim for a temperature of 450-500°C at the center of your pizza stone. Use an infrared thermometer to ensure accuracy. It should take around 25-30 minutes to reach temperature.For a home oven, using a pizza steel or stone, place the stone or steel inside the oven and preheat to the highest temperature for at least 30 minutes.
Prepare Base: On a lightly floured surface, stretch out the dough by hand according to the steps outlined in our dough recipe. Once you're happy with the shape of the base, lightly dust your pizza peel and transfer the dough onto the peel.
Assemble Pizza: To assemble the pizza, begin by spreading the beetroot relish over the dough. Next, evenly distribute pieces of mozzarella and oscypek cheeses across the dough. Each cheese piece should be around 2 cm in diameter and spaced at least 1.5 cm apart.
Bake Your Pizza:If you're using an outdoor pizza oven, launch the pizza into the oven and bake for 60-90 seconds. Keep an eye on the pie and rotate every 10-15 seconds to ensure even cooking and to avoid burning.For a home oven with a pizza steel or stone, the bake time should be around 7-10 minutes.
Serving: Once the pizza is ready, carefully remove it from the oven with a pizza peel. Place the pizza on a serving board and sprinkle the freshly chopped chives on top. Now, it's time to enjoy your homemade Beetroot Relish & Oscypek Pizza!
At My Husband Makes Pies, we love to challenge the conventional when it comes to pizza toppings. Today, we’re delighted to introduce an intriguing combo: Plum jam and Polish bacon (boczek). Plum jam, a homemade favourite in our household, brings a deliciously sweet and tart …
At My Husband Makes Pies, we love pushing the boundaries of traditional pizza toppings. Today, we’re thrilled to bring you an unlikely yet incredibly delicious pairing: Oscypek, preserved cherries, and Polish bacon (boczek). Oscypek, a smoked country cheese from the Tatra Mountains in Poland, is …
Today, we’re thrilled to combine cherry tomatoes, creamy gouda cheese, and low moisture mozzarella for a simple, yet delicious pizza.
For this pizza, we used Mutti Pomodoro Cherry Tomatoes, a premium quality tomato brand from Italy, known for its robust and rich tomato flavor. These cherry tomatoes add a burst of sweetness and acidity to the pizza. Gouda, on the other hand, is a rich and creamy cheese originating from the Netherlands. Its nutty and slightly sweet profile forms a delightful contrast with the bright and juicy cherry tomatoes. The pairing of gouda with low moisture mozzarella brings about a firm texture that perfectly accommodates the cherry tomatoes and its juices.
All in all, these ingredients come together to craft a pizza that is simple, yet bold and utterly delicious!
Pizza with Gouda Cheese & Cherry Tomatoes
The refreshing tang of cherry tomatoes paired with the rich, nutty flavor of Gouda cheese creates a bold and captivating flavour profile. Combined with the classic mozzarella, this pizza offers a refreshing and indulgent experience. To assemble this cherry tomato and Gouda cheese pizza, you'll need only a few key ingredients and a little bit of time to prep the dough and toppings. By following our instructions, you'll be enjoying a slice of this simple, yet flavorful pizza before you know it. Bon appétit! And don't forget to explore some of our other home pizza recipes for inspiration for your next pizza day!
Outdoor Pizza Oven, Pizza Steel, or Stone (if using a home oven)
1 Pizza Peel
1 sauce ladle
1 wooden chopping board or peel for prep and serving
Ingredients
1pizza dough ball
1can cherry tomatoes we used Mutti Cherry Tomatoes
Low moisture mozzarella cheese
Gouda cheese
Extra virgin olive oil
Instructions
Prepare Dough: Follow any of our dough recipes. You will need to prepare the dough at least 24 hours ahead of time.
Prepare Cheese: Tear the mozzarella into medium-sized pieces, and shred the Gouda. Once completed, set aside.
Prepare Cherry Tomatoes: For the canned cherry tomatoes, empty them into a bowl and proceed to crush some of them to form a sauce. Ensure that you leave a few tomatoes whole to create texture and visual appeal. Add ½ teaspoon of salt and mix thoroughly
Preheat Oven:If using an outdoor pizza like an Ooni pizza oven, aim for a temperature of 450-500°C at the center of your pizza stone. Use an infrared thermometer to ensure accuracy. It should take around 25-30 minutes to reach temperature.For a home oven, using a pizza steel or stone, place the stone or steel inside the oven and preheat to the highest temperature for at least 30 minutes.
Prepare Base: On a lightly floured surface, stretch out the dough by hand according to the steps outlined in our dough recipe. Once you're happy with the shape of the base, lightly dust your pizza peel and transfer the dough onto the peel.
Assemble Pizza: To assemble the pizza, begin by spreading a ladle of sauce in a circular motion, starting from the center of the dough. Next, distribute the low moisture mozzarella and gouda generously over the sauce, but be careful not to go too overboard! Scatter 6 – 8 whole cherry tomatoes across the base and follow up with a drizzle of extra virgin olive oil.
Bake Your Pizza: If you're using an outdoor pizza oven, launch the pizza into the oven and bake for 60-90 seconds. Keep an eye on the pie and rotate every 10-15 seconds to ensure even cooking and to avoid burning.For a home oven with a pizza steel or stone, the bake time should be around 7-10 minutes.
Serving: Once done, remove the pizza from the oven and place it on a serving board. Now it's time to enjoy your pizza with gouda cheese and cherry tomatoes!
At My Husband Makes Pies, we are always on the lookout for unconventional yet delectable pairings for our pizzas. Today, we combine the silky richness of smoked salmon and the creamy decadence of burrata cheese. Smoked salmon boasts a smooth, smoky flavor with the perfect …
Hello there, pizza enthusiasts! Are you ready to bring your favourite pizzeria right into your own kitchen? You’d be surprised how satisfying it is to craft your own pizza, serve it up to family and friends, and watch their eyes light up with that first …
At My Husband Makes Pies, we embrace both traditional and innovative approaches to pizza making. Today, we’re thrilled to create a pizza for cheese lovers, a rich ensemble of Mozzarella, Havarti, Pecorino, and Grana Padano. This is the ideal pie for those with a penchant for cheese indulgence.
Our Cheese Lovers Pizza harmoniously blends the creamy, meltability of Mozzarella, the buttery tang of Havarti, the sharp contrast of Pecorino, and the nutty sweetness of Grana Padano. This rich, cheesy quartet is offset by the peppery freshness of basil and pungent bite of garlic, with a drizzle of Extra Virgin Olive Oil tying all the flavors together.
This lavish blend of cheeses, coupled with garlic, basil, and EVOO, results in a robust yet harmonious flavor profile. The resulting pizza is both indulgent and comforting, an irresistible treat for all the cheese enthusiasts out there.
Cheese Lovers Pizza – Mozzarella, Havarti, Pecorino & Grana Padano
A dream come true for cheese enthusiasts. Boasting a harmonious blend of Mozzarella, Havarti, Pecorino, and Grana Padano, creating a luscious, melty symphony of flavors. The addition of EVOO, fresh garlic and fresh basil adds freshness and balance to this rich cheesy combination.In crafting this indulgent pie, you'll embark on a culinary journey with straightforward ingredients and a dash of patience to perfect the dough and orchestrate the toppings. Our easy-to-follow guide ensures that you'll be savoring a slice of this cheese-centric pizza before you know it. Buon appetito! Remember to explore our other pizza recipes for inspiration for your next pie day!
Outdoor Pizza Oven, Pizza Steel, or Stone (if using a home oven)
1 Pizza Peel
1 wooden chopping board or peel for prep and serving
Ingredients
1pizza dough ball
Fresh mozzarella cheese
Low moisture mozzarella cheese
Pecorino cheese
Grana padano cheese
Havarti cheese
1garlic clove
Extra virgin olive oil
Fresh basil leaves
Instructions
Prepare Dough: Follow any of our dough recipes. You will need to prepare the dough at least 24 hours ahead of time.
Prepare Cheese: Finely grate both the pecorino and grana padano, tear the mozzarella into medium-sized pieces, and chop the havarti into similar-sized chunks. Set aside.
Prepare Garlic: Thinly slice the garlic clove, set aside.
Preheat Oven:If using an outdoor pizza like an Ooni pizza oven, aim for a temperature of 450-500°C at the center of your pizza stone. Use an infrared thermometer to ensure accuracy. It should take around 25-30 minutes to reach temperature.For a home oven, using a pizza steel or stone, place the stone or steel inside the oven and preheat to the highest temperature for at least 30 minutes.
Prepare Base: On a lightly floured surface, stretch out the dough by hand according to the steps outlined in our dough recipe. Once you're happy with the shape of the base, lightly dust your pizza peel and transfer the dough onto the peel.
Assemble Pizza: To assemble this pizza, begin by lightly drizzling some EVOO onto the base of the pie using a swift circular motion – being careful not to overdo it! Proceed by sprinkling a handful of grated Grana Padano, half a handful of Pecorino, and an even distribution of both low moisture and fresh Mozzarella, along with Havarti – make sure to keep it balanced, not overloaded. Add two or three basil leaves and finish with another subtle drizzle of EVOO.
Bake Your Pizza:If you're using an outdoor pizza oven, launch the pizza into the oven and bake for 60-90 seconds. Keep an eye on the pie and rotate every 10-15 seconds to ensure even cooking and to avoid burning.For a home oven with a pizza steel or stone, the bake time should be around 7-10 minutes.
Serving: Once done, remove from oven, garnish with a few more fresh basil leaves and serve on a wooden peel or chopping board. Now it's time to enjoy your cheese lovers pizza!
At My Husband Makes Pies, we enjoy honoring traditional favorites. However, today’s star is a delightful variation of the classic Margherita pizza. Our take on the Margherita Pizza utilises low moisture mozzarella in place of traditional fresh types like fior di latte or mozzarella di …
Today, we’re delighted to prepare a timeless classic: the marinara pizza. Showcasing timeless and classic flavours of fresh garlic, dried oregano, chili flakes, and extra virgin olive oil. Sliced fresh garlic adds a robust and aromatic touch to any dish. Dried oregano, a staple herb …
At My Husband Makes Pies, we love pushing the boundaries of traditional pizza toppings and creating unusual, yet delectable combinations. Today, we’re excited to bake a brisket pizza with pickles, beautifully finished with balsamic glaze and chili flakes.
Tender, slow-cooked brisket takes center stage on this pizza, offering a rich and smoky flavor that will make your taste buds sing. Paired with tangy beer pickles, which infuse a delightful zest into every bite, this pizza boasts a harmonious blend of flavors. The balsamic glaze drizzled on top adds a touch of sweetness and acidity, while a sprinkle of chili flakes provides just the right amount of heat.
This is the perfect pizza creation for those in seek of culinary adventures. The tender brisket, zesty beer pickles, sweet balsamic glaze, and spicy chili flakes come together to create a truly unforgettable pizza experience. Join us in exploring the deliciously daring world of non-traditional pizza toppings!
Brisket with Beer Pickles Pizza
The tender brisket delivers a rich, smoky essence, while the tangy beer pickles infuse an irresistible zest to every bite. Paired with a sweet balsamic glaze and a touch of heat from the chili flakes, this pizza cultivates a bold and captivating flavor profile, perfect for those seeking a different and delicious pizza adventure.To craft this one-of-a-kind brisket and beer pickles pizza, you'll need just a handful of ingredients and a bit of time to prepare the dough and toppings. Follow our comprehensive, step-by-step guide, and you'll soon be devouring a slice of this exciting and flavourful pizza. Bon appétit! And don't forget to explore our other home pizza recipes for inspiration on your next pie-making endeavor!
Outdoor Pizza Oven, Pizza Steel, or Stone (if using a home oven)
Smoker and Grill (if cooking the brisket yourself)
1 Pizza Peel
1 sauce ladle
1 wooden chopping board or peel for prep and serving
Ingredients
1pizza dough ball
1 ladle of pizza sauce
Low moisture mozzarella cheese
Grana padano cheese
Balsamic glaze
Beer pickles
Chilli flakes
Beef brisket
BBQ rub of choice
Instructions
Prepare Dough: Follow any of our dough recipes. You will need to prepare the dough at least 24 hours ahead of time.
Prepare Sauce: We recommend our standard pizza sauce which is versatile, simple to make and is perfect for Neapolitan style pizzas. Spice up this sauce however you like, remember the best part about making pizza is the creative process!
Prepare Cheese: Tear the low moisture mozzarella chees into medium-sized pieces. Finely grate grana padano. Set aside.
Prepare Brisket: If you're making your own brisket, we recommend seasoning liberally with your BBQ rub of choice and following this recipe as closely as you like.
Preheat Oven:If using an outdoor pizza like an Ooni pizza oven, aim for a temperature of 450-500°C at the center of your pizza stone. Use an infrared thermometer to ensure accuracy. It should take around 25-30 minutes to reach temperature.For a home oven, using a pizza steel or stone, place the stone or steel inside the oven and preheat to the highest temperature for at least 30 minutes.
Prepare Base: On a lightly floured surface, stretch out the dough by hand according to the steps outlined in our dough recipe. Once you're happy with the shape of the base, lightly dust your pizza peel and transfer the dough onto the peel.
Assemble Pizza: To begin assembling your pizza, start by spreading a ladle of sauce in a circular motion, starting from the center of the dough and working your way outwards. Distribute mozaarella lightly and evenly across the base of your pizza, making sure to leave a few centimeters between each piece. Next, generously sprinkle a couple of handfuls of grated grana padano cheese.
Bake Your Pizza:If you're using an outdoor pizza oven, launch the pizza into the oven and bake for 60-90 seconds. Keep an eye on the pie and rotate every 10-15 seconds to ensure even cooking and to avoid burning.For a home oven with a pizza steel or stone, the bake time should be around 7-10 minutes.
Post Bake Toppings: Now it's time for the post-bake toppings. Add beef brisket (be sure not to overload it), beer pickles, one more sprinkle of grana padano, drizzle of balsamic glaze, and lastly a sprinkle of chilli flakes.
Serving: Once done, remove the pizza from the oven and place it on a serving board. Now it's time to enjoy your brisket and beer pickles pizza!
At My Husband Makes Pies, we’re always on the lookout for unique and healthy ingredients to make our pizzas stand out. Today, we’re excited to combine eggplant and marinated roasted peppers for a light and healthy twist on traditional pizza toppings. Eggplant, a staple in …
At My Husband Makes Pies, we love to experiment with ingredients that aren’t your “run-of-the-mill” when it comes to pizza. Today, we’re excited to combine enoki mushrooms, salami, and togarashi spice mix. Enoki mushrooms, which are commonly used in East Asian cuisine, have a delicate …
As we always say, we absolutely love pizza for providing us with unlimited potential for experimentation and creativity. Today we’re combining two of our favourite comfort foods, we present the Chicken Kyiv Pizza!
This pizza features slices of homemade (mouthwatering) chicken kyiv, a chili garlic butter sauce, along with fresh watercress as a garnish. The slices of chicken kyiv with garlic butter and herbs make for one of the most delicious and indulgent toppings we’ve come across. The chili garlic butter sauce provides wonderful texture and aroma, while the watercress garnish provides a fresh, peppery contrast.
Remember, it’s all about balance, and with the right balance, anything can work on your pie!
Chicken Kyiv Pizza
This delicious chicken kyiv pizza is the ultimate comfort pie, and is absolutely delectable. If you're craving a pizza that is rich, indulgent, with a bit of spice, this one is for you!To make this chicken kyiv pizza pie you'll need a few simple ingredients and a little bit of time to prep the dough and toppings. Follow our step-by-step instructions and you'll be indulging in a slice of this chicken kyiv pizza in no time. Bon appétit! And don't forget to check out some of our other pizza recipes for inspiration for your next pie day!
Outdoor Pizza Oven, Pizza Steel, or Stone (if using a home oven)
1 frying pan
1 Pizza Peel
1 wooden chopping board or peel for prep and serving
Ingredients
1pizza dough ball
1chicken kyiv
Fresh mozzarella cheese
Grana Padano cheese
Aged cheddar cheese
Chilli flakes
3garlic cloves
3tbspbutter
Watercress
Instructions
Prepare Dough: Follow any of our dough recipes. You will need to prepare the dough at least 24 hours ahead of time.
Prepare Cheese: Place your fresh mozzarella in a container or bowl with a paper towel at the bottom to allow some of the water to drain. Tear both the fresh mozzarella and aged cheddar cheeses into medium-sized pieces. Finely grate grana padano. Set aside.
Prepare Chicken Kyiv: Next move is to prepare your chicken kyiv. If you're keen to go the homemade route, we followed this recipe pretty closely, and the results were great. Once cooked, cut into slices, set aside.
Prepare Chilli Butter Garlic Sauce: Now for the chilli garlic butter sauce. Heat a small pan over medium heat. Add the butter until melted. Crush the garlic cloves, and add to the pan, along with ½ tsp of chilli flakes for 60 – 90 seconds. Add salt and pepper to taste.
Preheat Oven:If using an outdoor pizza like an Ooni pizza oven, aim for a temperature of 450-500°C at the center of your pizza stone. Use an infrared thermometer to ensure accuracy. It should take around 25-30 minutes to reach temperature.For a home oven, using a pizza steel or stone, place the stone or steel inside the oven and preheat to the highest temperature for at least 30 minutes.
Prepare Base: On a lightly floured surface, stretch out the dough by hand according to the steps outlined in our dough recipe. Once you're happy with the shape of the base, lightly dust your pizza peel and transfer the dough onto the peel.
Assemble Pizza: Start by distributing an even combination of the fresh mozzarella, low moisture mozzarella, and aged cheddar cheeses directly onto the base of your dough, followed by an even sprinkle (about a handful) of grana padano. Next, add your chicken kyiv slices, followed by a drizzle of chilli garlic butter sauce.
Bake Your Pizza:If you're using an outdoor pizza oven, launch the pizza into the oven and bake for 60-90 seconds. Keep an eye on the pie and rotate every 10-15 seconds to ensure even cooking and to avoid burning.For a home oven with a pizza steel or stone, the bake time should be around 7-10 minutes.
Serving: Remove from oven, serve on a wooden peel or chopping board, add watercress, another drizzle of the chilli garlic butter sauce. Now it's time to enjoy your delicious chicken kyiv pizza!
We love pizza purely for the unlimited potential for experimentation and creativity. For those looking for a unique twist on the classic margherita pizza, the addition of shimeji mushroom creates a delicious and satisfying variation to a traditional margherita pizza. Shimeji mushrooms are native to …
This dough recipe combines both room temperature and cold fermentation techniques. The bulk fermentation is carried out at room temperature, before rolling into dough balls and going into the fridge for a long, cold ferment. This process creates a lovely airy, flavourful crust when baked. …
Our cold fermentation dough recipe is a slight variation of our classic dough recipe. The cold fermentation process slows the yeast activity right down, allowing more time for development, resulting in a more complex and flavourful crust. Just like our classic dough recipe, our cold fermented dough is versatile and can be used to create a variety of pizzas, such as Neapolitan, New York style, Detroit style, and focaccia. It’s also easy to make, so you can enjoy homemade pizzas anytime, no worries!
MHMP Cold Fermentation Dough Recipe
Our cold fermentation dough recipe is simple to prepare and can be used to create a variety of pizza styles. We love the flavour and texture created by a long, cold fermentation. Another advantage of cold fermentation is the added flexibility in the baking process. Unlike same day room teperature fermentation methods that require you to bake your pizza within a fairly narrow window, cold fermentation gives you more time to prepare and select the perfect time for your bake. Follow our instructions below to achieve restaurant-quality results in the comfort of your own home. With this recipe, you'll be well on your way to crafting the perfect crust for your homemade pies. Happy baking!
Medium Ooni Detroit Style pan (32.4 x 24.1 x 5.9 cm) or similar for Focaccia, Detroit, and Sicilian styles
Ingredients
600grams00 flour (high protein bread flour can also be used as an alternative)
390 grams water (room temperature)
1.2grams dry yeast(active dry yeast or instant dry yeast can be used)
16grams salt
50/50 ish mix of 00 and semolina flour(for dusting and stretching)
Extra virgin olive oil(for greasing and drizzling, required for Detroit, Sicilian, and Focaccia styles)
Instructions
Steps 1-3 (Common for All Styles)
In a mixing bowl, combine the dry ingredients (00 flour, dry yeast, and salt) with a wooden spoon.
Add water and mix well with wooden spoon until the ingredients are fully combined.
Knead the dough by hand on a lightly floured surface for 10-15 minutes until it feels firm and stretchy. As you knead, add small amounts of flour as needed to prevent the dough from sticking to your hands.
For Round Pizza Styles – We Make Neapolitan, New York Style, and Pizza Tonda Romana with This Dough (But It’s Not Limited to These!)
Place the dough in a bowl with an airtight lid or cover it with cling wrap. Allow it to bulk ferment for 24 – 36 hours in the refrigerator.
After the bulk fermentation period, divide the dough according to the style you are making:For Neapolitan, New York-style, or similar round pizzas, divide the dough into 4 balls.For Pizza Tonda Romana or other super-thin, crispy styles, divide the dough into 5 balls, as less dough is needed due to the thinness of the final crust.Place each dough ball in an airtight, lightly greased container and allow it to cold ferment for 24-72 hours in the refrigerator. The sweet spot for us is days 3-5, but don’t be afraid to let it ride a little longer for deeper flavour development.
Once it's time to bake, remove dough balls from the refrigerator and rest at room temperature for around 4 hours.
To shape the dough:Toss the dough ball in a 50/50 mix of semolina and 00 flour. This will prevent the dough from sticking when stretching.Place the dough ball on a lightly floured surface and use your fingertips to press out the air from the center, leaving just under an inch of dough on the edge. This will help create a nice, airy cornicione (crust), especially when baking Neapolitan-style pizza. For Pizza Tonda Romanaor other thin-crust styles, press the dough flat all the way to the edge by hand or use a rolling pin for an even, crisp base.
To stretch the dough:Gently lift and transfer between the palms and wrists of your hands a few times.Place the dough on your knuckles and lightly stretch and rotate until you're satisfied with the size and shape. Be sure to stretch the dough evenly and not too thin, as this may cause the dough to tear.
Ready to bake:For best results, we recommend using a quality home pizza oven, such as an Ooni pizza oven, or a pizza steel or stone if baking in a home oven.
For Focaccia, Detroit Style, and Sicilian Style:
Place the dough in an airtight container greased with EVOO. Drizzle more EVOO over the dough ball, rubbing it evenly across the surface. Allow to bulk ferment for 24 – 36 hoursin the refrigerator.
After bulk fermentation, move the dough to an oiled tray or pan (we like to use the medium Ooni Detroit Style pan, 32.4 x 24.1 x 5.9 cm). Drizzle more EVOO on top and prove for another 24 – 72 hours in the refrigerator.
After cold fermentation, remove from fridge, leave to rest at room temperature for around 4 hours.
After 4 hours at room temperature, begin to lightly press and stretch the dough. Gently pull from underneath while pressing until the dough is nearly at the edges of the pan.
Cover and proof for another 15-20 minutes to allow the dough to relax and expand further.
After proofing, press and stretch again until the dough comfortably reaches the edges of the pan. Drizzle with a little more EVOO, then use your fingertips to form dimples in the dough.
Ready to bake:For best results, we recommend using a quality home pizza oven, such as an Ooni pizza oven, or a pizza steel or stone if baking in a home oven.
The thing we love most about pizza is the endless possibilities of toppings and flavors. Today, we’re excited to try a unique combination of figs, honey, feta, caramelized onion, and balsamic glaze. The sweetness of the figs and honey together with the salty, sweet, tanginess …
The thing we love most about pizza is the versatility in being able to experiment and combine different cuisines. Today, we get to enjoy two of our favorite foods, fried chicken and pizza! This delicious pizza combines the wonderful creamy, tangy flavour of kewpie mayo …
Cheese lovers, this one’s for you! A simple yet delicious 5 cheese and basil pizza with fresh mozza, low moisture mozza, truffle cheese, smoked cheddar, and grana padano.
Five Cheese and Basil Pizza Pie
Fresh mozzarella, low moisture mozzarella, truffle cheese, smoked cheddar, and grana padano come together in a creamy, cheesy masterpiece. The addition of EVOO and fresh basil adds a touch of freshness and balance to the rich cheesy combination.To make this decadent pie, you'll need a few simple ingredients and a little bit of time to prep the dough and toppings. Follow our step-by-step instructions and you'll be indulging in a slice of this 5 cheese and basil pizza in no time. Bon appétit! And don't forget to check out some of our other pizza recipes for inspiration for your next pie day!
Outdoor Pizza Oven, Pizza Steel, or Stone (if using a home oven)
1 Pizza Peel
1 wooden chopping board or peel for prep and serving
Ingredients
1pizza dough ball
1ladle of pizza sauce
Fresh mozzarella cheese
Low moisture mozzarella cheese
Grana Padano cheese
Truffle cheese
Smoked cheddar
Extra virgin olive oil
Fresh basil leaves
Instructions
Prepare Dough: Follow any of our dough recipes. You will need to prepare the dough at least 24 hours ahead of time.
Prepare Cheese: Place your fresh mozzarella in a container or bowl with a paper towel at the bottom to allow some of the water to drain. Tear the fresh mozzarella low moisture mozzarella, truffle and smoked cheddar cheeses into medium-sized pieces. Finely grate grana padano. Set aside.
Preheat Oven:If using an outdoor pizza like an Ooni pizza oven, aim for a temperature of 450-500°C at the center of your pizza stone. Use an infrared thermometer to ensure accuracy. It should take around 25-30 minutes to reach temperature.For a home oven, using a pizza steel or stone, place the stone or steel inside the oven and preheat to the highest temperature for at least 30 minutes.
Prepare Base: On a lightly floured surface, stretch out the dough by hand according to the steps outlined in our dough recipe. Once you're happy with the shape of the base, lightly dust your pizza peel and transfer the dough onto the peel.
Assemble Pizza: Start by lightly drizzling some EVOO on the base of the pie (use a swift circular motion, being careful not to overdo it!). Next, sprinkle a handful of grated Grana Padano and an even amount of the mozzarella cheeses, truffle cheese, and smoked chedda (again, be sure not to overload). Add three or four basil leaves and finish with another light drizzle of EVOO.
Bake Your Pizza:If you're using an outdoor pizza oven, launch the pizza into the oven and bake for 60-90 seconds. Keep an eye on the pie and rotate every 10-15 seconds to ensure even cooking and to avoid burning.For a home oven with a pizza steel or stone, the bake time should be around 7-10 minutes.
Serving: Once done, remove the pizza from the oven and place it on a serving board. Enjoy your 5 cheese and basil pizza with a cold drink and some good company!
Who loves potatoes? Who loves potatoes on pizza? We sure do. This delicious pizza combines a creamy carbonara-type texture with all the savory goodness of fried potatoes.
Our classic dough recipe is highly versatile, making it perfect for a variety of pizza styles, including Neapolitan, New York style, Detroit style, Sicilian, and focaccia. Whether you’re aiming for a thin, crispy base or a light, airy pan-style crust, this dough provides the ideal foundation. With a straightforward preparation process and a long fermentation period to enhance texture and flavour, this recipe ensures you can enjoy restaurant-quality homemade pizza anytime, no worries!
MHMP Classic Dough Recipe
Our classic dough recipe is simple to prepare and can be used to create multiple pizza styles. Follow our instructions below to achieve restaurant-quality results in the comfort of your own home. With this recipe, you'll be well on your way to crafting the perfect crust for your homemade pies. Happy baking!
Medium Ooni Detroit Style pan (32.4 x 24.1 x 5.9 cm) or similar for Focaccia, Detroit, and Sicilian styles
Ingredients
600 grams00 flour (high protein bread flour can also be used as an alternative)
390 grams water (room temperature)
1.2gramsdry yeast(active dry yeast or instant dry yeast can be used)
16gramssalt
50/50 ish mix of 00 and semolina flour(for dusting and stretching)
Extra virgin olive oil(for greasing and drizzling, required for Detroit, Sicilian, and Focaccia styles)
Instructions
Steps 1-3 (Common for All Styles)
In a mixing bowl, combine the dry ingredients (00 flour, dry yeast, and salt) with a wooden spoon.
Add water and mix well with wooden spoon until the ingredients are fully combined.
Knead the dough by hand on a lightly floured surface for 10-15 minutes until it feels firm and stretchy. As you knead, add small amounts of flour as needed to prevent the dough from sticking to your hands.
For Round Pizza Styles – We Make Neapolitan, New York Style, and Pizza Tonda Romana with This Dough (But It’s Not Limited to These!)
Place the dough in a lightly greased bowl with an airtight lid or cover it with cling wrap. Allow it to bulk ferment for 14-16 hours at room temperature.
After the bulk fermentation period, divide the dough according to the pizza style you are making:For Neapolitan, New York-style, or similar round pizzas, divide the dough into 4 balls.For Pizza Tonda Romana or other super-thin, crispy styles, divide the dough into 5 balls, as less dough is needed due to the thinness of the final crust.Place each dough ball in an airtight, lightly greased container and allow it to prove for another 4-6 hours at room temperature.
To shape the dough:Toss the dough ball in a 50/50 mix of semolina and 00 flour. This will prevent the dough from sticking when stretching. Place the dough ball on a lightly floured surface and use your fingertips to press out the air from the center, leaving just under an inch of dough on the edge. This will help to form a nice, airy cornicione (crust) around the edge of your pizza.
To stretch the dough:Gently lift and transfer between the palms and wrists of your hands a few times. Place the dough ball on a lightly floured surface and use your fingertips to press out the air from the center, leaving just under an inch of dough on the edge. This will help create a nice, airy cornicione (crust), especially when baking Neapolitan-style pizza. For Pizza Tonda Romanaor other thin-crust styles, press the dough flat all the way to the edge by hand or use a rolling pin for an even, crisp base.
Ready to bake: For best results, we recommend using a quality home pizza oven, such as an Ooni pizza oven, or a pizza steel or stone if baking in a home oven.
For Focaccia, Detroit Style, and Sicilian Style:
Place the dough in an airtight container greased with EVOO. Drizzle more EVOO over the dough ball, rubbing it evenly across the surface. Allow it to bulk ferment for 14-16 hours at room temperature.
After bulk fermentation, move the dough to an oiled tray or pan (we like to use the medium Ooni Detroit Style pan, 32.4 x 24.1 x 5.9 cm). Drizzle more EVOO on top, then begin to lightly press and stretch the dough. Gently pull from underneath while pressing until the dough is nearly at the edges of the pan.
Cover and proof for another 15-20 minutes to allow the dough to relax and expand further.
After proofing, press and stretch again until the dough comfortably reaches the edges of the pan. Drizzle with a little more EVOO, then use your fingertips to form dimples in the dough.
Ready to bake: For best results, we recommend using a quality home pizza oven, such as an Ooni pizza oven, or a pizza steel or stone if baking in a home oven.
Pizza overloaded with onions? Yes please! This delicious pizza combines brown onions, spring onions, spinach, and a little bit of chilli for a meal that’s both light and fresh, with a little bit of a kick.